Data Traffic Tab


The Data Traffic tab is used to define the type of data test, the Network Hosts used in the test, the test control and IP parameters, to select the Data Message Flows that are executed, and to map DMFs to the appropriate Network Host and MN connection.

In the following test cases, the Data Traffic tab displays additional parameters or only the parameters listed for the test case:

NOTE: In Mobile IPv6 test case, the Correspondent Node is treated just like the Network Host. The L3-7 tab is available only when Data Traffic and/or Data IPSec are selected on the Test Configuration tab.

Parameter Index

The parameters that are enabled depend on the traffic type selected. In addition, some parameters are only available in certain test cases.

Data Traffic -Network Host

Data Traffic - Client

  Data Traffic -Server

(Traffic Type = Continuous, Verification)

(Traffic Type = Continuous)

 (Traffic Type = Verification)

(LNS Node/HA Node)

NATed Traffic

MQTT Server

Reset Idle Host Traffic Session

Apply Test Data File to Network Host Side

IPDV Measurement Traffic


Data Profile -

Data Profile


Data Profile

Mainflows

Assignments

Traffic Mixer

License Limits

User Data

Data Profile -

Data Profile

Data Profile

Mainflows

Assignments

Traffic Mixer

License Limits

User Data

External App -

External App Configuration

User Data

Android Apps -

External App Configuration

GGSN Nodal Test Case

End-to-End Mobile IP/FA Nodal Test Cases

Network Host Test Case

(Traffic Type = Continuous, Verification)

IP Application Node Test Case

Mobile IPv6 Test Cases


Related Measurements

Data Traffic measurements are reported on the L3, L4, and L5-7 report tabs.


Network Host/Correspondent Node

Host Type

In most nodal test cases, you can use the radio buttons to select the location for the Network Host nodes. A Local Network Host is defined within a nodal test case, and executes on the same test server as the test case. A Remote Network Host runs in a Network Host test case. If the test case supports multiple Network Host nodes, you can assign DMFs to each with the Instances and Assignments... button.

NOTE: You may define a maximum of 20 Network Hosts per test case.

Important: The network host should have a Next Hop Ip Address or static route provisioned in order to properly route packets without impacting performance. You will get a warning that you can either click OK or Cancel to return to Gui. Select checkbox labeled "Do not show warnings again during this login session" to prevent showing warnings in all test cases for the remainder of the client session.


Tcl Parameter: NetworkHostAddrRemote

Options:

Local If you choose a Local host, define the Network Host Node or Correspondent Node (Mobile IPv6).
Remote

If you choose a Remote Network Host, you can use the Add and Delete buttons to define the IP addresses for the remote hosts. Click Add to add another host, double-click the IP fields, and then enter the host's address. Select a host and click Delete to remove it from the list.

  • VLAN ID is only available when the Test Server supports VLAN and emulates a device that talks directly to the NH (that is, the PGW for MME Nodal and SGW Nodal test cases).  Select VLAN and enter a VLAN ID to include a VLAN tag with the specified ID in every packet transmitted.

Tcl Parameter:  NetworkHostAddrRemoteVLanTag

Range: 1 - 4095

Default: 0 (No VLAN tag)

  • Next Hop IP Address: Add appropriate IP address.

Tcl Parameter: NetworkHostNextHopType

values: 1 = IPv4,  2 = IPv6, default = 1

 Tcl Parameter: NetworkHostNextHopIpAddr

NOTES:

  • Remote is not available in Simple IP VPN or FA Nodal test cases, and it is always used in the IP Application Node test case.

  • Only one Local host can be used for a Verification test or when a GGSN node is used in the UMTS test case.

  • Only one remote Correspondent Node is supported in the IPv6 HA Nodal test case. Enter the IP address in the field provided.

Dual Stack

The Dual Stack enables the Network Host to operate concurrent IPv4 and IPv6 stacks. when available, select the Dual Stack checkbox to enable concurrent IPv4 and IPv6 stacks. This displays the IPv4 and IPv6 nodes that must be configured. Define the IPv4/IPv6 stacks on the Network Host Node pane.

NOTE:

  • Enabling Dual Stack indicates the preferred transport type of the DMFs assignments.
  • Validation prevents you (when dual-stack is selected) from defining duplicate ports on a node.
  • Dual Stack is not available when you select the Host Type as Remote.  
  • Dual Stack is not available in eMBMS Nodal test case.

Value: True/False

Default: False

Tcl Parameters: DualStackEn  

IPv4 local host

Ipv4NetworkHostAddrLocal

IPv6 local host

Ipv6NetworkHostAddrLocal


MN Only

Available in MME Nodal, SGW Nodal and PGW Nodal (when NEMO is enabled) and Wifi Offload Gateway Nodal (when AP Tunnel Type = GRE L2) test cases. Select to add support for UE-to-UE traffic.

When you select MN Only, the Network Host related parameters are hidden, i.e., no Local Network Host Test Node can be configured, and no Remote Network Hosts Address list.  

The DMF Profile registers 0 Network Hosts available and allows MN.

The following validation applies when you click OK on test case:

  • DMF must be UDP if the assigned Node=MN
  • Number of Subscribers must be even when using Node=MN

Tcl Parameters: NetworkHost  


TIP: Double the data capacity of a test case by executing the Network Host or Correspondent Node test case on a separate test server from the application test case.

NOTES: Validations rules (during test execution) prevent you from defining duplicate DMF instances.

  • For Local Network Hosts, duplicate DMF instances are not allowed to share the same node, primary context or default bearer, client port, server port, and transport protocol.
  • For Remote Network Hosts, duplicate DMF instances are not allowed to share the same node, primary context or default bearer, client port, and transport protocol.

NATed Traffic

  • When selected, the local Network Host learns the client IPs from packets received from the Client.

  • When not selected, the local network host learns or pre-binds the client addresses at run time before it received any packets.

Available in the Network Host test case when Fireball is enabled.

NOTE: Not every Data Traffic scenario is supported in NATed mode (i.e., server initiated DMF, start/pause).


Tcl Parameter: NetworkHostNatedTrafficEn

MQTT Server

Select to enable MQTT (MQ Telemetry Transport) Server. MQTT is a publish/subscribe, simple and lightweight messaging protocol, designed for constrained devices and low-bandwidth, high-latency or unreliable networks. Requires Local Network to be selected and Fireball to be turned off.


NOTE: Added the ability to modify MQTT parameters by enabling the Text and Auto-Fill Editor tabs for MQTT protocol. (However, this feature is not compatible with MQTT helper). Additional details in About the Message Editor Window.


Several Canned DMFs have been added to the Basic Library for use.


Tcl Parameter: MqttServerEn

Reset Idle Host Traffic Session

When stateless (UDP or RAW) data types are used with a Network Host, the idle traffic timer enables the host to detect an MN session that is not responding or that has been disconnected. When the timer expires, the Network Host releases the data resources associated with the MN so that they will be available if the MN becomes active again.

When an MN session is programmatically disconnected, during a Session Loading test, for example, this timer is handled automatically. You can use the checkbox to override an automated timer or to manually define a timer and then specify the maximum idle seconds in the Idle Time to Reset field. 

Note: The value of this timer should be less than the Session Pending Time configured on the Nodal side.

Range: 0.04000.0 (0.0 disables the timer)

Default: 0.0

Tcl Parameters:

TrafficHostIdleTimeEnabler TrafficHostIdleTime
IPDV Measurement Traffic

In eMBMS Nodal test case, measurement of IPDV (Internet Protocol Packet Delay Variation) is relevant to real-time video-streaming services. To assess the Quality of Service (QoS), the IPDV measures may be compared to configured thresholds.

Tcl Parameter: NetworkHostMeasTrafficEn

Enter the Measurement Packet Interval.

Interval (1 of every n packets))

Enter the IPDV packet measurement interval.

Option: 20 - 1000

Default: 100

Tcl Parameter: NetworkHostMeasTraffic


Apply Test Data File to Network Host Side

Apply Test Data File to Network Host Side.

Tcl Parameter: DataHostCfgFileEn

  • See Apply TDFSee Apply TDF topic

    See Test Data Files for further explanation and sample files. If a sample is not found for the specific TDF, you can obtain a sample file from your Technical Support representative. You may also use the following options to select an existing TDF or create/edit TDF-CSV files (TDF-CSV Editor). 

    For most TDF Parameters used for Applying Parameters, each row in the file is the overridden value for a different “Session”, aka a different UE. But some TDFs are done in other dimensions, like Bearers, eNodeBs, Subscribers (2 per UE sometimes) or even Hosts, etc. Tooltips on the TDF Parameter: 

    Note that the “ID” is a unique ID. Please Provide the ID when reporting issues with a TDF. For TDFs that do not apply / override Parameters, but instead are just their own configuration or data or media files you won’t see TDF ID row details.

    TIP: When including large files, please be aware of memory limitations, since the TDF Editor shares memory with the Client.

    NOTE: The available TDF options vary. on the L3-7 | IPSec tab > IKE with RSA Settings you may only select the Certificate TDF from TAS (these are non-CSV TDFs).

    In addition, where applicable, any rules for defining TDFs are included in specific Test Cases. (For example, In MME Node test case, see MME Node - Provisioning TDF.)

    From the DMF Window, press Shift+Alt+A to display the  Save DMF as Tcl window. Click the Save to File button to save as Tcl file. See additional details on Using the Tcl API.


    Select/Create a new TDF-CSV

    Allows you to create a new TDF by entering a file name that doesn’t already exist or select an existing file by entering a file name that already exists.

    Click to open the Select Existing or Create window.

    • Navigate to the relevant library/folder,

    • Enter the name of the file:

    • If the file name already exists, the file is selected and applied in the test case.

    • If the file name does not exist, a message displays that says you are creating a new TDF and the embedded TDF-CSV will be launched.

      • Click Yes to launch the TDF-CSV Editor and create/save the new TDF-CSV.

      • Click No to select a different file

    NOTE: If you do not have permission to save in the selected library, an error displays when you try to create a new file.
    TIP: You may also navigate to the relevant library/folder and select file, and click OK.


    Upload a New TDF to TAS

    Click to import a new TDF file from your local folder and select in the test Case (instead of having to go to TDF Admin).

    • Navigate to the file on your local folder and select.
    • Then navigate to the location (library) where you want to save it on the TAS. You may rename the file, if required.  

    View Edit Selected TDF in TDF-CSV Editor

    Available only when you have selected a TDF on TAS. Click to open the selected file in TDF-CSV Editor (in place, that is, within the Test Case).

    Edit the file and save. You may also click Save As to save the edited TDF-CSV to a different library and also rename the file, if required.

    NOTE: You may also select a TDF from a library to which you do not have write permissions, edit the file as required, and save (Save As) only to a different library with the same file name or a different name.

    The only options available are Save As and Cancel.

    Open Selected TDF in Standalone TDF-CSV Editor

    Available only when you have selected a TDF on TAS. Select to retrieve the CSV file and open it in the stand alone TDF-CSV Editor.

    Generate Stub TDF-CSV

    TIP: Available only when a CSV specification has been defined for in the Test Case for the TDF widget ( View TDF Actions/Options Menu)


    Opens an example context specific test data parametersexample context specific test data parameters, which you may save as a .CSV file or open in the TDF-CSV Editor.


    Launch Standalone TDF-CSV Editor

    Click to open a blank TDF-CSV Editor.

    The Launch Standalone TDF-CSV editor options handles very large TDFs that may use too much Client memory if opened within the Test Case/in the embedded editor.  You may set the standalone TDF-CSV Editor memory high to edit large TDFs.


Apply Parameter Values from Test Data File

In Network Host test case, Apply Test Data File to Parameter Values.

  • See Apply TDFSee Apply TDF topic

    See Test Data Files for further explanation and sample files. If a sample is not found for the specific TDF, you can obtain a sample file from your Technical Support representative. You may also use the following options to select an existing TDF or create/edit TDF-CSV files (TDF-CSV Editor). 

    For most TDF Parameters used for Applying Parameters, each row in the file is the overridden value for a different “Session”, aka a different UE. But some TDFs are done in other dimensions, like Bearers, eNodeBs, Subscribers (2 per UE sometimes) or even Hosts, etc. Tooltips on the TDF Parameter: 

    Note that the “ID” is a unique ID. Please Provide the ID when reporting issues with a TDF. For TDFs that do not apply / override Parameters, but instead are just their own configuration or data or media files you won’t see TDF ID row details.

    TIP: When including large files, please be aware of memory limitations, since the TDF Editor shares memory with the Client.

    NOTE: The available TDF options vary. on the L3-7 | IPSec tab > IKE with RSA Settings you may only select the Certificate TDF from TAS (these are non-CSV TDFs).

    In addition, where applicable, any rules for defining TDFs are included in specific Test Cases. (For example, In MME Node test case, see MME Node - Provisioning TDF.)

    From the DMF Window, press Shift+Alt+A to display the  Save DMF as Tcl window. Click the Save to File button to save as Tcl file. See additional details on Using the Tcl API.


    Select/Create a new TDF-CSV

    Allows you to create a new TDF by entering a file name that doesn’t already exist or select an existing file by entering a file name that already exists.

    Click to open the Select Existing or Create window.

    • Navigate to the relevant library/folder,

    • Enter the name of the file:

    • If the file name already exists, the file is selected and applied in the test case.

    • If the file name does not exist, a message displays that says you are creating a new TDF and the embedded TDF-CSV will be launched.

      • Click Yes to launch the TDF-CSV Editor and create/save the new TDF-CSV.

      • Click No to select a different file

    NOTE: If you do not have permission to save in the selected library, an error displays when you try to create a new file.
    TIP: You may also navigate to the relevant library/folder and select file, and click OK.


    Upload a New TDF to TAS

    Click to import a new TDF file from your local folder and select in the test Case (instead of having to go to TDF Admin).

    • Navigate to the file on your local folder and select.
    • Then navigate to the location (library) where you want to save it on the TAS. You may rename the file, if required.  

    View Edit Selected TDF in TDF-CSV Editor

    Available only when you have selected a TDF on TAS. Click to open the selected file in TDF-CSV Editor (in place, that is, within the Test Case).

    Edit the file and save. You may also click Save As to save the edited TDF-CSV to a different library and also rename the file, if required.

    NOTE: You may also select a TDF from a library to which you do not have write permissions, edit the file as required, and save (Save As) only to a different library with the same file name or a different name.

    The only options available are Save As and Cancel.

    Open Selected TDF in Standalone TDF-CSV Editor

    Available only when you have selected a TDF on TAS. Select to retrieve the CSV file and open it in the stand alone TDF-CSV Editor.

    Generate Stub TDF-CSV

    TIP: Available only when a CSV specification has been defined for in the Test Case for the TDF widget ( View TDF Actions/Options Menu)


    Opens an example context specific test data parametersexample context specific test data parameters, which you may save as a .CSV file or open in the TDF-CSV Editor.


    Launch Standalone TDF-CSV Editor

    Click to open a blank TDF-CSV Editor.

    The Launch Standalone TDF-CSV editor options handles very large TDFs that may use too much Client memory if opened within the Test Case/in the embedded editor.  You may set the standalone TDF-CSV Editor memory high to edit large TDFs.


Related Measurements

The measurements for the Network Host emulator are reported on the Network Host tab.


^ Back to Top


Client Pane - Data Traffic

The Client pane allows you to set the data test options.

Traffic Type

Use the Data Traffic drop down list to select the type of data test. Follow the links to learn more about each type of test.

Tcl Parameter: DataTraffic

Options:

  • Disabled (default)

  • Continuous — Generate a continual stream of data traffic, as defined by DMFs, through established MN sessions towards one or more Network Hosts. Default roles are assumed by both sides: MNs assume the client role and Network Hosts act as servers.

  • Verification — Verify the data packet connectivity of an MN session with a single PING. Verification can also be performed during a Continuous test with the Perform Verification checkbox.

    NOTE: Verification is not a valid option with auxiliary service instances or secondary PDP contexts since packet filters that would correctly route the forward traffic cannot be defined. Although the test will run, verification will only succeed on the main service instances and primary PDP contexts.

  • External — Use another test device to drive the bearer plane traffic.

Perform Verification

Use the checkbox to include a Verification test in a Continuous data test. The verification test is executed first, and if it is successful, the test proceeds to the continuous data test.

This checkbox is disabled when Host Type = MN Only.

Tcl Parameter: ContinuousWithVerification

Related Measurements

When you choose this option, Data Verification measurements record the results of the verification test.

Traffic Start

Use the drop-down list to select the trigger that initiates the Data Start Delay timer. When the timer expires, the test begins sending data.

NOTE: In IP Application Node testing, the Traffic Start is not available when only Data Traffic tab is selected on the Test Configuration tab.

Options:

  • When All Sessions Established — The timer begins when the final MN session is established.

    NOTES:

    • This option is only valid for a Capacity test. There may not be a point during a session loading or handoff test when all sessions are established at the same time.

    • When Start Retries is enabled, "all sessions established" is only reached if all sessions successfully establish. If errors are encountered that prevent one or more sessions from being established, traffic will never be started.

  • When Session Established — The timer begins for each session as it is established.

Default: When All Sessions Established

Tcl Parameter: TrafficStartType


Data Start Delay

The number of milliseconds to wait, after the Traffic Start trigger, before initiating data traffic by executing a Data Message Flow.

  • When All Sessions Established — After the last MN session is established, the test waits for the defined time and then initiates data traffic evenly across all sessions at a fixed rate of 1000 sessions per second. In a test with 200,000 established sessions, for example, 200 seconds is required to start data across all sessions.

  • When Session Established — An independent timer is created for each session as it is established. As each session's timer expires, the test initiates data traffic for that session.

Once data traffic has been initiated in a MN session, the Transaction Rate defined in the DMF controls the rate and timing of that session's data traffic.

NOTE: In IP Application Node testing, the Data Start Delay is not available when only Data Traffic tab is selected on the Test Configuration tab.

Range: 03600000 (enter 0 to disable)

Default: 1000

Tcl Parameter: TrafficStartDelay

^ Back to Top

Auto Stop Control Layer

Use the checkbox to determine whether MN sessions are disconnected when the traffic layer is stopped. The traffic layer stops naturally at the end of the message flow transactions, but it can also be stopped due to packet loss, tunnel failure, or when Stop on Error is triggered. If the data protocol supports retry processing, the traffic layer can be stopped when the number of retries has been exhausted by selecting this option. Thus, if all MNs are down, the TC will auto-stop.

Start Retries cannot be used when Auto Stop Control Layer is enabled since the test would attempt to re-connect sessions that were disconnected when bearer plane traffic stopped.

Select Auto Stop Control Layer for Test Case (TC) to auto-stop once Data traffic test has completed. The following test cases that support External Apps also support the use of Auto Stop Control Layer : AMF Nodal, gNB CU NSA Nodal
gNB CU SA Nodal, IP Application Node, MME Nodal, PGW Nodal, SGW Nodal
SMF Nodal, UE Emulator Data Node, UE Node, UPF Nodal and Wifi Offload Gateway Nodal. 

Options:

  • Checked (True) — MN sessions are disconnected when data traffic stops.

  • Cleared (False) — MN sessions are left intact when data traffic stops.

Default: Cleared

Tcl Parameter: AutoStopControlLayer

NOTE: If all MNs are down, the Test Case will auto-stop.

GPRS/UMTS Testing

When a DMF contains a subflow that will be executed on secondary PDP contexts and this box is Checked, the secondary contexts are disconnected after the first transaction is completed. Clear the checkbox to maintain the secondary contexts through the life of the test.

Related Measurements

Link Speed Limits

You can limit the rate at which the MNs can receive and transmit Data Traffic with the Limit Ingress Link Speed and Limit Egress Link Speed checkboxes. Check a box and enter the rate, in kilobits per second, in the field provided.

  • Limit Ingress Link Speed — Limit the MN receive (downlink) speed

  • Limit Egress Link Speed — Limit the MN transmit (uplink) speed

NOTE: Limit Ingress Link Speed is not available when you select Host Type as Remote (You cannot configure the Network Host to achieve Ingress throttling).

Range: 18,000

Default: 16

Tcl Parameter:

DataIngressRate

DataEgressRate

^ Back to Top

Fragmentation


You can specify the MTU size or choose to set the Do Not Fragment bit. When you select a Local Network Host in a nodal test case, these settings apply to the MNs and the local host. When you select a Remote Network Host, the settings in the nodal test case only apply to the MNs and you can configure different settings in the Network Host test case.

Set "Do Not Fragment" Bit

Select to set the Do not Fragment bit in all bearer plane traffic sent by the node. When  Fireball option is selected in supported test cases, the label is changed to read "Set 'Do Not Fragment' Bit (Non-Fireball DMFs)" which Requires TS configured for Mixed-Mode to allow Non-Fireball DMFs that support this feature. If Fireball and "Set 'Do Not Fragment' Bit (Non-Fireball DMFs)" are both checked, the GUI and Tcl validation will set an error if the Data Profile is only using Fireball DMFs. 

Additional details about Mixed-Mode can be found in topic About Data Message Flows 

Tcl Parameter: TrafficDontFragIp

Maximum Transmission Unit

The number of bytes at which fragmentation will take place at the bearer plane IP layer.

NOTES:

  • Supports jumbo frames and this value includes all data payload bytes, TCP headers (if present), and IP headers.
  • The maximum value for 32-bit machines is 2000 and for 64-bit machines is 9300.
  • The maximum value for WiFi Offload Gateway Nodal or UE Node test with RF UEs enabled is 1500. 

    Any saved WiFi GW Nodal or UE Node test with RF UEs enabled and "TrafficMtu" > 1500 will be blocked, the test case will be red. Tcl validation will give the following error message:

         Data Traffic - Maximum Transmission Unit [TrafficMtu=3000] must be <= 1500 with RF UEs

Range: 123 — 9300

Default: 1400

Tcl Parameter: TrafficMtu

NOTE: During HA Node testing, you may set the Maximum Transmission Unit on the HA Node Emulator Configuration tab only when the Data Traffic check box is disabled. If you enable the Data Traffic check box on the HA Node Emulator Configuration tab, you set the MTU on the L3-7 tab.

Related Measurements

Ignore Network Provided MTU

Select to ignore network provided MTU. Available for selection when Maximum Transmission Unit is also available for input.

Tcl Parameter: TrafficIgnoreNtwkMtuEn

Data Resume Rate

Use Data Resume Rate to start/resume data traffic at a specific rate and transactions (continuous or limited transactions (Transactions) with delay between Mobiles Node (Data Start Delay)).

For example, during SGW Nodal testing, you can use the On Demand button during execution to control the rate of Control Plane messages (Activation Rate).  In addition, using Data Resume Rate you can specify the rate at which the traffic resumes, number of transactions (continuous or limited transactions (Transactions) with delay between Mobiles Node (Data Start Delay)).

When you resume/execute, the test resumes with the rates configured by you and prevents the Node under test from being flooded with control pane messages.  

Range 1 - 10000

Default: 3000

Tcl Parameter: DataResumeRate


Error Inject

See Error Injection Settings

External Data Source NAT  

Starting IP Address  


Dual-Stack

Starting IPv4 Address

Starting IPv6 Address


Override TTL

Enabled if "External Data" is selected. If selected, enter a valid IPv4 or IPv6 address that can be different than the IP address used by the emulated device.

Tcl Parameter: ExtDataSrcAddrNatEn


Enter a Valid Starting IP Address (IPv4 or IPv6). Do not start IPv6 addresses with 2001:, it will result in failure.

Tcl Parameter: StartingSrcIpAddr


Select Dual-Stack for External App Dual Stack support.

Enter a valid Starting IPv4 Address or Starting IPv6 Address.


Tcl Parameter: ExtDataSrcAddrNatDualStackEn

Tcl Parameter: StartingSrcIpv4Addr

Tcl Parameter: StartingSrcIpv6Addr


Enter Override TTL. This field allows the user to configure an IP TTL value that will be used when Landslide forwards a packet received from the external source.

The TTL field applies to all test cases that allow External Data.

Range : 0 to 255 ( 0 (zero) means do not override TTL).

Default : 0

Tcl Parameter: ExtDataOverrideTtl

External Applications

Enabled if "External Data" and External Data Source NAT are selected. Only supported on AMF Nodal, gNB CU NSA Nodal, IP Application Node, MME Nodal, PGW Nodal, SGW Nodal, UE Node, UPF Nodal and Wifi Offload Gateway Nodal test cases. Select for a Stateful HTTP client , execute a Ookla Speedtest.net® and/or to execute a TCP-based Traceroute.

External App Tab becomes available for input.

The Starting IP Address must be hard-coded to 10.1.1.1 when using IPv4 and 2000::1 for IPv6.

NOTE: During MME Nodal testing, you must connect the PGW User Node to Internet for HTTP Client feature to work properly.

Tcl Parameter: ExternalAppsEn

Multipath TCP

Multipath TCP (MPTCP) is defined in RFC 6824.  An MPTCP connection basically consist of multiple TCP connections between endpoints where the MPTCP data can be distributed and sent over the different TCP paths.  You can think of MPTCP as a “super TCP” connection.  The TCP connections function independently of each other with the MPTCP “layer” making sure the data flows correctly.  The user (application above MPTCP) has no knowledge of MPTCP – it acts like TCP as far as the application is concerned.

For example, you can have subscriber A with two IP addresses (ip1 and ip2) and a network server with a single IP address (srvrIP).  With traditional TCP you would establish a TCP connection from ip1 to srvrIP and all data would flow over that single TCP connection.  With MPTCP, there are actually 2 TCP connections established ( ip1-to-srvrIP  and  ip2-to-srvrIP ) and instead of sending all data over one TCP path, MPTCP distributes the data across the two TCP paths. In theory MPTCP can monitor the individual TCP connections and adjust where it sends the data.  For example, if MPTCP notices that the main path is slow, it can send more packets over the subflow thus increasing overall data throughput (from the user perspective).

NOTE: MPTCP allows for multiple connections (more than 2) but our implementation currently provides a 2 x 1 scenario (2 source IP addresses to a single destination IP).


Landslide initiates all MPTCP connections from the client side, the network host will only respond to MPTCP requests. The GUI will allow you to configure the DMF so that the network host initiates the flow of data, however the sessions will fail to connect, and data is not transmitted.

When MPTCP is configured for a test case, Landslide will attempt to open an MPTCP mainflow (using MPTCP options in the TCP header). Once the MPTCP mainflow has been established Landslide will attempt to open a second MPTCP connection (referred to as an MPTCP subflow).  Once the MPTCP subflow is established, data packets will alternate between it and the MPTCP mainflow.  (Until the MPTCP subflow is established all data packets will be sent over the MPTCP mainflow).

NOTE: Do not confuse MPTCP Mainflow and MPTCP Subflow with DMF Mainflow and DMF Subflow. There is no correlation between the two.


A DMF configured for a persistent connection operates as described above, with packets alternating between the mainflow and subflow.  For example, a Basic TCP, persistent DMF that runs at 1 transaction every 5 seconds will send the first packet over the mainflow socket (first IP address) and 5 seconds later the second packet is sent over the subflow (second IP Address).  This alternating continues every 5 seconds as long as the DMF is running.

With a non-persistent DMF, the connection is torn down after each iteration of the DMF.  The connection is re-established (from scratch) for the next iteration.   Therefore, a single step, non-persistent DMF will only send data over the mainflow since the connection is torn down before a second packet is sent.  A custom, non-persistent DMF with multiple steps can used to ensure both MPTCP mainflows and MPTCP subflows are utilized in a non-persistent DMF. Note that the DMF cannot terminate before the subflow socket has been established.  It is suggested that the second step in such a DMF have a 200ms delay before sending its request.

If segmentation occurs in the DMF it is handled the same as a non-segmented packet. Assuming both the MPTCP mainflow and MPTCP subflow have been established, segments will alternate between the flows.

The MPCTP mainflow will traverse the subscriber path of the test case being used.  For example, in an SGW Nodal test case the MPTCP mainflow would be tunneled in the GTP tunnel between the eNodeB and the SGW user plane.  The MPTCP subflows all traverse a straight IP path – there is no tunneling/encapsulation involved.  As such care must be taken when configuring the second IP address for a subscriber.

This applies to the entire test case and it is where the second IP address is defined (recall that we are supporting a 2x1 scenario).  Regardless of the test case type (SGW Nodal for example) this is how the subscriber is assigned its second IP address and all data sent out this address will be straight IP (i.e. there is no tunneling of the data).    Any test case that supports the Client box in the Data Traffic tab will support this Multipath TCP checkbox.  Of particular importance is the Outbound traffic port. Depending on customer lab network configuration the user may need to force the data from the MPTCP subflows out a specific ethernet port (to ensure proper routing of these “straight IP” packets).

Limitations: The initial implementation is for a Landslide MPTCP Client to communicate with a Landslide MPCTP Network host. Our implementation was NOT designed nor intended to test an MPTCP stack of an MPTCP application.

There are some MPTCP things we don’t support. 

- 2 x 1 only  (2 TCP connections/IP Addresses from Client to a single TCP Connection at the network host)

- advertising of available addresses is not supported

- Sockets Initiated from Client only, Network Host will respond

- MPTCP Checksum is not supported

- Packets alternate between mptcp Mainflow and mptcp subflow

- No Failover once session established

- Change of Path priority is not supported – only support a regular MPTCP path.

- Mainflow and subflow sockets share same configuration (MTU, 3-way handshake, etc)

- Network Host must configure twice as many Client IP addresses as there are clients (2 x 1)

- MPTCP Subflow sockets are all standard IP (no tunneling).

- Per Session measurements on Network host can be somewhat misleading/confusing

- MPTCP retransmission not implemented (but TCP retransmission does occur – not sure if it handles MPTCP packets properly or not).

- Data Ack and Data Sequence numbers are always sent as 64 bit numbers. 32 bit Ack/Sequence numbers can be received but wrapping of 32 bit Ack/Sequence numbers is not supported.


MPTCP measurements are on L4 Client and L4 Server tabs.

Enter second IP Address as defined in the 2x1 scenario described above. Enter:

Physical Interface, Starting IP Address, MAC Address, Default Routing or Next Hop IP Address, Outbound Traffic Port

Tcl Parameter: MultipathTcpEn

Tcl Parameter: MultipathTcpAddr

Stop Data Before Test Case (s)

Select to enter number of seconds where Data is stopped before the active session in the test case is stopped.

Range : 0 to 999

Default : 1

Tcl Parameter: StopDataTimeBeforeTc

Stop Data if UE/Network Host IP Address Type  Conflict

Select to prevent Landslide from sending out traffic if the UE IP address type doesn’t match with Network Host IP address type.

Only enabled when Fireball is unchecked. (It is not applicable in Fireball mode)

Tcl Parameter: StopDataIfIpTypeMismatchEn

Use Standalone Container as Ext Apps Data Source

Visibility of this option requires External Apps licensing and Container Small Hybrid Test Server that supports this feature.

Also available on External Utility Node's ( Ext Util Node Test Configuration ) Network Devices tab, a panel named "Standalone Container" will be visible when enabled. A single "Standalone Container SUT" selection is enabled. Tcl variable is "ExtAppContainerSut".

When "Use Standalone Container as Ext Apps Data Source" is checked, the "Starting IP Address" field on L3-7|Data Traffic is disabled.
When the "Dual-Stack" checkbox is checked on L3-7|Data Traffic along with "Use Standalone Container as Ext Apps Data Source", the "Starting IPv4 Address" and "Starting IPv6 Address" fields are disabled.

When "Use Standalone Container as Ext Apps Data Source" is checked, a tab named "Standalone Container" will appear in the vertical L3-7 tab stack.

The Standalone Container tab has two internal panels named "Physical Interface Receiving External Data" and "Standalone Container SUTs". "Physical Interface Receiving External Data" is a standard, single node test node pane. The "Standalone Container SUTs" panel has a table for SUT entries. The number of rows will follow "Number of Subscribers" up to a max of 4. Tcl variables for the SUTs is "ExtAppContainerSut_<#>", where # = 1-4.

When the Standalone Container tab is visible and the "Dual-Stack" checkbox is checked on L3-7|Data Traffic:
a) the "Physical Interface Receiving External Data" panel will show a dual stack test node, Tcl variables "ExtAppContainerV4Addr" and "ExtAppContainerV6Addr"
b) the Standalone Container SUTs table will show two columns for "SUTs (v4)" and "SUTs (v6)". Tcl variables are "ExtAppContainerV4Sut_<#>" and "ExtAppContainerV6Sut_<#>", where # = 1-4.

Tcl Parameter: ExtAppStandaloneContainerEn

Tcl Parameter: ExtAppContainerAddr

Tcl Parameter: ExtAppContainerV4Addr

Tcl Parameter: ExtAppContainerV6Addr

Tcl Parameter: ExtAppContainerSut

Tcl Parameter: ExtAppContainerSut_1

Tcl Parameter: ExtAppContainerV4Sut_1

Tcl Parameter: ExtAppContainerV6Sut_1

Apply Test Data File to User Side

Apply Test Data File to User Side. As of Release 18.8, two new fields have been added to this TDF:

UE Reply Ping All and UE Dynamic Dest.  (Only supported for IPv4)

  • UE Reply Ping All - this subscriber/UE will reply to all pings. UE/Subscriber can be the destination of pings from any number of sources. Options Blank, zero or Non-Zero. If Non-Zero is entered, this UE will reply to any / all pings it receives. If zero or blank,  then Ping requests will be treated as in prior releases (prior to release 18.8)  
  • UE Dynamic Dest - This the index (row number in the TDF file) of the destination UE. (This provides the means to dynamically allocate the  destination IP address instead of hard coding it)

A UE can be configured to reply to all pings but not be configured for dynamic destinations. Thus a subscriber can be running any DMF and still blindly respond to any Pings it receives. For example: UE A can be running a UDP DMF with Google.com and respond to pings from UE B.

Traffic should be configured to start “when all sessions established”. Single default bearer / single APN only per subscriber.

UE’s don’t have to be paired:

  • Example 1: “A” can ping “B”, “B” can ping “C”, “C” can ping “A”
  • Example 2: “A” can ping “C”, “B” can ping “C”, “C” can ping “Google”

Single Destination only, Basic Ping DMF only, Single DMF only (cannot configure multiple remote network hosts) , Using existing OM counters. All counts will be accounted for in the client Oms (L3 Client tab, L4 Client Tab, L5-7 Client tab).

Note: The Data Gen L5-7 Ping Received counter will not be accurate. All other L3, L5-7 counters are accurate.

Tcl Parameter: DataUserCfgFileEn

  • See Apply TDFSee Apply TDF topic

    See Test Data Files for further explanation and sample files. If a sample is not found for the specific TDF, you can obtain a sample file from your Technical Support representative. You may also use the following options to select an existing TDF or create/edit TDF-CSV files (TDF-CSV Editor). 

    For most TDF Parameters used for Applying Parameters, each row in the file is the overridden value for a different “Session”, aka a different UE. But some TDFs are done in other dimensions, like Bearers, eNodeBs, Subscribers (2 per UE sometimes) or even Hosts, etc. Tooltips on the TDF Parameter: 

    Note that the “ID” is a unique ID. Please Provide the ID when reporting issues with a TDF. For TDFs that do not apply / override Parameters, but instead are just their own configuration or data or media files you won’t see TDF ID row details.

    TIP: When including large files, please be aware of memory limitations, since the TDF Editor shares memory with the Client.

    NOTE: The available TDF options vary. on the L3-7 | IPSec tab > IKE with RSA Settings you may only select the Certificate TDF from TAS (these are non-CSV TDFs).

    In addition, where applicable, any rules for defining TDFs are included in specific Test Cases. (For example, In MME Node test case, see MME Node - Provisioning TDF.)

    From the DMF Window, press Shift+Alt+A to display the  Save DMF as Tcl window. Click the Save to File button to save as Tcl file. See additional details on Using the Tcl API.


    Select/Create a new TDF-CSV

    Allows you to create a new TDF by entering a file name that doesn’t already exist or select an existing file by entering a file name that already exists.

    Click to open the Select Existing or Create window.

    • Navigate to the relevant library/folder,

    • Enter the name of the file:

    • If the file name already exists, the file is selected and applied in the test case.

    • If the file name does not exist, a message displays that says you are creating a new TDF and the embedded TDF-CSV will be launched.

      • Click Yes to launch the TDF-CSV Editor and create/save the new TDF-CSV.

      • Click No to select a different file

    NOTE: If you do not have permission to save in the selected library, an error displays when you try to create a new file.
    TIP: You may also navigate to the relevant library/folder and select file, and click OK.


    Upload a New TDF to TAS

    Click to import a new TDF file from your local folder and select in the test Case (instead of having to go to TDF Admin).

    • Navigate to the file on your local folder and select.
    • Then navigate to the location (library) where you want to save it on the TAS. You may rename the file, if required.  

    View Edit Selected TDF in TDF-CSV Editor

    Available only when you have selected a TDF on TAS. Click to open the selected file in TDF-CSV Editor (in place, that is, within the Test Case).

    Edit the file and save. You may also click Save As to save the edited TDF-CSV to a different library and also rename the file, if required.

    NOTE: You may also select a TDF from a library to which you do not have write permissions, edit the file as required, and save (Save As) only to a different library with the same file name or a different name.

    The only options available are Save As and Cancel.

    Open Selected TDF in Standalone TDF-CSV Editor

    Available only when you have selected a TDF on TAS. Select to retrieve the CSV file and open it in the stand alone TDF-CSV Editor.

    Generate Stub TDF-CSV

    TIP: Available only when a CSV specification has been defined for in the Test Case for the TDF widget ( View TDF Actions/Options Menu)


    Opens an example context specific test data parametersexample context specific test data parameters, which you may save as a .CSV file or open in the TDF-CSV Editor.


    Launch Standalone TDF-CSV Editor

    Click to open a blank TDF-CSV Editor.

    The Launch Standalone TDF-CSV editor options handles very large TDFs that may use too much Client memory if opened within the Test Case/in the embedded editor.  You may set the standalone TDF-CSV Editor memory high to edit large TDFs.


Route Optimization

In Mobile IPv6 test cases, you can use this checkbox to include Route Optimization in the test. If the routability test succeeds, MN-CN bindings are established and Data Traffic is not routed through the HA — the MNs send packets directly to the CN and the CN sends packets to the MN care-of addresses.

When you enable Route Optimization, you can also define the following settings:

  • Lifetime — The maximum number of seconds that the CN will accept for an MN-CN binding lifetime.

Range: N/A

Default: 3600

  • Re-registration — Use the checkbox to direct the CN to send Binding Refresh requests to the MNs before the Lifetime expires.

    Time Prior to Lifetime defines the number of seconds prior to the lifetime expiration that the Binding Refresh is sent.

Range: 0100

Default: 20

Related Measurements

The following counters on the MN and CN report tabs record the messages exchanged and any errors encountered during return routability tests.

MN Message Counters

  • MN BA Received

  • MN BE Received

  • MN BR Received

  • MN HT Received

  • MN COT Received

  • MN HOTI Sent

  • MN COTI Sent

  • MN BU Sent

  • MN BA00

CN Message Counters

  • CN BA Sent

  • CN BE Sent

  • CN BR Sent

  • CN HT Sent

  • CN COT Sent

  • CN BU Received

  • CN HTI Received

  • CN COTI Received

  • CN BA00

MN Error Counters

  • MN BA Retry

  • MN BA Retry Exceeded

  • MN BA128

  • MN BA130

  • MN BA135

  • MN BA136

  • MN BA137

  • MN BA138

  • MN BA139

CN Error Counters

  • CN BA128

  • CN BA129

  • CN BA130

  • CN BA135

  • CN BA136

  • CN BA137

  • CN BA138

  • CN BA139

^ Back to Top

Apply Test Data File to User Side
  • See Apply TDFSee Apply TDF topic

    See Test Data Files for further explanation and sample files. If a sample is not found for the specific TDF, you can obtain a sample file from your Technical Support representative. You may also use the following options to select an existing TDF or create/edit TDF-CSV files (TDF-CSV Editor). 

    For most TDF Parameters used for Applying Parameters, each row in the file is the overridden value for a different “Session”, aka a different UE. But some TDFs are done in other dimensions, like Bearers, eNodeBs, Subscribers (2 per UE sometimes) or even Hosts, etc. Tooltips on the TDF Parameter: 

    Note that the “ID” is a unique ID. Please Provide the ID when reporting issues with a TDF. For TDFs that do not apply / override Parameters, but instead are just their own configuration or data or media files you won’t see TDF ID row details.

    TIP: When including large files, please be aware of memory limitations, since the TDF Editor shares memory with the Client.

    NOTE: The available TDF options vary. on the L3-7 | IPSec tab > IKE with RSA Settings you may only select the Certificate TDF from TAS (these are non-CSV TDFs).

    In addition, where applicable, any rules for defining TDFs are included in specific Test Cases. (For example, In MME Node test case, see MME Node - Provisioning TDF.)

    From the DMF Window, press Shift+Alt+A to display the  Save DMF as Tcl window. Click the Save to File button to save as Tcl file. See additional details on Using the Tcl API.


    Select/Create a new TDF-CSV

    Allows you to create a new TDF by entering a file name that doesn’t already exist or select an existing file by entering a file name that already exists.

    Click to open the Select Existing or Create window.

    • Navigate to the relevant library/folder,

    • Enter the name of the file:

    • If the file name already exists, the file is selected and applied in the test case.

    • If the file name does not exist, a message displays that says you are creating a new TDF and the embedded TDF-CSV will be launched.

      • Click Yes to launch the TDF-CSV Editor and create/save the new TDF-CSV.

      • Click No to select a different file

    NOTE: If you do not have permission to save in the selected library, an error displays when you try to create a new file.
    TIP: You may also navigate to the relevant library/folder and select file, and click OK.


    Upload a New TDF to TAS

    Click to import a new TDF file from your local folder and select in the test Case (instead of having to go to TDF Admin).

    • Navigate to the file on your local folder and select.
    • Then navigate to the location (library) where you want to save it on the TAS. You may rename the file, if required.  

    View Edit Selected TDF in TDF-CSV Editor

    Available only when you have selected a TDF on TAS. Click to open the selected file in TDF-CSV Editor (in place, that is, within the Test Case).

    Edit the file and save. You may also click Save As to save the edited TDF-CSV to a different library and also rename the file, if required.

    NOTE: You may also select a TDF from a library to which you do not have write permissions, edit the file as required, and save (Save As) only to a different library with the same file name or a different name.

    The only options available are Save As and Cancel.

    Open Selected TDF in Standalone TDF-CSV Editor

    Available only when you have selected a TDF on TAS. Select to retrieve the CSV file and open it in the stand alone TDF-CSV Editor.

    Generate Stub TDF-CSV

    TIP: Available only when a CSV specification has been defined for in the Test Case for the TDF widget ( View TDF Actions/Options Menu)


    Opens an example context specific test data parametersexample context specific test data parameters, which you may save as a .CSV file or open in the TDF-CSV Editor.


    Launch Standalone TDF-CSV Editor

    Click to open a blank TDF-CSV Editor.

    The Launch Standalone TDF-CSV editor options handles very large TDFs that may use too much Client memory if opened within the Test Case/in the embedded editor.  You may set the standalone TDF-CSV Editor memory high to edit large TDFs.


^ Back to Top


Data Profile

A Data Profile provides the configuration of user plan Data Message Flows (DMFs) in a Test Case. The Data Profile includes the list of DMFs, their extra instances if needed, custom adjusted traffic mix rates, and specific assignments to Network Hosts, Preferred Transport, Bearers/PDUs/Context/Chunks, Client Ports, Rating Groups and Service IDs. Data Profiles can be saved as templates for re-use in other Test Cases.  

NOTEs:

  • When Test Configuration/Data Traffic is checked but External Data/External Applications is not, the Data Profile panel will be on a "Data Profile" tab above Data Traffic in the vertical L3-7 tab stack
  • When Test Configuration/External Data is checked but Test Configuration/Data Traffic is not and External Applications is checked, the External App tab will appear above Data Traffic in the vertical L3-7 tab stack. Android Apps has its own tab next to External Apps tab and it is controlled by the Android Apps License Key.
  • When both Test Configuration/Data Traffic & External Data is checked and External Applications is checked, the Data Profile and External App tabs will be together, side by side on a "User Data" tab above Data Traffic in the vertical L3-7 tab stack. Android Apps has its own tab next to External Apps tab and it is controlled by the Android Apps License Key.

When you Add/Open an existing DMF, the Save, Copy, Instances and Assignments, and Traffic Rates/Mix becomes available. The Paste/Replace button becomes available when you select a DMF, which you may use to replace DMF from the clipboard.

Data Profile Control Buttons: Use the control buttons/icons to perform the following actions:

Open a Data Profile From Template

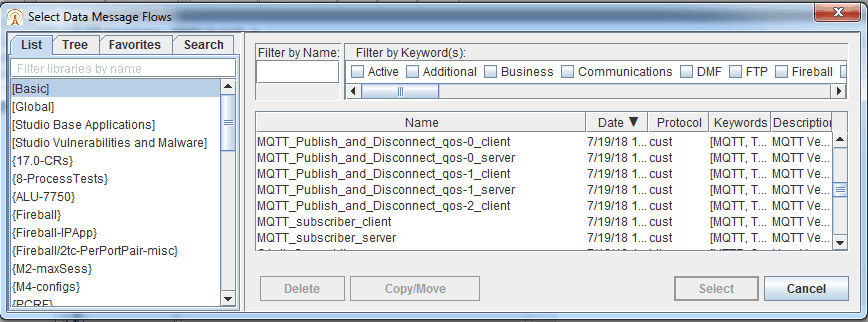
Click to open the Data Profile Template window and select a Data Profile from available libraries.

Allows you to open a saved Data Profile Template (from the Open Data Profile template window) into a test case, you open/display a copy of the template which are expanded into a list of DMFs and associated assignments/instances.     

Save as Data Profile Template

Click to save a DMF as a Data Profile template with relevant assignments and defined traffic mix.

The Save button allows you to save a DMF profile as a template. Changing a saved DMF profile template does not affect any test cases.

Copy Entire Data Profile to Clipboard

Available when at least one DMF and/or associate assignments exists in the Data Profile pane.   

Copy allows you to copy an entire Data Profile (DMFs, Assignments, and Traffic Mixer) to the clipboard.  

NOTE: You will have to manually fix any test case DMF profile that do not match, for example, # of Nodes,  Bearers, Contexts and so on.

Replace with Data Profile from Clipboard

Available when you have copied a Data Profile to the clipboard.

The Replace/Paste operation replaces any existing DMF profile. You may setup a list of DMFs with certain Instances and Assignments and resulting Traffic Mix, Copy profile, and Paste the same profile into other test cases.

UDP Estimated Stats

Checkbox is available when Data Protocol = udp and at least one udp DMF is setup in the DMF list.  When enabled, the L5-7 Client/Server|Basic measurements that begin with "Estimated and Basic" are collected and are displayed. See Layer 5-7 Protocol Measurements Basic for additional details.

In the Data Message Flow enter :

NOTE: Use of this feature may cause performance degradation. The performance of UDP degrades about 4% after "UDP Estimate Stats" is checked.

HTTP Stats

Checkbox is available when Data Protocol = http or https.  When enabled, the L5-7 Client|Advanced HTTP measurements are collected and are displayed. See Layer 5-7 Protocol Measurements Advanced HTTP  

NOTE: Use of this feature may cause performance degradation. 


Strict Pause

When the "Strict Pause" function is activated the TS will pause DMFs immediately, including when there is pending retransmission (e.g., TCP Connection has not yet established and there are retries of traffic from Simulated UEs pending). However, there is a technical limitation, when large amount of subscribers pause multi DMFs, the total pause time depends on how long every DMF will pause itself.

When the "Strict Pause" function is de-activated (legacy way), the TS will discard the ongoing transaction and re-start with a completely new transaction.  

The "Strict Pause" function is only applicable to Basic Data, Advanced Data, and Lite DMFs that support the Pause function at all. The DMFs that do not support this function include, rtpvoice, rtpvideo, ulp, abr, tracert, and fireball. TCs in Fireball Mode will not support this feature.

Show Library

Toggle to show/hide the DMF library name and DMF or just the DMF name.

Click the icon on the right-hand side of the Data Profile pane to undock the Data Profile pane and open in the Data Profile window.

Data Profile Tabs

Mainflows The Mainflow tab display unique Mainflow Instances (these become the DMF_N subtotal tabs and these are the things you can Pause/Resume).
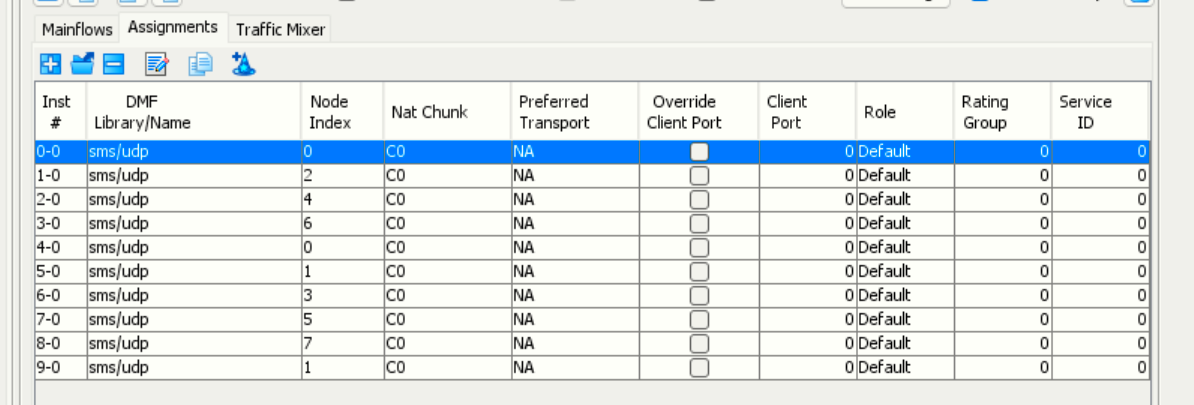
Assignments Each DMF is independently timed according to its Transaction Rate, and DMFs are mapped to MN data connections and Network Hosts with on the Assignments tab.

NOTE: In the Network Host test case, the node will support the server side of the DMFs that are selected and no mapping is required.

The Assignment tab allows you to:

  • Edit the DMF to TC-object assignments, i.e., Nodes, Contexts, etc...,
  • Add another instance of the selected mainflow
  • Add multiple instances of mainflows
  • View the subflows.

NOTE: Selecting a subflow row and clicking delete will delete the entire mainflow instance. And if you delete the first Mainflow instance, all duplicate instances will also be deleted.

Traffic Mixer

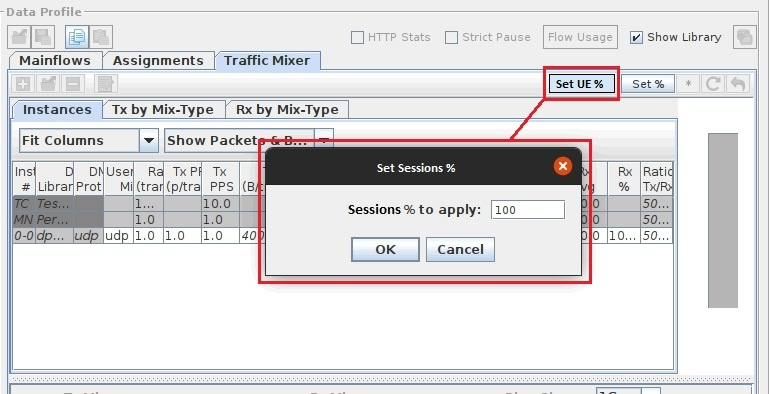
Set UE % is available when Data Tuning is enabled in AMF Nodal, IP Application Node, MME Nodal and SMF Nodal test cases. Data Traffic (with DMF) must be enabled and Test Activity = Capacity. Also requires a TAS that supports Data Tuning.

Additional details about Data Tuning - About Data Tuning

Select to be able to adjust the number of sessions established (mobile or UE) during a running test in the Data Traffic Mixer.

Click on Set UE % to enter the percentage of UEs to actually send data traffic.


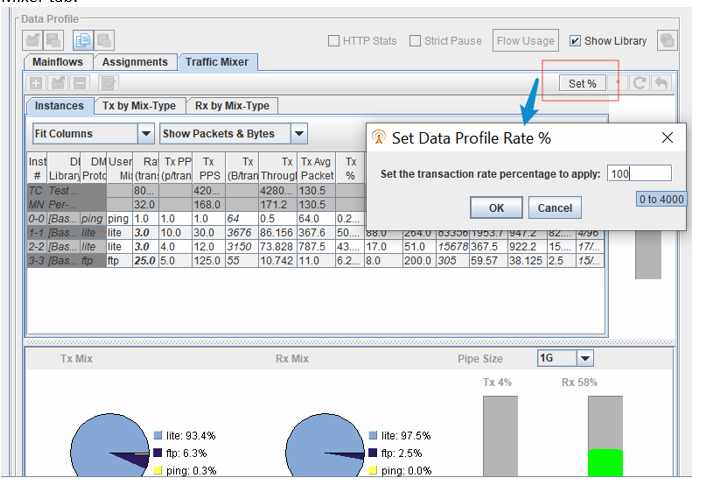
The (Set %) button has been added to the Mainflows and Traffic Mixer tabs only when viewing the test case while the test is running:

View/adjust your current traffic (Tx/Rx) rates/mix. Added the ability to adjust the Data Profile Rate % across all defined DMFs during a running test while preserving the configured data mix. Instead of having to manually set the transaction rate of each DMF individually, via opening the DMF editor, now you can quickly adjust the rates of the entire data profile by % in one function.


License Limits

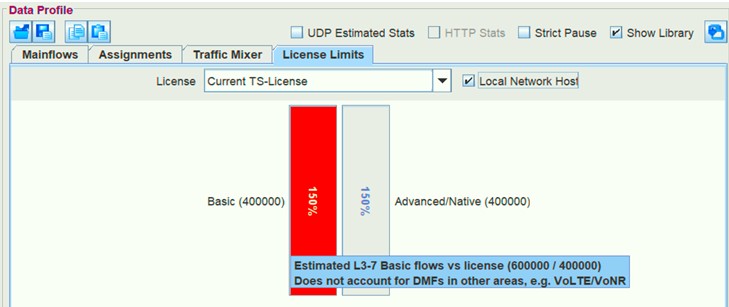
Shows how the configured Data Profile will compare against the license limits of the Test Server. This section has replaced the "Flow Usage" dialog.

The TS executes all instances of DMFs on each UE, the specific running DMF instance is called a Flow. The TS limits the total number of Flows with license keys. These are applied per TS-Process, regardless of how many processes are on the TS, each one will allow the license limit.

Select the License - Select the TS-License to check limits. Note - This is only for limit checking, it does not persist with the test case. 

Options : Current TS-License (default), No License, Virtual Large, C100 M4 Ultra Extreme, (etc)

Select Local Network Host - Toggle to compare Local vs Network Host, i.e Using 2x flows. This is set be default based on your current Test Case settings. Currently : (will display your TC setting). This does not change your configuration, only the limit estimate.

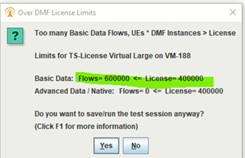
If you try to save the Test Case with a Data Profile that has too many DMFs, you will get a warning dialog:


The first line (or two) will point out which DMF type is over the limit.
The next section shows the TS license information.
Then the expected Flows <= License, and so if the Flows value is > License, it is more than the license.
Additionally at the Test Session level, the Test Session validation will try to check totals by Test Server. 

Additional Details : 

  1. The License Limits apply whether DMF is Paused or not. 
  2. Clicking OK on the Test Case only counts the standard User-Plane L5-7 DMFs, but the Test Session Validation will count ALL DMFs, e.g. VoLTE RTP, Files Transferring, etc…  
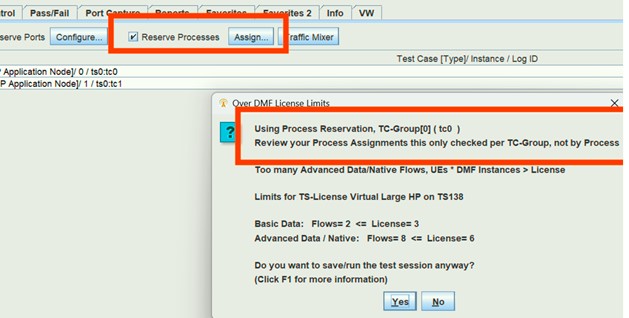
  3. When using Process Reservation, the Test Session validation will check and total each TC-Group separately, it will not try to figure out any custom assignments or if any groups are being combined into one TS-Process it . But it will check each natural TC-Group, which must by nature, run together on one single TC-Process.  
  4. When not using Process Reservation, the Test Session validation will total all TCs on each Test Server.
  5. When using Local Network Host, the Flows are doubled within the TC, counting both sides, the TAS knows to do this only for L3-7 DMFs when doing the Test Session Level and counting all TCs. Potential Gotcha: If any of the other DMFs are also being used twice in the TC, the TAS does not know this and won’t count them twice.  
  6. DMFs are licensed as either Basic Data or “Advanced Data/Native”, the categorization of each is listed here : About Data Message Flows
     

For the checks, these are the Basic DMFs: TCP, SCTP, PING.,RAW, UDP, FB_TCP, FB_UDP, TWAMP_LITE

All other DMFs are treated as Advanced Data and Native DMFs.

Definitions:
DMF Mainflow - A single unique DMF profile included in a test case.
DMF Subflow – A single unique DMF profile included in a DMF mainflow (multiple related User Plane Sessions, FTP control/user)
DMF Instance – An instance of a DMF profile that represents a single network 5-tuple, that is executed for each UE
DMF Flow – A single User Plane Traffic Session (network 5-tuple) that is executed by a UE based on the DMF Profile.  A DMF Flow is a single User Plane traffic session, one UE talking to one destination.  


Example with Process Reservation:

Tab Control Buttons/Options

  • Add a New DMF: Click to add a New DMF or New Lite DMF (this option is available from all the three tabs: Mainflows, Assignments, and Traffic Mixer tabs).

  • Add Existing DMF From Library (this option is available from all the three tabs: Mainflows, Assignments, and Traffic Mixer tabs).

  • Edit the Selected DMF (this option is available from both the Mainflows and Assignments tabs).

  • Remove DMF from the Test Case (this option is available from both the Mainflows and Assignments tabs).

  • Add another Instance of selected mainflow DMF (this option is available only from the Assignments tab).

^ To DMF Profile


Mainflow

In a nodal test case, the Data Message Flows are executed in the order listed when data traffic begins.

NOTE: See About VoLTE Testing for including SIP RX DMF in Network Host test case for VoLTE testing (in Landslide 10.8).

Tcl Parameter: Dmf

IMPORTANT: You can include up to 325 DMFs in a test case, which will simultaneously execute when data traffic begins. If you use multiple DMFs, keep the following rules in mind:

Due to the resources required to collect measurements for each of the DMFs, the maximum number of MN sessions that can be provisioned for the test case is proportionally reduced by the number of DMFs. In this calculation, a DMF that includes an embedded subflow is evaluated as 2 DMFs.

For example, if you use 2 DMFs or 1 DMF that includes 1 subflow, the maximum number of sessions is reduced by 50%. If you use 5 DMFs or 1 DMF with 4 subflows, the maximum number of sessions is reduced by 80%.

The DMFs are executed, in the order listed, when data traffic begins. Each DMF is independently timed according to its Transaction Rate and its StartPaused property.  If DMF is started paused, the user can then start DMFs at whatever time and order they choose, using GUI or APIs.  

You can have 325 Mainflows as long as none of them have subflows and no extra instances. 


^ To DMF Profile


Assignments

Whenever a test includes multiple Network Hosts, multiple DMFs, or multiple data connections per MN (GPRS PDP contexts or CDMA auxiliary service instances), you can define the relationships between all of these elements.

NOTE: You cannot save Instances and Assignments when a Subflow role doesn't match its mainflow's role.  

The Instances and Assignments... button opens the DMF Node/Context/Port Assignments window where you can:

NOTES: You may perform the following:

Add extra instances of Mainflows that can run different rates (you may set different rates via the Traffic Mixer window).
Extra instances of a Mainflow will cause Per-DMF Subtotals to be inaccurate.
Modify rates while test is running, which sets the same rates for all duplicate instances of same Mainflow.
  • Mainflow DMFs must be continuous for traffic mixer to be valid over time.

  • Subflow DMFs must be non-continuous to accurately calculate the Mainflows packet size and throughput based on rate (Mainflow DMFs with missing subflow DMF(s) are reported).

  • Accurate rates are not reported if Mainflow DMFs are not continuous. When Mainflow DMFs are not continuous, the DMFs run at expected throughput until they complete, the Configured Rate measurement will not know the DMF stopped, so it will still report full rate.

The top portion of the window displays a list of the DMFs that you added to the test case and the lower portion contains the grid where you define the mapping between DMFs (mainflows and subflows), Network Hosts, and data connections. When you add a DMF to the test case, the grid is provisioned with an instance of the DMF mainflow and one instance each of any embedded subflows, and they are all assigned to the first Network Host and the MN's first data connection.

Instance #

Every instance of a DMF, including both mainflow and subflows, is identified by an index number. To assign the same DMF to more than one Network Host or data connection, select the DMF, click Add Mainflow DMF Instance, and another instance of the DMF is added to the grid.

NOTE: Multiple Instances of same DMF allows you to assign the same DMF to

multiple contexts and/or get a data throughput multiplier for same DMF.  

The Test Results reports the DMF_N subtotal including all DMF instances of the same mainflow/definition.


The grid can contain up to 325 DMF instances with no duplicate instances or less than 325 Mainflows (as long as none of them have subflows and no extra instances) plus some duplicates instances, i.e. same mainflow multiple times on the Instances/Assignments table. 

You can remove an instance with the Remove Instance button (use the Remove button in the Data Traffic pane to entirely remove a DMF from the test case). Every DMF in the list must appear at least once in the grid.

When selecting mainflows (primary instances) and deleting, this will delete ALL instances of selected mainflow. If you delete the primary instance it will delete ALL instances. On Assignment tabs, "Primary Instances" are at the top, which includes mainflows and subflows of the first instance of each Mainflow DMF included in the TC (from Mainflow Tab). When you add "Extra Instances", these are separate instances that can be deleted individually. A "Mainflow DMF" includes any Sub-flows, they are tied together and inseparable. If you delete any part of an Extra Instance, that entire instance will be removed. If you delete any part of a Primary Instance, ALL instances of that DMF will be removed.

NOTE: Since client and server ports cannot be defined for ICMP, only one instance of an ICMP DMF in a test case is allowed.

The ability to ping multiple destination IPs was added using multiple instances of the Ping DMF along with test data file to specify unique IP addresses. See sample dmf_tdf.csv file.

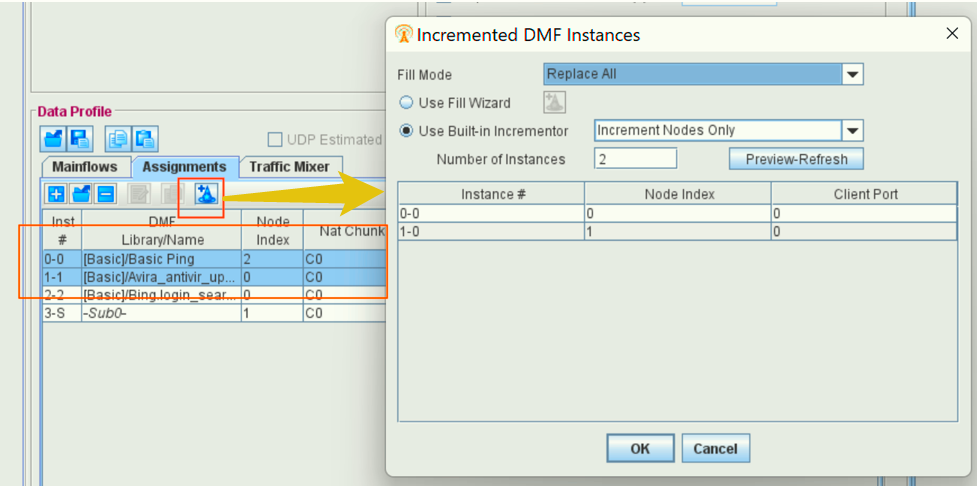
A Wizard button was added on the Assignments tab. The wizard can add multiple instances of the DMFs with optional incremented Node Indexes or Client Ports. You can apply this to multiple single-flow (no subflows) DMFs at the same time. If you apply this for multiple DMFs they each get the same number of instances and each instance gets the Node/Client values.

Select the Fill Mode

  • Replace-All :  Removes all existing data profile instances for your selected DMFs and replace them entirely with your new instances.  
  • Replace Mainflow and Add New Extras: Maintains all the data profile extra instances you have, but replaces the Mainflow instance with your first instance in the wizard, and then adds the rest as new instances. 
  • Add New Extra Instances: Maintains all the data profile instances you have, and adds all the wizard instances as new extra instances.

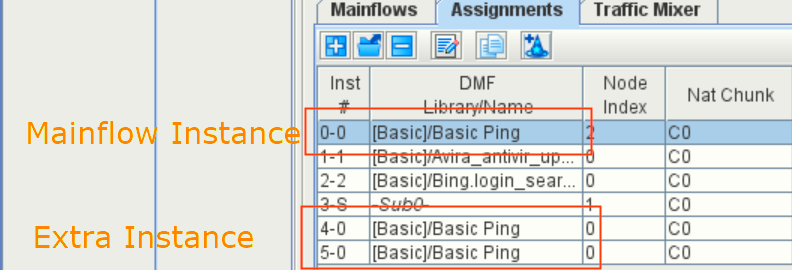
In a data profile, when you add DMFs, the first instance is the mainflow instance.

Mainflow instances are always at the top of the table and in the same order as the DMFs on the Mainflows tab. Extra instances are added in the order in which the user adds them, after the mainflow instances.


The Inst# column indicates some details:
The prefix 0-, 1-, 2-, indicates the overall 0-based instance-row index.
The ending -0, -1, -2 indicates the index of the mainflow DMF the instance-row is a part of.  -0 means “Basic Ping” DMF in this case.
The ending -S, indicates it’s a subflow for the preceding mainflow.

Using the example above as a guide… 
Replace all would replace 0-0, 4-0 and 5-0 and add new 6-0, etc..    
Replace Mainflow and Add New Extras would replace 0-0 and add 6-0, 7-0, etc….
Add New Extra Instances would only add new ones to the end , 6-0, 7-0, 8-0, etc…..
 

Use Built-in Incrementer , Options : Increment Node Only, Increment Client Ports Only , Increment Nodes and Client Ports

Enter the Number of Instances

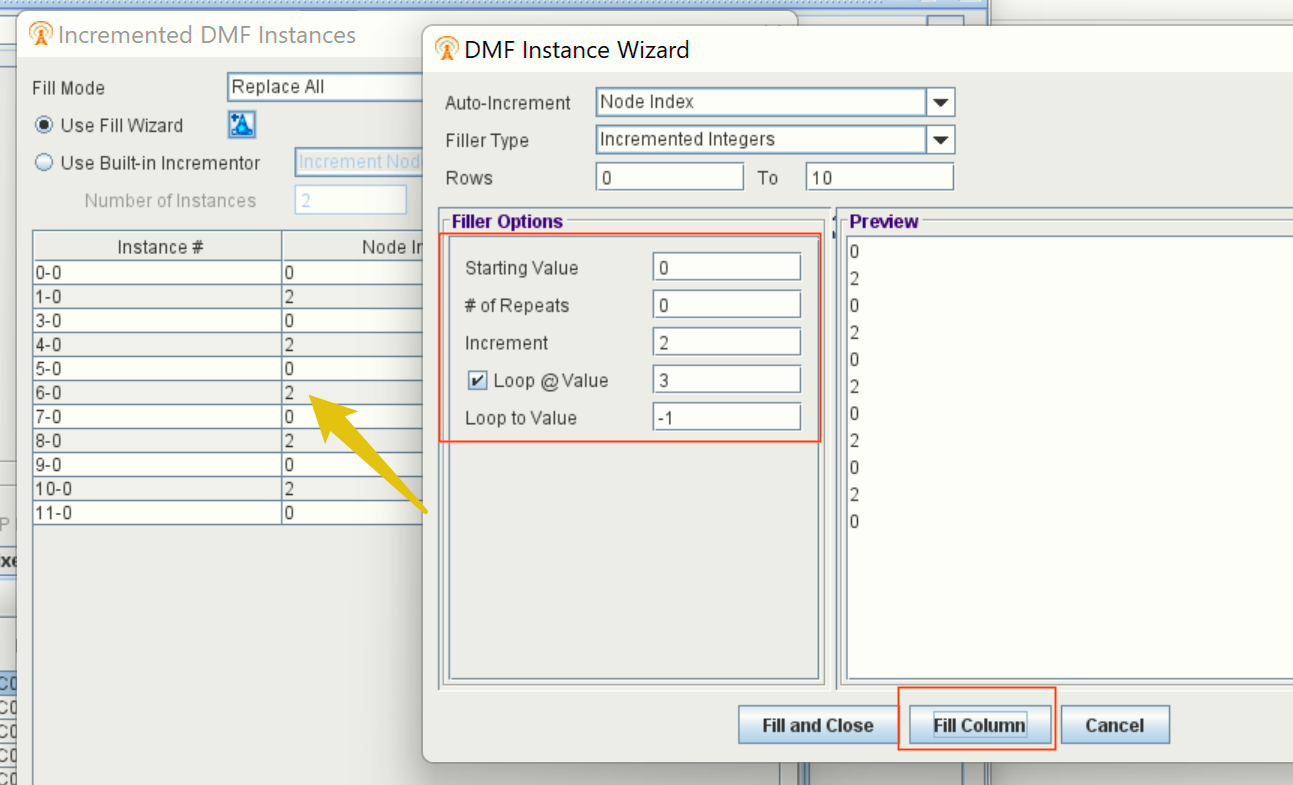
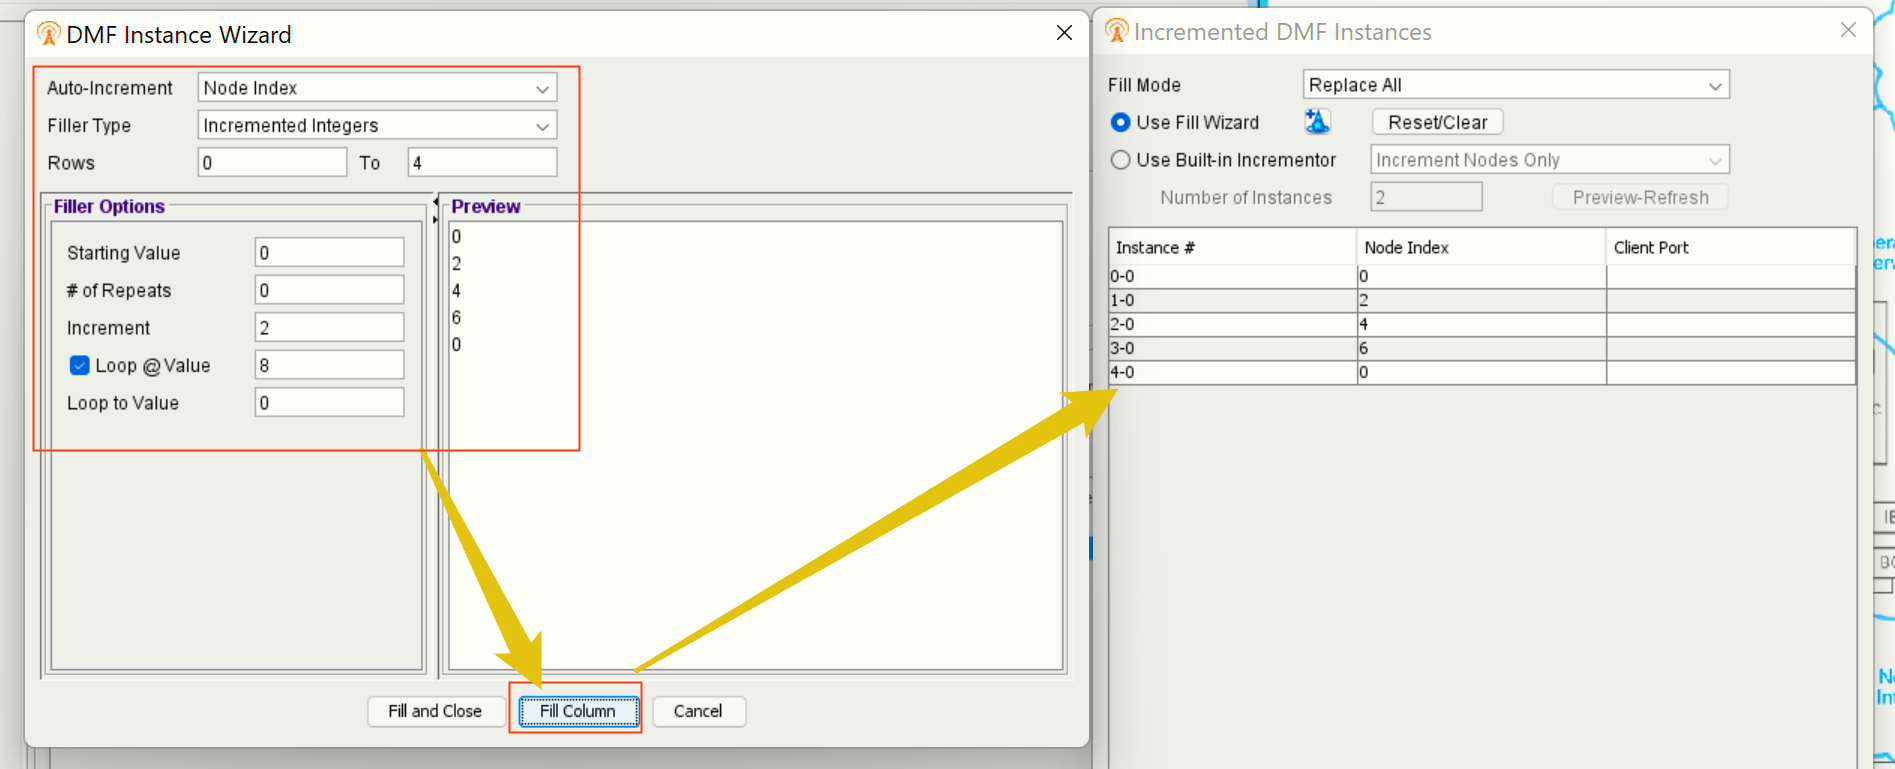
Use Fill Wizard : This wizard will fill out the Preview table on the original dialog. You can keep the Fill Wizard open by clicking just the “Fill Column” button to build up the instance you prefer.
You use the Rows to decide which rows you want to fill out. 

Example : To fill out the even Nodes only for this set of DMFs:

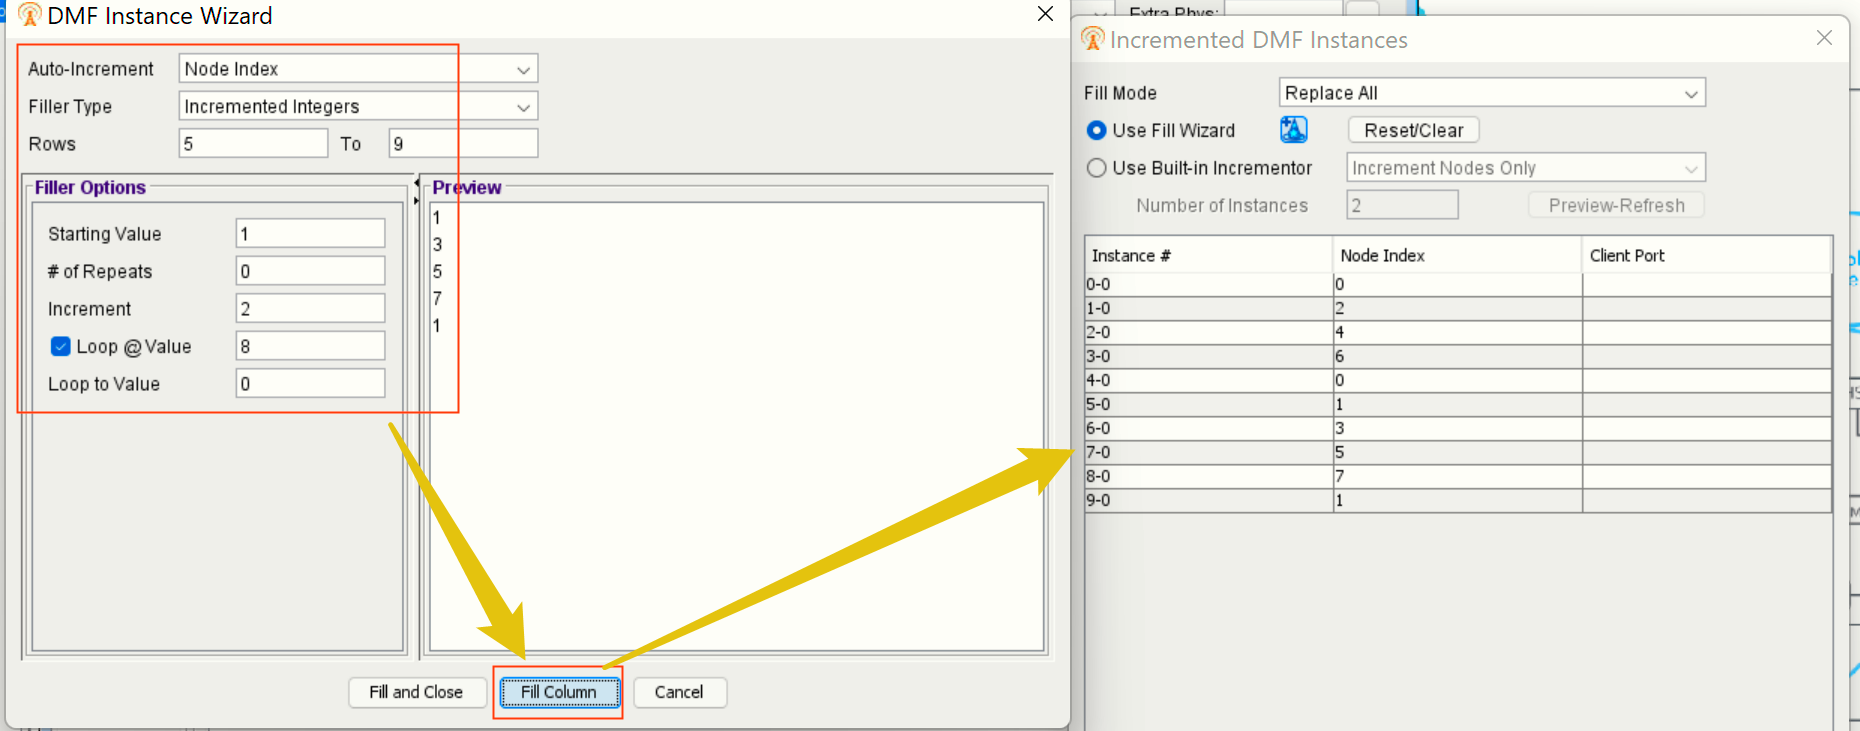
To do the same thing for Nodes 1,3 on a different DMF or even for different instances/rows for this set of DMFs. :sing the Rows fields you can fill out multiple ranges of incrementing values.
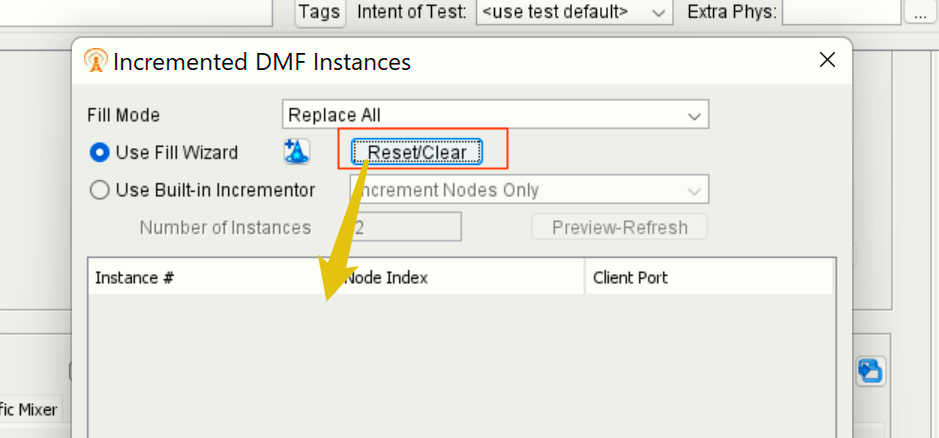
First you can reset the table with the reset button:

Start with empty list.   Then use the Fill Wizard to fill it out from scratch.
For this example we will create 10 instances across 8 nodes (0-7) with first 5 instances using Even numbers and last 5 using Odd numbers:

Leave the Client PORT empty and unfilled out and the Wizard will just use the default value:

If you attempt to use a Node Index value larger than the TC’s current Number of Nodes you will get an error similar to this: INVALID Value: 3 at row 3 greater than Max value:2

DMF Library/Name The name of the mainflow or subflow. Subflows are displayed in italics and are also identified by their index number relative to the mainflow.
Node Index If you defined multiple Network Hosts, you can use the drop-down list to select the index number of the Network Host that will support the server side of the DMF. At least one DMF must be assigned to each Network Host. You can assign a mainflow and its subflow to different Network Hosts.

NOTE: Applicable only for UDP protocol.

  • In SGW Nodal TC, you can only select Node=MN when you select Host Type as MN Only.
  • Only one DMF instance with Node=MN is allowed.
 
Sub Group Add support for Context Assignment type for Groups. Able to assign different DMFs per Group in a single test for Wi-Fi RF Interface. Select to assign the Sub Group from the list. A drop down list will display the available Group (s) in addition to All Subs.
Bearer/Context   Bearer D-Def/B-Ded - label if both Default and Dedicated Bearers are requested. the label will be "Default Bearer" if the test case does not request any Dedicated Bearers". Assign the Bearer/Context index from the list. The number of bearers/context displayed in the list depends on your selection on the Mobile Subscriber pane of the Test Configuration tab.  If Default Bearer per session is 1, you cannot edit this column.

NOTE: Depending on the test case type, the following indexes are available for assignment from the dropdown list under the Bearer/Context column:

  • CDMA: Main (Main Svc Instance), Aux-n (Auxiliary Svc Instance n). Example: Main, Aux-0, Aux-1.
  • GPRS: Pn (Primary Context n), Sn (Secondary Context n). Example:  P0, P0-S0, P0-S1, P1, P1-S0, P1-S1.

  • LTE: Dn (Default Bearer n), Bn (Dedicated Bearer n). Example:  D0, D0-B0, D0-B1, D1, D1-B0, D1-B1.

***DMf's are assigned to Default Bearers (Dn) for LTE with the following exceptions where they are assigned to both Default and Dedicated Bearers (Dn and Bn).

  • In MME Nodal TC where Handoff Protocol = UMTS or GPRS and S3 Interface is not checked   OR

  • In SGW Nodal TC where Handoff Protocol = UMTS or GPRS and UMTS Version = 7

NAT Chunk Assign the Chunk index from the list. The number of Chunk Index displayed in the list depends on the number of rows in the NAT Settings table in Pilot Packets tab.  If Chunk Index is 1, you cannot edit this column.
Context or Service Instance If an MN can establish multiple data connections, auxiliary service instances in a CDMA2000 test or PDP contexts in a GPRS or UMTS test, each DMF instance will be executed on the data connection that you select with the drop-down list.  Data connections that are not assigned a DMF instance will not carry any data traffic.

If a DMF contains one or more subflows, the subflow must be executed with the same IP address as the mainflow. Subflows in a CDMA2000 test must be assigned to the same service instance that executes the mainflow. Subflows in a GPRS or UMTS test can either be assigned to the primary PDP context that executes the mainflow or to secondary PDP contexts associated with that primary context.

Secondary contexts are normally established to receive or transmit a data stream that is controlled by a data session in the associated primary context but can also execute mainflows. Since a secondary context shares the IP address of its primary context, the MN must use a different TCP or UDP port with every secondary context. In the example shown, the MN's first primary context executes the RTSP TCP mainflow, its secondary context executes the RTP subflow, and both DMFs are assigned to the first Network Host.

With the Advanced Data feature, you can configure the test to dynamically establish secondary contexts when they are required by a subflow by clearing the
Auto Start Secondary Contexts checkbox and using event controls to trigger context activation when the subflow is executed.
LTE/DSL Tunnel

Available when Hybrid Access is enabled in the Wifi Offload Gateway Nodal test case. Select LTE, DSL or Both.

Traffic for DMF with LTE selected will go on the LTE Tunnel.

Traffic for DMF with DSL selected will go on the DSL Tunnel.

Traffic for DMF with Both selected will be distributed on both the LTE and DSL Tunnel based on the Packet Distribution in the Hybrid Access Tab.

Preferred Transport type

This is applicable when Dual Stack is defined and indicates whether the preferred transport type is Any, IPv4 or IPV6. The MN will use the preferred transport, if an address of that type has been assigned.

NOTE: When Dual Stack is not selected or not supported, Preferred Transport Type is set to NA and cannot be edited.


  • If the transport is configured with Dual Stack selected and then Dual Stack is turned off without revisiting the assignments, the transport will be automatically set to Any when you commit the test case (click OK).
  • If you change the configuration of a saved test case to Dual Stack, the transport will be upgraded to Any, even if the transport type of the saved test case was Ipv4 or IPv6.
Override Client Port

Every DMF assignment must result in a unique MN IP address/client port combination in order for response traffic to be properly routed. In addition, TCP-based DMFs that are assigned to the same Network Host must have unique client/server port combinations and UDP-based DMFs assigned to the same Network Host must have unique client ports and unique server ports in order for the test system to correctly match responses received to the originating DMF.

Use the checkbox to replace the Client Port defined in the mainflow or subflow DMF with the value you enter in the Client Port column as shown in the example. The second primary context executes a POP3 DMF, its secondary context executes an SMTP DMF, and both DMFs are assigned to the second Network Host. Since the POP3 and SMTP DMFs use the same Client Port, one of them must be overridden. Conversely, the two instances of the HTTP DMF are assigned to different Network Hosts and since the HTTP ports do not conflict with the ports in the other DMFs executed by those hosts and both instances are assigned to primary contexts, the ports defined in the DMFs are valid.

NOTE: The Client Port cannot be overridden for DNS DMFs.


Client Port

The MN port that will be used for the DMF at the time of execution.

Role

Setting the role to Server, changes the orientation of the DMF. That is, setting initiating Side to Server just changes which side initiates the Socket.

In a default data test configuration, the MN acts as the client/initiator and the Network Host acts as a server/responder. When you use a Local Network Host in a Continuous test, you can configure the test for host-initiated traffic by selecting Server. You may  use the drop-down list to explicitly define the MN role as that of a Server. In both scenarios, Local Network Hosts will assume the Client role automatically.

NOTE: For UPD Protocol, traffic is generated only when you set the Role as Server.

Rating Group

Indicates the group of services that share the same cost/rating type. A Rating Group can include one service or group of services that share the same cost and rating type — HTTP and email services could be defined in one Rating Group, for example, while multimedia services are defined in another.

Service ID

Indicates the Service ID for which the credit is granted. The server can choose whether to grant credit for individual services within the same Rating Group or grant credit for the entire Rating Group. In the latter case, all services within a group can draw from the same credit pool.

^ To DMF Profile or ^ Back to Top