Message Flow Controls
When you define an Advanced Data message flow, you can use various types of controls to define the messages generated by the DMF and to control the execution of the flow itself. Use the Add drop-down list near the bottom of the Data Message Flow window... to select the type of control to add to the flow. A DMF can support a certain number of each type of control and when the maximum number of a control already exists in the DMF, that type of control will no longer appear on the list. A new control is always added to the bottom of the message flow. You can drag it to the correct position in the flow sequence.
The following types of controls are available in message flows:
Command Control
The Command control is typically used to define the messages that will be sent when the DMF is executed. You can also define a message that is expected to be received from an external source, allowing it to be recognized and acted upon when it is received. When a strict request-response exchange is required, you can force the flow to pause until a response is received. A DMF can contain a maximum of 2048 command controls.
The content of a message is defined with the Message Editor window. A portion of the message text is displayed next to the View/Edit button that opens the editor.
|
NOTE: You will get an error (via GUI, Tcl and RESTful API) if the Command list is empty for fb_http or fb_https protocols. Error text:
|
Command Applies To
Use the drop-down list to choose which node will execute the command: the MN (Client), the Network Host node (Server), or both. Normally, this is set to Both and only specifies a node when it must respond to a request that originates from outside of the message flow.
In the FTP with PWD command default message flow, for example, the Server responds to a PWD command from a proxy that is in the data stream, but not under control of the test. In this case the command applies to the Server only. The expected request is defined in the Client side of the command, with message verification enabled, allowing the request to be recognized by the Server when it is received.
You can also define a command that applies only to the Client. In this case, the Client sends the request and waits for the defined response from an external device before the test continues to the next step.
Options: Both, Client, or Server
Default: Both
Message
A Message drop-down list is available on both the Client and Server sides of the Command control. Use the lists to select the type of message, if any, that will be sent by the respective node. The test system does not require that you define the response to a request in the same Command, allowing you to force pipelining by generating multiple requests without waiting for responses. In order to calculate Command Messages Round Trip Delay, however, both messages must be defined in the same Command.
Options:
-
None — No message is sent
-
Request — A message is sent with the expectation of a Response message from the other side.
-
Response — A message is sent in reply to a Request received from the other side. Response should also be used to send a message when a reply is not expected.
Default: None
Wait for Response
With the Wait for Response checkbox, you can force the flow to wait until a certain message is received by either the Client or the Server. If you enable message verification, the receiver will validate the specified number of bytes before considering the response to be valid and continuing with the flow execution. When you do not validate the message, any packet with the correct protocol is considered to be a valid response.
Your ability to check or clear the box depends on the Message type selected by the sender:
-
If a Request will be received, the checkbox is disabled and checked since a request must be received before the response can be sent. If a response message is not defined on the receiving side, this setting has no effect.
-
If a Response will be received, the checkbox is enabled and checked. You can clear the box to permit the flow to proceed without waiting for the response.
-
When the message type is None, the checkbox is disabled and cleared since no message will be received.
 Transaction Controls
The transaction controls allow you to group command controls in an iterative transaction loop within the message flow. A DMF can contain 1 transaction loop.
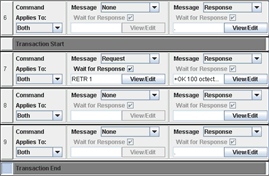
When you use a transaction loop, the entire DMF executes once, and the messages between the Transaction Start and Transaction End controls — in this example, steps 7-9 — repeat for the number of Transactions and at the Transaction Rate that you defined before the flow proceeds to the next step. This method allows you to design a POP3 message flow, for example, that performs a login, retrieves a simulated message a number of times, and then logs out.
Event Controls
Event controls give you the ability to trigger and respond to events generated by the message flow. You can trigger an event within the main flow, send an event from the main flow to a subflow, send an event from a subflow to the main flow, or send an event to a Client or Server node. You can also force a main flow or subflow to wait for an event to be received from an event source.

Four types of event controls are available:
-
Start Sub is used in a main flow to trigger the execution of a subflow. Select the subflow from the drop-down list.
-
Stop Sub is used in a main flow to release any connection established by the subflow after the subflow has completed. If a subflow is not explicitly stopped, the connection will not be released until the message flow is completed.
-
Send Event sends the selected Event to the specified target. You can use up to 4 send events, including the Start Sub and Stop Sub controls, between Command controls.
-
Wait for Event forces the message flow to wait until the selected Event is received from the specified source. You can use up to 4 of these controls between Command controls.
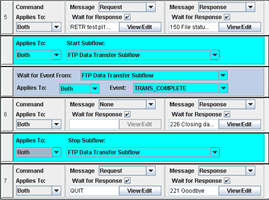
In the FTP example shown, a Start Sub triggers the data transfer subflow, the main flow waits for the TRANS_COMPLETE event (indicating that the subflow has completed), and then executes a Command control. A Stop Sub releases the data connection, and the main flow continues on to the next step.
|
NOTE: When you use a Wait for Event control, it can only be followed by another Wait for Event control or a Command control that applies to both the Client and Server (or two Command controls if Applies To is not Both). |
Event Targets and Sources
With the Send Event control, you can specify the target of the event with the Send Event to Target drop-down list. With the Wait for Event control you define the source of an expected event with the Wait for Event From drop-down list.
Options:
-
<External> — The other side of the message flow or the test case. When Applies To is set to Client, the external device is a local Network Host in a nodal test case; when it is set to Server, the external device is the MN. You can send a RESTART_SOCKET event to a local Network Host, for example, when Applies To is set to Client.
-
<MainFlow> — The main message flow.
-
Subflows — Any subflow included in the message flow is a valid target or source and subflows are included in the target and source lists when a control is used in the main flow. Subflows cannot directly send events to each other.
Default: <External>
Event Execution
As with the Command control, the Applies To drop-down list controls which side executes the event. If you select Both, the Client and Server are affected by the event. Some event types are designed to only be executed by the Client or by the Server or to only be executed by one side at a time. See the Event Type definitions below for more information.
Event Types
Use the Event drop-down list to select the type of event that is sent or expected.
Options:
-
SUBFLOW_START
-
SUBFLOW_STOP
-
TRANS_START — This event is automatically sent from a subflow to the main flow when the subflow initially begins or when it begins another transaction if it performs more than one transaction. You can also manually send it from either the main flow or a subflow.
-
TRANS_COMPLETE — This event is automatically sent from a subflow to the main flow when the subflow has completed all transactions. You can also manually send it from either the main flow or a subflow. Wait for a TRANS_COMPLETE in the main flow when you want to execute additional steps after a subflow finishes.
-
RESTART_SOCKET — If you use a local Network Host, you can send this event to an External target to restart the TCP connection. Applies To determines which side sends the event. If you select Client, for example, the Network Host will restart the connection. You can also wait for the restart before continuing the flow.
-
SOCKET_OPEN — Wait for this event in the main flow before starting a subflow when you trigger secondary PDP context or auxiliary service instance activation from within the DMF.
-
USER_DEFINED_EVENT_1 — USER_DEFINED_EVENT_10 — The user defined events can be sent to any target and waited for in either a subflow or the main flow. You can send a USER_DEFINED_EVENT_1 to <External> and trigger secondary PDP context or auxiliary service instance activation.
-
IPSEC_TUNNEL_1_START — IPSEC_TUNNEL_16_START — When Data IPSec is included in the test, you can send this event to an <External> target to trigger SA negotiation for the appropriate tunnel, and wait for this event to be received before continuing with the DMF. Typically the MN will initiate SA negotiation, and Applies To should be set to Client.
-
IPSEC_TUNNEL_1_STOP — IPSEC_TUNNEL_16_STOP — When Data IPSec is included in the test, you can send this event to an <External> target to delete the SA for a tunnel at the end of the message flow. The DMF will automatically handle the stop event and should not wait for this event.
-
EXECUTE_AKA — When AKA authentication is enabled, send this event to <External> to calculate AKA values based on the settings you defined in Security Options. Applies To determines which side performs the calculation. See Building an IMS AKA DMF for more information on using authentication in a DMF.
-
WEBAUTH_LOGOUT — Use with webauth protocol DMFs.
-
OAUTH_NETWORK_CHALLENGE — Use with oauth protocol DMFs. See Ott Auth Tab for additional details.
-
MQTT_CONTROL_PKT_EVENT — Use with MQTT protocol DMFs.
Default: TRANS_START
 The GOTO Command
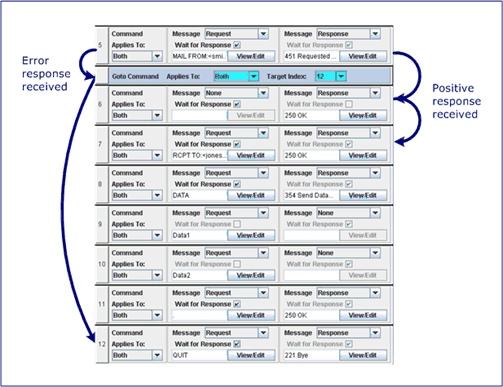
 With the GOTO command you can conditionally alter the execution sequence of the DMF steps based on which of two possible responses is received. If the response defined with the request message is received, the GOTO command is executed and the DMF proceeds to the step selected in the command. If the alternate response is received, the DMF continues with the next step.
In the SMTP example shown to the right, the DMF is provisioned to look for either a 451 error or a 250 OK in response to the MAIL command. If the error response is received, the GOTO Command is executed and the DMF skips forward to the QUIT command (step 12). If the error response is not received, the DMF tries to match the response received to the response message defined in the Command control immediately following the GOTO Command (step 6). If the responses match, the DMF continues with the RCPT TO request message in step 7.
In this way, you can design the DMF to handle an error returned from a Server and still allow the transaction to complete.
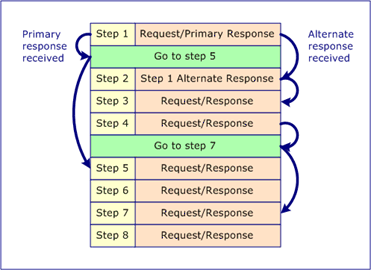
You can also use the GOTO Commands to execute a different set of steps depending on the response received or to repeat a previous step. Example:Example:
 In this
example, either steps 3, 4, 7, and 8 or steps 5, 6, 7, and 8 are executed
depending on the response received in step 1. A GOTO Command after
step 4 (with no provisioned alternate response) directs the flow to
continue with step 7, which is executed in both cases.
You can also use a GOTO Command to jump to a previous step. If the alternate response was a login prompt, for example, the GOTO following step 4 could direct the flow to repeat step 1 after a successful authentication.
Use caution when repeating a previous step. If the same response message is always received, the DMF could be caught in an endless loop.
|
NOTES:
|
Applies To
Use the drop-down list to choose which node will execute the command.
Options: Both, Client, Server
Default: Both
Target Index
Use the drop-down list to select the step that will be executed after the GOTO command.
Options: All step numbers in the Sequencing pane view
Default: N/A