About the Message Editor Window
Use the Message Editor window to configure the request and response messages used in an Advanced Data DMF. Request-Response message pairs are contained in Command controls, and you can open this window with the View/Edit buttons on the client and server sides of a control. The message that is ultimately transmitted can be a combination of a variety of elements: explicit static content that you can compose on the editing sub-tabs or import with a Test Data File, static filler content that you can use to expand the size of a message payload, and dynamic content that is provisioned from values received in another message or from values calculated by the test. You can customize the messages from a default DMF, an imported message trace, a message flow built with the Protocol Wizard, or start with a new control and a blank slate.

-
Define the content of the message in the Filler Data and Auto-Fill Fields panes and the Hex-Ascii and Text Editor sub-tabs and view the defined message in the CRLF Viewer tab.
|
NOTE: You may sort the information in the Auto-fill Fields pane based on the Offset Column. |
-
The general pane allows you to select Verification, Fill/Padding or Auto-Fill Fields panes
-
Verification pane - Select whether Receiving end should verify message and if so, enter First byte to Check and Number of bytes to check. Enter Send Delay (ms) in milliseconds.
-
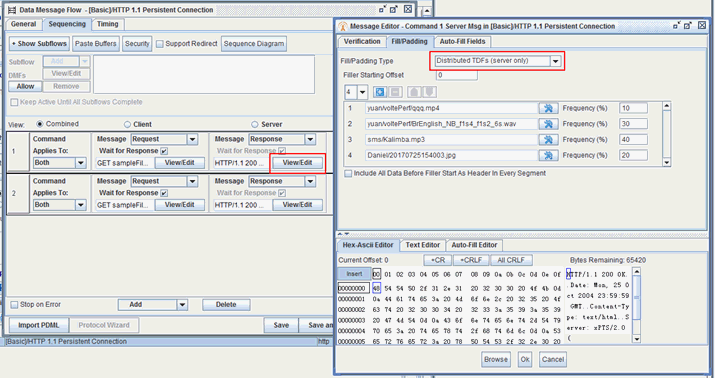
Fill/Padding pane - allows you to select Fill/Padding Type:
-
No Filler,
-
Automatic Padding with Zs - Enter Filler Starting Offset, Padded Msg Size and select to Include All Data Before Filler Start As Header In Every Segment.
-
-
|
NOTE: When using the Fireball DMFs (fb_http and fb_https) and selecting Automatic Padding with Zs, the filler value will be filled with Zero (0x00) not the character "Z". |
-
-
-
Insert Test Data File - Enter Filler Starting Offset, Test Data File and select to Include All Data Before Filler Start As Header In Every Segment.
-
Encrypted Content (Signed Content) - Enter Certificate Test Data File, Private Key Test Data File, File Format (RSA or EVP), Number of Entries, Use Auto-Fills <Signed_Start>/<Signed_End> to define range, <Cert_Insert> is Optional (Set Range to Selected Text, Set Certificate Insert) , Encrypted Content Start and Encrypted Content End and select to Include All Data Before Filler Start As Header In Every Segment.
-
Distributed TDFs - Enter Filler Starting Offset and Number of TDFs (up to 30 Test Data Files) - Total Frequency (%) of all TDFs must equal 100%. Select to Include All Data Before Filler Start As Header In Every Segment. Note: The Traffic Mixer will only count the TDF that has the highest frequency of use when calculating throughput.
-
-
-
Auto-Fill Fields pane - Insert to add - Type, Format, Offset and Command/Search Pattern. See additional details below in Message Content section.
-
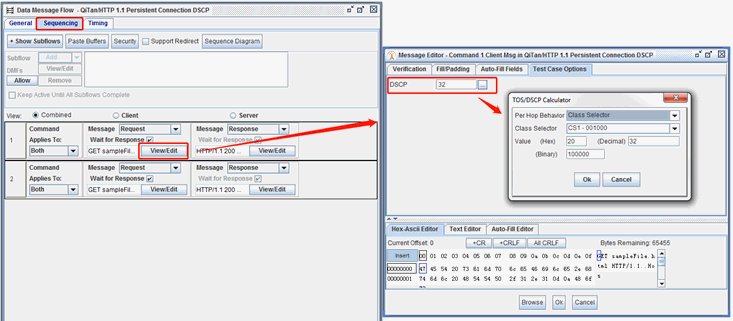
Test Case Options - Available to add DSCP Value in DMF Messages. Click button to add TOS/DSCP Calculator details. See TOS Calculator topic for additional details.
-
| NOTE: A message displays if the Padded Message Size is less than or equal to the user-defined message data, as this results in no padding. |
-
The Auto-Fill Viewer pane allows you to view the placement of the fields and filler embedded in the content defined on the editing sub-tabs. See the Static and Dynamic content sections below for more information on these areas.
-
The CRLF Viewer tab allows you to view the generated CRLF characters, highlighted for ease of reference.
For example, the following shows the same message viewed in Auto-Fill Viewer and CRLF Viewer.
| Auto-generated Message/A | 0d0aHeaderName: HeaderValue0d0aContentSize: 00d0a0d0a |
| Auto-Fill Viewer | <CR><LF>0dHeaderName: HeaderValue<CR><LF>0dContentSize: 0<CR><LF>0d<CR><LF>0d |
|
In the CRLF Viewer |
HeaderName: HeaderValue<CR><LF> ContentSize: 0<CR><LF> <CR><LF> |
-
You can direct the receiving entity to validate the integrity of the message by checking Receiving end should verify message and then specifying the First byte to check and Number of bytes to check. For example, bytes 0, 1, and 2 in row 0 would be checked and are highlighted in the Hex-Ascii sub-tab. When you also check the Wait for Response box in the receiving side of the Command control, the message flow will wait until the correct message is received before continuing to the next step. In the FTP example shown above, for example, the MN must receive the request for a password (response message in Step 2) before sending the password (request message in Step 3).
|
IMPORTANT: When a message with the correct protocol is received and it does not match the expected response defined in the current Command control, the test will compare the message to all responses defined in any subsequent Command controls in the DMF. If it finds a response that is not verifiable (verification is disabled), the test assumes that the received message is a valid response for that Command control. |
-
Specify the number of milliseconds (up to 2,000,000,000) to wait before sending the message with Send Delay.
-
Whenever your cursor is in a field that specifies a byte offset, a starting byte, or a range of bytes, the applicable byte(s) in the Hex-Ascii and Text Editor sub-tabs are highlighted. The bytes highlighted will dynamically change as you modify parameter values.
-
Use the arrows on the split pane bar to show only the sub-tabs (up) or to hide them (down), or drag the bar to re-position it.
-
Accept the message (OK), or Cancel the changes that you have made.
Message Content
The Message Editor gives you the ability to define any type of message from a simple packet with a specific number of bytes using one of the provided protocols to a message that defines the headers and payload for a custom protocol. You can include dynamic content that is unique for each message flow, packet, or MN, define any required binary encoding, and import files for use as payloads.
Static Content
You can explicitly define some or all of the message content on the Hex-Ascii, Text Editor amd MQTT Helper sub-tabs. These editing sub-tabs are normally used to define application-level control messages, as shown in the FTP example above, and to define packet headers for custom protocols. When you insert dynamic content in the message, it is inserted into this portion of the message. A maximum of 1500 bytes can be defined on these sub-tabs, and the available bytes remaining is displayed above the ASCII portion of the Hex-Ascii sub-tab. You can also import a text file to use for this portion of the message with the Browse button.
Use the Hex-Ascii tab to compose the message if the protocol is not text-based. The left column displays the row number, the center column displays the hex value of the bytes arranged by row and byte position, and the right column displays the ASCII translation. Values that cannot be represented by an ASCII character are shown with a square.
Select a byte, and the row number, byte, and ASCII character are highlighted. When a byte is selected, you can modify its value. The character that will be modified is highlighted in blue. Byte editing always begins with the left nibble — you cannot edit only the right nibble.
ASCII characters can be edited in the ASCII portion of the sub-tab.
Use the Mode button (above the row numbers) to toggle between Overwrite (default) and Insert mode, or use the Insert key on your keyboard to toggle the editing mode. When you use Insert mode, bytes are pushed to the right as you type.
You can also add to the message by right-clicking and selecting Paste from the context menu.
Use the Delete key to delete the selected byte, and the Backspace key to delete the previous byte.
Navigate through the bytes with arrow keys, jump to the first byte with the Home key, or jump to the last byte with the End key.
Insert carriage return or line feed characters at the selected byte with the Insert CR or Insert CRLF buttons or by right-clicking at the insertion point and selecting the option from the context menu.
Use the Text Editor tab to compose the message in plain text. The text in the Text Editor is converted to hex, and you can still use the Hex-Ascii tab to insert bytes for any encoding that the protocol requires. The example to the right shows the hex message used above in the Text Editor.
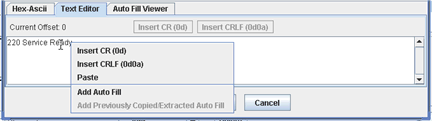
You can insert carriage return or line feed characters with the Insert CR or Insert CRLF buttons or by right-clicking at the insertion point and selecting the option from the context menu.
Paste from the clipboard by right-clicking and selecting Paste from the context menu.
You can use keys to navigate through the text as you would in a word processor: scroll through characters with the arrow keys, jump from word to word with Ctrl-arrow key combinations, go to the beginning or end of a line with the Home and End keys, or go to the beginning or end of the message with the Ctrl-Home and Ctrl-End key combinations.
If text can be used in the message without regard to the content, you can use the Automatic setting in the Filler Data pane to pad the message with "Z" characters. You can start the filler at a particular byte (Content Start) and define the total size of the final message, including any dynamic content inserted into the message and the literal portion of the message defined on the editing sub-tabs, with Content Size. The Auto-Fill Viewer sub-tab (see the Dynamic Content section below) displays the placeholder for the filler data positioned within the message content as specified.
With the Test Data File setting, you can select a data file that has been imported into your Test Library, and the file will be inserted into the message beginning at Content Start. Data files can be up to 500KB (512,000 bytes) and can contain text, graphic, or multimedia data. If there is any overlap between filler data and bytes defined on the editing tabs, the remaining bytes from the editing tabs are appended to the filler data.
When the message's total size is larger than the Segment Size defined for the DMF, the message will be sent using multiple packets. If you have defined header fields in the editing sub-tabs, this information will be included in every packet when you check Include All Data Before Content Start As Header In Every Segment.
Use the MQTT Helper tab to compose messages that are supported by the mqtt protocol. For mqtt protocol, the text and auto-fill tabs are not available. The message format is a combination of binary and ASCII.
Select Control Packet Type:
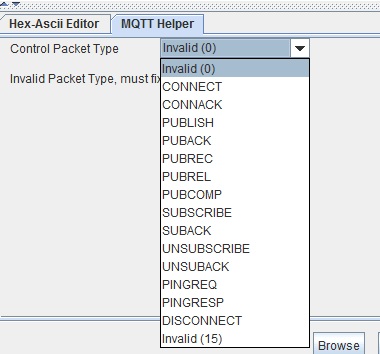
Based on the Control Packet type, various input fields will become available to generate the mqtt messages.
For example, a SUBSCRIBE message type, capture input for : Packet ID, capture up to 20 Number of Topics. For a CONNACK message type, enable Session Present and select the Return code.
Go to mqtt.org for further details on the mqtt supported messages.
NOTE: Added the ability to modify MQTT parameters by enabling the Text and Auto-Fill Editor tabs for MQTT protocol. First create messages with MQTT Helper, and when done, add the paste buffers. When the paste buffers are added to the messages, MQTT Helper can no longer parse that message. The paste buffers should be input into DMF test data file.
The paste buffers for this feature are as follows :- Mqtt Connect:
Paste buffer 1: Client Id (example: Subscriber_#) - Mqtt Subscribe:
Paste buffer 2-5: Topic Name and requested QoS (example: Plano/Spirent@1) - Mqtt Unsubscribe:
Paste buffer 9: Topic Name (no QoS value) - Mqtt Publish:
Paste buffer 9: Topic Name (no QoS value)
Paste buffer 10: Application Message
- Mqtt Connect:
Dynamic Content
You can use Auto-Fill Fields to insert values that are unique to the MN, the MN's data session, or the message flow into your message. Fields are also provided that enable you to capture a value from a received message — the session ID or the port to be used for a data connection, for example — and insert it into subsequent messages or use it to provision other settings in the test. Defined fields are listed in the Auto-Fill Fields pane and are also displayed, embedded within the message content, on the Auto-Fill Viewer sub-tab as shown in the example. Fields that insert content are shown in red and fields that capture content are shown in yellow.

You can use the Add and Remove buttons to manage the fields, and you can also add new fields by using the context menu. Right-click in one of the editing sub-tabs, select Add Auto-Fill, and a field is added at that position. If you select a series of characters in the Text Editor sub-tab first, the field will replace the selected characters.
The position of a field that inserts content is defined by its Offset. Fields that capture values from a message can be targeted by position using Offset or they can use a Search Pattern to find the target anywhere in the message. The Current Offset of your cursor is displayed near the tops of both editing sub-tabs, and it can aid you in confirming the exact placement of a field. If you add content to the editing sub-tabs after adding fields, any affected Offset values are automatically adjusted, keeping them in the same position relative to the surrounding content.
See Auto-Fill Fields for more information about the types of fields available and how you can use them in a test.