About the TDF–CSV Editor
The Test Data File (TDF) Comma Separated Values (CSV) Editor allows you to create, edit and save TDFs. Use TDF-CSV Editor to edit CSV files and quickly and easily provision unique values. The TDF-CSV Editor provides a Column Fill Wizard to assist you to create complex incrementing values across many rows. As well providing built-in support for the Auto-Incrementing Groups.
Learn more about:
You may launch the TDF-CSV Editor from the Landslide home page window or you can open either the Embedded TDF-CSV Editor or Standalone TDF-CSV Editor from the TDF Parameter field in the Test Case editor window. The “Embedded TDF-CSV Editor” means it executes within Landslide Client as internal window.
| NOTE: Opening large files requires a lot of memory and thus the processing / parsing of the CSV may take a long time (i.e. a symptom of low memory is CPU churn). The client will attempt to warn you when it detects low memory. Consider using the non-Embedded, Standalone TDF-CSV editor to process large files. The standalone TDF-CSV editor gets it’s own separate memory thus all memory is dedicated to the TDF-CSV function. |
|
Open TDF-CSV Editor from the Landslide Home page Window |
Click the Launch button TDF-CSV Editor from the Home page window, and your browser will attempt to download the TDF-CSV Editor application. This may take more than a minute with a slow connection speed and will only occur on subsequent sessions if the test system has been upgraded. |
|
Open TDF-CSV Editor from Test Case Window
|
You may launch the TDF-CSV Editor the Embedded TDF-CSV Editor or Standalone TDF-CSV Editor from the TDF Parameter field in the Test Case editor window where you can Apply Test Data File:
The following options are available:
|
The application opens the Start TDF-CSV Editor window where you can set Java Memory and then click Launch to open the TDF-CSV Editor application window.
| NOTE: Where applicable, you may click Generate Empty TDF, enter the desired value and save the values to a .CSV file for reuse. |
The TDF-CSV Editor application will be downloaded. This may take more than a minute with a slow connection speed and will only occur on subsequent sessions if the test system has been upgraded.
| NOTE: The TDF-CSV Editor does not require you to login. |
TDF-CSV Editor Window

Title bar and tooltip on the Embedded TDF-CSV editor (when associated with TDF Parameter):
The TDF-CSV Editor allows you to define a .CSV file with columns, rows and values that you may include in the Test Case, to override the previous values you defined in the test case.
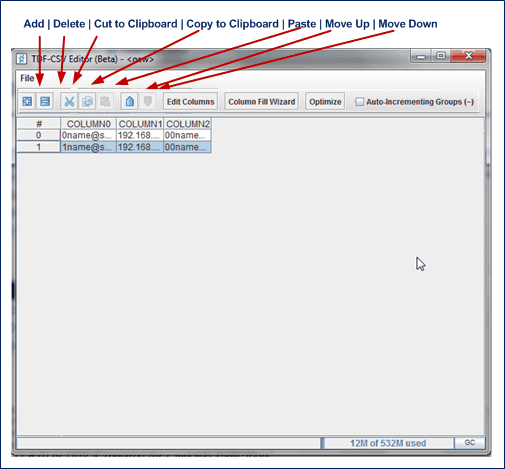
The table below defines the command buttons and their functions.
|
Buttons |
Actions/Functions... |
||
|
Add |
Click Add to insert rows and edit each cell in the table. |
||
|
Delete Cut to Clipboard Copy to Clipboard Paste Move Up Move Down |
Select row and click Delete, Cut/Copy to Clipboard, Paste, Move Up or Move Down as required. |
||
|
Click to open Column Editor window. |
|||
|
Click to open Column Fill Wizard window. |
|||
|
Optimize |
Click Optimize to display a window (Remove These Columns ?) with a list of columns (if applicable) to be removed, to compact the TDF. You may select to remove columns with static values, no values, or all same values or keep them.
Click Yes to delete selected columns or No to cancel the operation. |
||
| TDF Info |
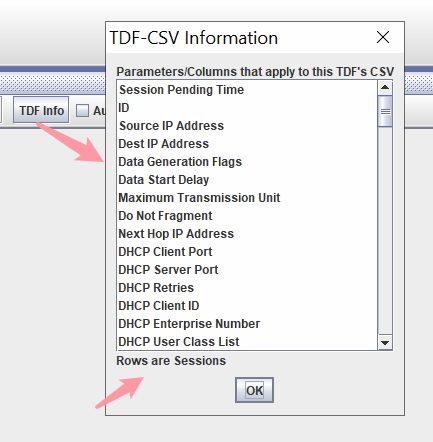
Select for TDF-Info Dialog to display the Parameters / Columns that apply to a TDF-CSV file. Example:
|
||
|
Auto-Incrementing Groups (~) |
Select to add a column labeled Group Size (~) in the TDF-CSV Editor window. See About Auto-Incrementing Groups for more detailed information on this feature. |
||
|
TDF Fields |
Visible only when you select a TDF (on the TC window) and open it in the TDF-CSV Editor. Click TDF Fields to display the available parameters/fields as a scroll list. |
||
|
File > New Open, Save, Save As, Close, Exit |
|
Edit Columns
The Edit Columns window allows you to insert the first line in the CSV file, add more columns and define names/labels of each column.
|
Add Add a new TDF column Add a new blank column Add/Duplicate selected column(s) |
Click Add a new TDF Column to insert column and edit column name/label. The fields that have already been added to the TDF will now be shown in Bold. Click Add a new blank Column to insert a non-standard (or just undocumented) column. Click Add/Duplicate Selected Column (s) to make a copy of TDF field(s). |
|
Test Case selected TDF Opened in TDF-CSV-Editor:
|
|
|
Move Up/Left or Down/Right |
Select column and click Delete, Move Up/Left or Move Down/Right as required. |
|
NOTES:
|
Column Fill Wizard
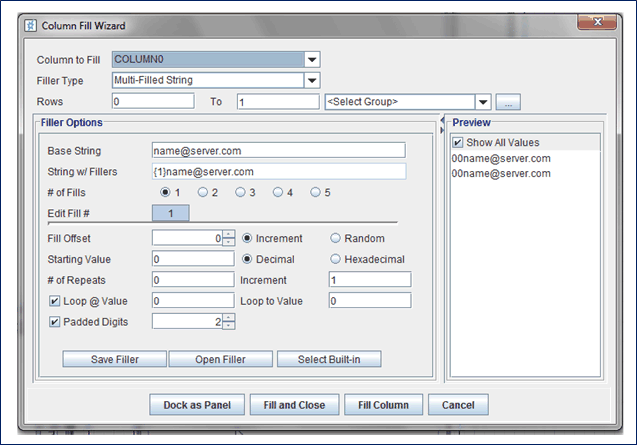
The Column Fill Wizard allows you to select a specific column and row-range and fill them with an incrementing value.
You may also save the incrementing options as templates for reuse. Complex incrementors can be saved off so you do not have to recreate them from scratch.
|
Select a specific column to assign value. |
|||||||||||||||
|
Select the Filler type used to assign a incrementing value. You may select many variations and options for the incrementing values:
|
|||||||||||||||
|
Rows |
Specify the row-range to fill with the defined incrementing value. For example rows 0 to 50 may have certain values with a specific filler type and rows 51 to 100 may have another set of values based on a different set of filler type. |
||||||||||||||
| Groups |
Click ... to open Group Editor window and define groups of row as required. Use Add, Delete, move up and down arrows to define, order, and delete as required. You may specify the number of rows of a column to be grouped together where you can define similar information to be filled.
Use the row-range (for example 1 to 50) and Filler Type to define the information to be filled in each column for the specified range of rows, change the range of rows (for example 51 to 100) and repeat the process. |
||||||||||||||
|
Save, Open, Select Built-In |
These options apply only to Multi-String fillers.
|
||||||||||||||
|
Dock as Panel |
Click Dock as Panel to dock the Column Fill Wizard as a panel of the main TDF-CSV Editor window. When docked, the Column Fill Wizard is in a split pane on the right side, which may expanded or collapsed. You may click Undock to separate the main window and the Column Fill Wizard. When opening a new editor via File->New it will maintained the Docked state of the editor you called it from. |
||||||||||||||
| Fill and Close | Click Fill and Close to fill the selected Column to Fill with the Filler Type and close the Column Fill Wizard window. | ||||||||||||||
| Fill Column | Click Fill Column to fill the selected Column to Fill with the Filler Type and continue to work in the Column Fill Wizard window. | ||||||||||||||
| Close | Click Close to exit the Column Fill Wizard window. |
Multi-Filled String
Allows you to enter string format with five different incrementing values.

|
Base String |
Indicates the name/text that appears in the parameter and is the initial value (non-incremented) for the Parameter (resulting text displayed in Preview pane). |
|
|
String w/Fillers |
Displays the resulting text based on the number of fills and values you select. |
|
|
# of Fills |
Select a fill value 1 to 5. The resulting text changes according to the # of Fills. |
|
|
Edit Fill # |
Select the Fill # and edit Fill Offset, Starting Value, # of Repeats, and the related information displayed below the Edit Fill #. |
|
|
Fill 2 Offset |
Offset is not available if Type is None (Do Not Increment). The parameter indicates the position of the auto-increment value. That is, whether the auto-increment value is a prefix, suffix, or within the base text. For example, if the Base String is user, the auto-increment value is positioned as follows according to the Offset value you select.
|
|
|
Increment/Random |
Select the type of incrementer you want to use or incrementing you want to happen.
|
|
|
The starting value in an incrementing field, for integer, any value, for IP can be v4 or v6 |
||
|
The number of times to duplicate a value, that is whether to repeat once, twice, and so on. Valid range is 0 - 255. The number of times to repeat the value,
|
||
|
The value to increment (increase or decrease) each time, valid range 1 to 255. |
||
|
Max |
Enter the minimum and maximum values to be used to Fill Offset value. Min and Max are available when you select Random Integers as the Filler Type. |
|
|
Indicates the value that causes the incrementing to loop |
||
|
Indicates the reset value assigned after reaching the Loop To Value. |
||
|
Padded Digits |
Indicates the number of digits displayed. Select Padded Digits and increment the values as required. The incremented value is prefixed with 0’s until the number of digits is equal to Padding value. Valid values is 1-24. |
|
|
Enter a Slash/CIDR mask or 255.255.255.255 mask |
||
|
Select to make sure the IP address is incremented within the subnet boundary. |
||
|
Preview |
Displays the value of the parameter based on the auto-increment values. You may select to limit preview to 500 values. |
About Auto-Incrementing Groups
TDF-CSV files allow users to define unique values for each individual object it is meant to support. To accomplish this, the file must have a row for each object. For example to provide auto-incremented round robin ports for UEs on a DMF, you would use the Apply DMF Initialization from Test Data File TDF and have a line for each UE. This example is just for demonstration purposes.
| Source Port | Dest Port |
Dest IP Address |
| 110 | 2000 | 192.168.0.1 |
| 112 | 2002 | 192.168.0.1 |
| 114 | 2004 | 192.168.0.1 |
| 116 | 2008 | 192.168.0.1 |
| 118 | 2006 | 192.168.0.1 |
| 120 | 2010 | 192.168.0.1 |
| 110 | 2000 | 192.168.0.2 |
| 112 | 2002 | 192.168.0.2 |
| 114 | 2004 | 192.168.0.2 |
| 116 | 2006 | 192.168.0.2 |
| 118 | 2006 | 192.168.0.2 |
| 120 | 2010 | 192.168.0.2 |
| ... | ... | ... |
The first 6 UEs will target the same destination address, but use different ports, then the next 6 repeat that on a different address. With 1000’s of UEs this could get quite large.
To reduce the size of the TDF, we can use the Auto-Incrementing Groups (AIG) feature. For most TDF-CSV files (Trial and error, or contact support to know), Landslide supports AIG where each line can represent a group of multiple objects, and the fields can use auto-incrementing syntax to define the sequence of values for each object in the group. This allows users to define much smaller files when sections are using the same values or simple auto-incrementing values. Using our example above, we can reduce it by a factor of 6 to 1, by using auto-incrementing syntax for the Ports and having each row expand to 6 UEs, but using the Group (~) column to indicate the size of the Group:
| ~ | Source Port | Dest Port | Dest IP Address |
| 6 | #(N110 0/2) | #(N110 0/2) | 192.168.0.1 |
| 6 | #(N110 0/2) | #(N110 0/2) | 192.168.0.2 |
| ... | ... | ... | ... |
When executed the Test Server will automatically expand this to match the earlier example.
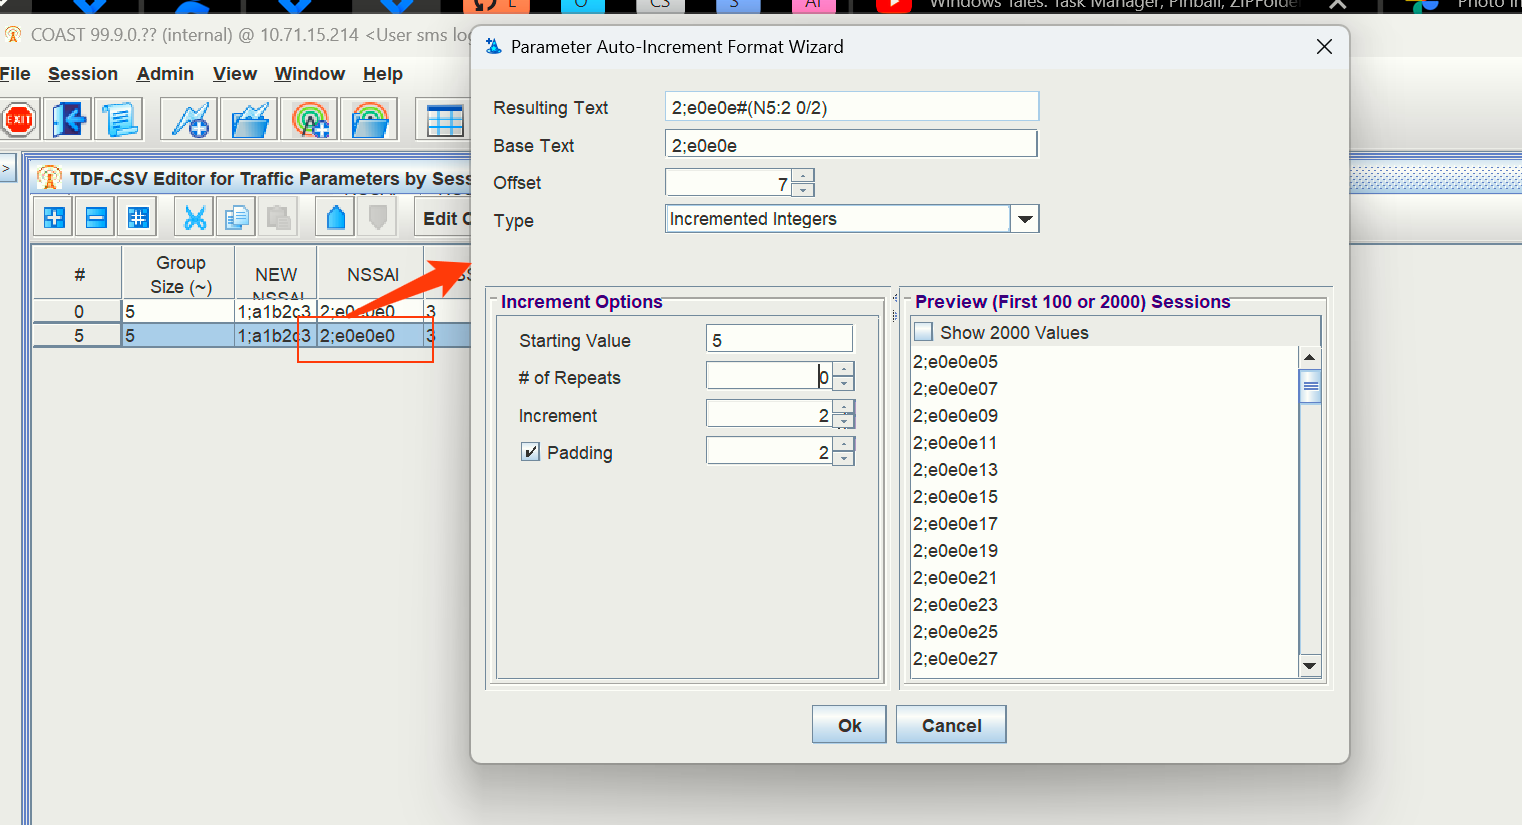
To help users build the Auto-Incrementing Groups, our TDF-CSV Editor provides functions to add the Groups (~) column and to build the auto-incrementing syntax for the fields.

After which editing any field offers the Auto-Increment Syntax Wizard:

Click OK applies the syntax and saves it to the TDF:

Using the TDF-CSV Editor is not a requirement, how the TDF is filled out does not matter, as long as the Test Server supports AIG for the TDF-CSV parameter, and the TDF’s first column is the Group (~) indicator, the TDF will be using AIG.

