Importing a PDML Message Trace
When you define either an Advanced or Lite Data Message Flow, you can provision the Command control messages from an existing message trace rather than manually defining the messages or using the Protocol Wizard.
|
PDML to DMF Wizard |
Use for defining Advanced Data Message Flow. PDML import supports selection of a single stream from PDML files at various stack/protocol levels for an Advanced DMF. The PDML to DMF Wizard translates the XML from a trace saved in a Packet Details Markup Language (PDML) format into Command messages, links request and response messages, and populates the sequencing pane with Command controls containing the messages. |
The following topics lists the steps involved in importing a PDML trace. If you are not familiar with defining DMFs and messages, review the information in Learn the basics before you begin.
Before you import a message trace, you should have a basic understanding of:
Prepare the message trace
You can use Wireshark to filter out the packets that should not appear in the final message flow, if necessary, and to export the trace in a PDML format. Version 0.10.12 supports PDML (download it here).
Filtering a message trace — If your trace contains packets from devices other than the client and server or packets with protocols unrelated to the final message flow, use Wireshark's packet filter to weed out the undesirable packets. At a minimum, you should isolate the packets sent by the client and the server if the trace file is large.
1. |
Start Wireshark and open the message trace. |
2. |
Define a filter that will display as closely as possible the desired message flow, including all of the connections involved if the protocol uses different connections for session management and data transfer. The simplest method is to enter an expression in the Filter field and click Apply. You can further trim the trace by selecting only a range of packets during the export if the trace includes multiple transactions. Wireshark provides many ways to compose a filter expression. Refer to the Wireshark documentation for more information or modify one of the following examples to fit your trace.
|
Exporting a message trace
| 1. | When you are satisfied with the filtered trace, select File > Export > as XML - "PDML" and the export window opens. |
2. |
Click Browse..., navigate to the export location, enter a name for the exported file in the Name field, and then click OK. Be sure to add the ".xml" extension to the file name. |
| 3. | If you have filtered the trace, select Displayed to only export the displayed packets as shown in the example. |
| 4. | If you only want to export a portion of the displayed trace, select Specify a packet range and enter the range in the field provided. The tool tip for the field explains the syntax used. |
| 5. | Click OK to export the trace. |
PDML to DMF Wizard
To start the PDML to DMF Wizard and select the trace file (page 1):
|
1. |
Edit the test case that will execute your DMF and configure it for Continuous Data Traffic (see Adding Data Traffic). |
|
2. |
Add a New DMF and the Data Message Flow window... opens. |
|
3. |
Click the Import PDML button to start the PDML to DMF Wizard. |
|
4. |
Click Browse..., navigate to the file that you exported in the previous section, select the file, and click Select. By default, files with ".xml" extensions are displayed. Select All Files from the Files of Type drop-down if necessary, and all files in that location are displayed. Only files with a PDML format can be imported with the wizard. Ensure that the file path and name are displayed next to the Browse... button, |
|
5. |
Select Import PDML packet Timings into Message Send Delays to automatically set the message Send Delay based on the packet timings in the PDML. The timings will be relative to the first message included in the DMF, that is, message 0 will have a time of 0. |
|
6. |
Click Next to continue to the next step. |
To select the client and server (page 2):
|
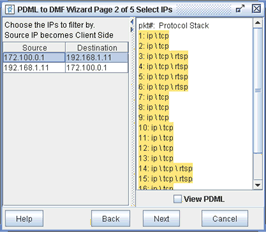
The second page of the import wizard displays the IP address and protocol layers interpreted from the imported PDML and instructs you to select the IP address pair from the trace that represent the client (MN) and server. Source is always the client and Destination is always the server (Network Host). All of the unique combinations of source and destination addresses from the IP headers in the trace are displayed in a grid in the left pane, and the protocol layers of each packet are displayed, by packet, in the right pane. You can use the arrows on the vertical split pane to expand one pane or the other. |
 |
|
TIPS:
|
|
1. |
Select the row that contains the correct combination of client and server IP addresses and the packets that contain those IP addresses are highlighted. Packets that are not highlighted will not be included after this step. |
|
2. |
Click Next to continue with port selection. |
To select the data protocol port (page 3):
|
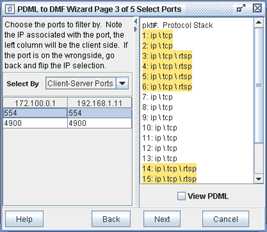
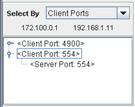
The third page of the import wizard displays the packets remaining in the trace after the previous step and the ports used in those packets. In this step, you will select the client and server port configuration for the DMF. You have three choices for port configuration: explicit client and server ports, explicit client port with random server ports, and random client ports with an explicit server port. Set the configuration for your DMF with the Select By drop-down list:
|
 |
|
 |
|
All of the ports used in the trace are grouped in a tree structure, with unique client ports at the first level and server ports at the second level. You can include all packets with a matching client port, regardless of the server port, by selecting a client port. Expand a client port node and select one of its server ports to include only packets with a particular port combination. |
|
| The trace shown in the example includes both RTSP control and RTP data transfer packets. In this case, the main flow is under construction and the RTSP port (554) is selected. Since both client and server will use the same ports used in the trace, the default Select By option — Client-Server Ports — is appropriate. | |
|
1. |
Set Select By if necessary. |
|
2. |
Select the appropriate client or server port or the appropriate port combination and the packets containing those ports are highlighted and retained. |
|
3. |
Click Next to continue with protocol selection. |
To select the protocol layers (page 4):
The fourth page of the import wizard displays the packets remaining in the trace after the previous step and the data protocol layers used in those packets. In this step, you will select the protocol layers to include in the Command request and response messages.
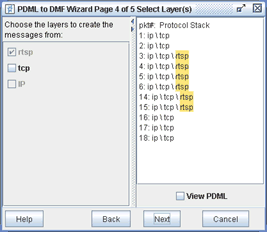
Checkboxes are provided for all data protocol layers, from the IP layer through the application layers. If more than one application layer is involved, the first layer is identified by protocol name and any layers above it are included with the "REST" checkbox. The first application layer, and any layers above it, are selected by default. The data IP layer cannot be selected since it is generated by the test. If the trace includes encapsulated packets, control protocols such as GTP or RP will not appear as selections. The selectable layers will always begin with the layer above the data IP layer.
If you import a trace with multiple application layers and the lowest application layer is a supported Underlying Protocol, such as MMS over HTTP, you can select REST and only import the MMS layer, and then select HTTP or any other valid protocol as the Underlying Protocol in the DMF settings. If TCP or UDP is used, only select the layers above. The wizard will select TCP or UDP as the Underlying Protocol in the DMF settings.
|
1. |
Select all data protocols above the IP or TCP/UDP layer. |
|
2. |
Click Next to import the message sequence into a DMF. If fields are missing from any packets or if fields are out of order, the wizard pads those bytes with "00" and the PDML Missing Fields window opens. Determine how to handle the undefined bytes and then continue with the import. If the wizard encountered other problems parsing the messages, a pop-up warning will inform you which packets should be visually inspected in the next step. |
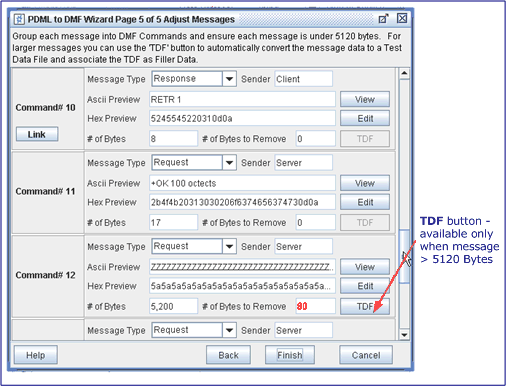
To import a message sequence (Page 5 Adjust Messages):
In the final step of the DMF wizards, you will edit the individual messages and arrange them in request/response pairs to form the DMF Command controls.
Each packet is shown in a pane that identifies the Message Type, the Sender, the number of bytes in the message, and that displays a portion of the message in ASCII and hexadecimal.
NOTE: PDML Importer automatically associates a request and responses into a DMF command row. 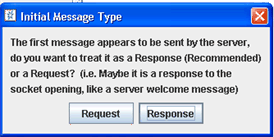 If the first message encountered is from the Server, you will be prompted to treat it as a Response, which line up the Command rows better. If the first message encountered is from the Server, you will be prompted to treat it as a Response, which line up the Command rows better. |
|
1. |
Confirm that the Sender is correctly set to Client or Server. If not, return to page 2 and change your Source/Destination selection ( import wizard), or click Cancel and correct your message objects (protocol wizard). |
|
2. |
If you are using the import wizard, check the Message Type in all messages. It will default to Request in the first message and then alternate between Response and Request depending on the Sender. If the first message is a notification from the server that it is ready for a transaction, change the type to Response and toggle the type in the other messages as appropriate. |
|
3. |
All messages must be less than 5120 bytes. If any messages contain data transfer payloads that cause the message to exceed the maximum bytes the exceeding number of bytes displays in red and the TDF button becomes available. Click the TDF button and Save as Save as Test Data File Window... opens. Select the library where you wish to save the Test Data File and click Save. This saves the entire message as a TDF and associates it as Filler Data for the message. The saved message data file is included in place of the message as a Test Data File for filler data. Use the Edit button and remove the data payload while retaining any encoding at the beginning or end of the message such as a CR-LF pair. You can delete the payload and define other Filler Datato take its place after the DMF has been imported, or you can highlight the payload, right-click, and choose one of the file creation options to use the actual payload as filler data. |
|
4. |
Finally, use the Link buttons as necessary to group a request and response in one Command control as shown in the example. The test will only be able to ensure that the correct response has been received if the request and response messages are in the same Command. Click Link in a request message to group it with the response message that immediately follows it. You cannot group two requests or two responses in one Command. After two messages have been linked, you can separate them with the Unlink button. |
|
5. |
When you are finished adjusting the messages, click Finish to create the DMF. The wizard closes, and your messages are now displayed in the DMF window. You will receive an error message if there are any problems with your configuration. If the message flow contains more than 64 commands, a warning will be displayed. The excess commands must be removed before you will be able to save the DMF. |
|
6. |
The ports and Underlying Layer are automatically selected based on the imported flow. If you are importing a message trace, the Data Protocol is set to custom in all cases and you should select the appropriate protocol from the list unless you are using a custom protocol. Define the rest of the message flow parameters as you would for any new DMF. |
|
7. |
Step through the Commands in your message flow and check Wait for Response where appropriate. |
|
8. |
Refine the message definitions by enabling verification and adding Filler Data or Auto-Fill Fields as desired (see Defining a Message). |
|
9. |
If you are importing an RTSP flow, complete the DMF by adding the RTP subflow. You can run the wizard again and select the RTP port on page 3 to construct the subflow. |
The PDML Wizard parses field elements until non-empty value attributes are found. However, PDML occasionally leaves out a byte and the way to track to track it and displays the PDML Warning Window.
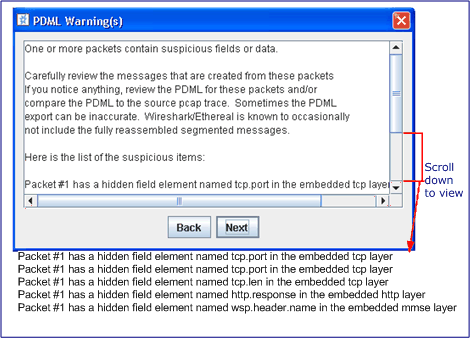
| NOTE: When the PDML Warning window doesn't display, the PDML Missing Fields window opens after you click Next on page 4. | 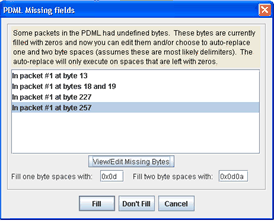 |
Click Next on the PDML Warnings window and the import wizard lists the detected undefined bytes (0x00) in the messages in the PDML Missing Fields window opens. A list of all of the packets that contain undefined bytes is displayed, as shown in the example.
| NOTE: You may choose to correct some or all of the bytes with the PDML Missing Fields window or continue with the import and manually correct the bytes later using the DMF Message Editor Window. |
Use the Fill one byte space with or Fill two byte space with to search-and-replace all one-byte or two-byte occurrences with the values you define or use the Edit Missing Bytes as Hex window to edit missing bytes.
|
1. |
Define the values that will be used to globally replace the undefined bytes in the fields provided. By default one-byte occurrences (0x00) are filled with a CR (0x0d) and two-byte occurrences (0x0000) are filled with a CR-LF pair (0x0d0a). | |
|
2. |
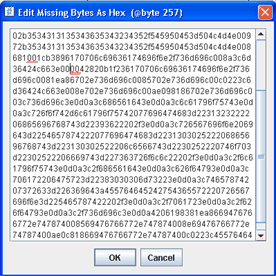
Manually edit the missing bytes that should not be filled with the global values you defined in the previous step. Select a packet on the PDML Missing Fields window, click View/Edit Missing Bytes. The Edit Missing Bytes as Hex window opens with the cursor’s byte offset in the window title bar (@byte257) and displays the hexadecimal coding for the portion of the packet that will be imported. Only the missing bytes are underlined and the cursor is positioned at the start of the first missing byte. You can modify them as necessary.
|
|
|
3. |
Click the Fill button to perform the global replace on any remaining undefined bytes (or click Don't Fill if you have manually edited all of the occurrences that you want to change at this time) and the wizard continues with page 5. If you click Cancel, you will be returned to page 4. | |
|
— or — |
||
|
|
|
|