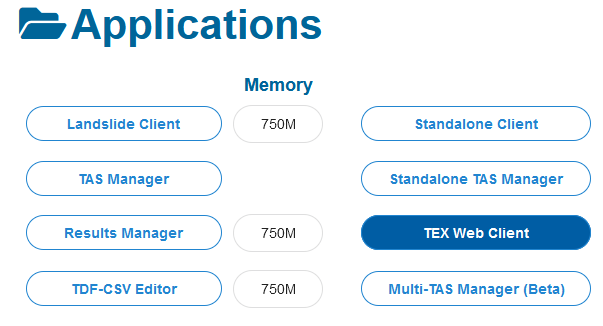
TEX Web Client
TEX (Test Execution) Web Client
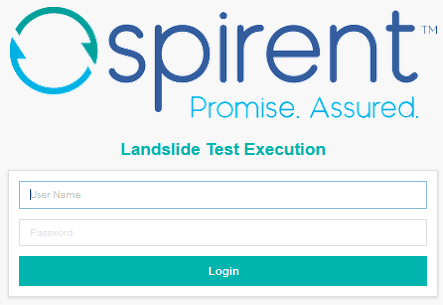
To Login and use TEX follow the steps in this section :
The Web Client functions:
-
Serial Test Runner (STR), Running Serial Test Runners
-
Browse, Upload and Download Test Data Files (TDF)
Login TEX Using:
From the Landslide Client The Home Page... select :
You can also execute this URL: TASIP/tex/ (HTTP and HTTPS are both supported)
|
NOTE:
|

After a successful login, the TEX menu bar page is displayed.

The TEX menu bar includes links for Test Session, Scheduler, Serial Test Runner (STR) and TDFs.
Select :
- Test Session
- STR - TEX provides full access to the Serial Test Runner (STRs)
- DU Nodal Test - Adding details in DU Nodal Testing
- View Test Servers
- Scheduler - TEX provides full access to the Test Scheduler
- Browse, Upload and Download Test Data Files (TDF)
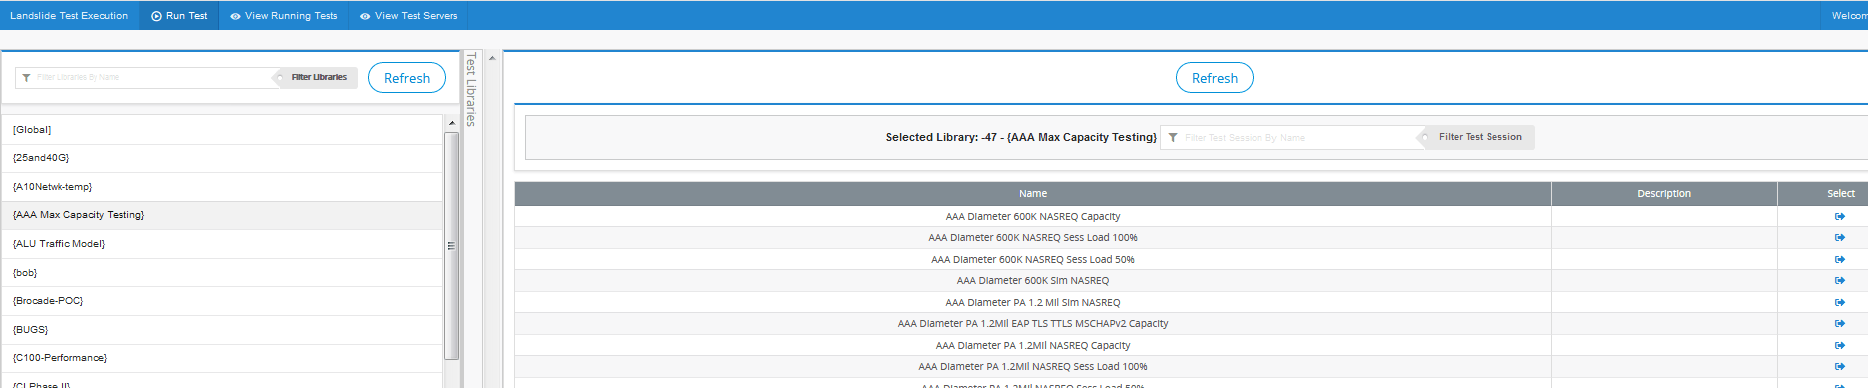
TEST Session
Click on Test Session - Select Test Session or Running Test Sessions.
"Run Test" test selection page. Select a library, filtering by name to find it, then select a test session:
You may see the informational message " Just one second, we are fetching the content for you" to let you know that the system is working on getting the information that you requested.
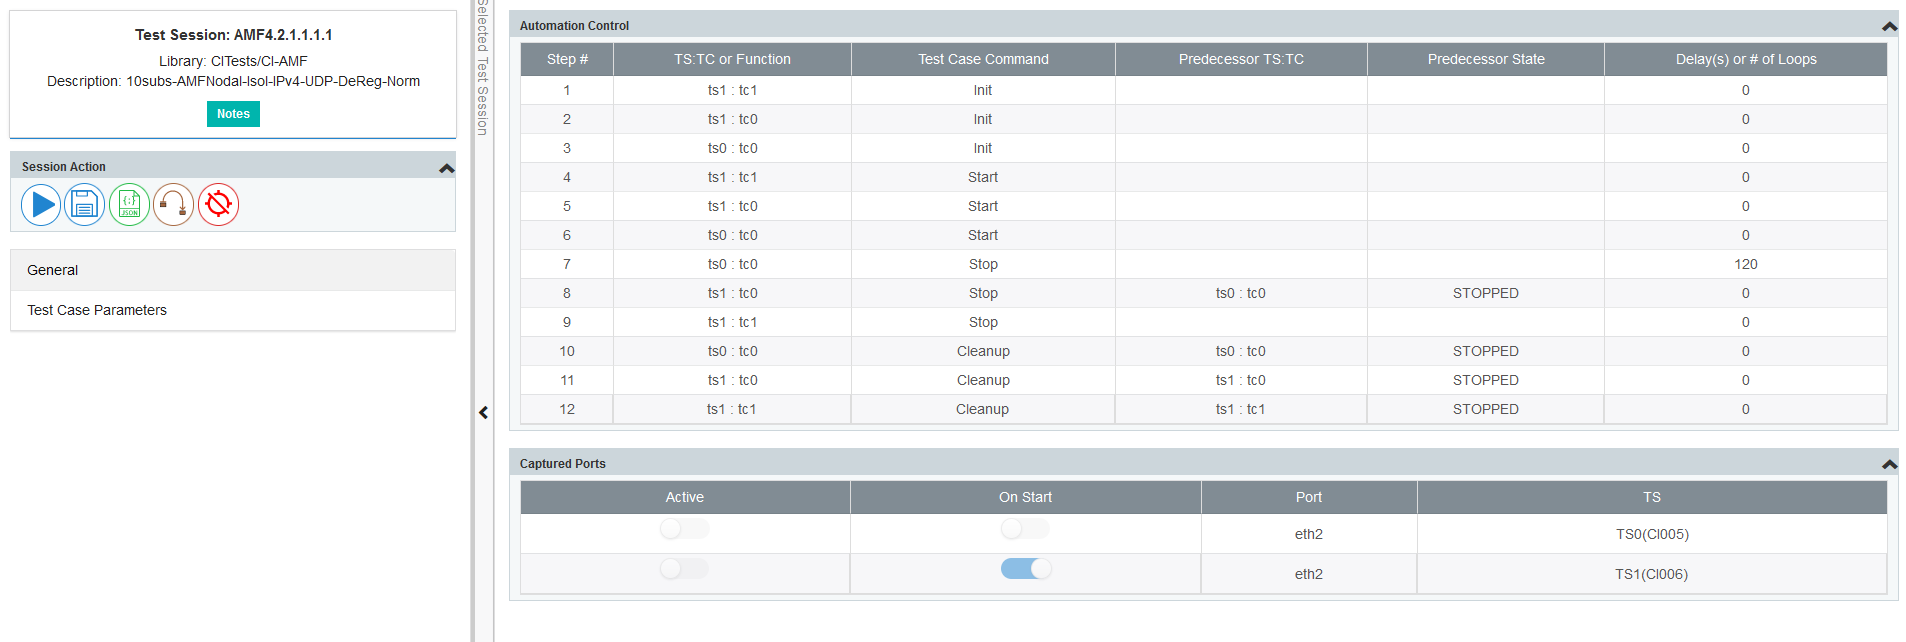
From the Run Test page with a selected test, you can start the test, save off JSON for RESTful API, or select a different test. There are several panels to view.
For additional information about JSON: https://www.json.org/json-en.html
The General tab will show you read-only views of any Automation Steps you have and Port Capture:
Click on Notes for a Pop-Up window where up to 10K character size can be input and saved successfully.
Select Session Action :
-
Select
 to start a Test Session
 -
Select
 to Save As a Test Session - Select to override parameters and then save the test session. When you open a test session or reconnect to a running test session, click this button to save a copy of the test session. The Save as dialog contains 3 parts, on the left side, library selection allows you to select a library to get the list of test sessions which will be appear at right side. Click on a test session and the bottom Test Session Name input will be updated to match the selected test session :
 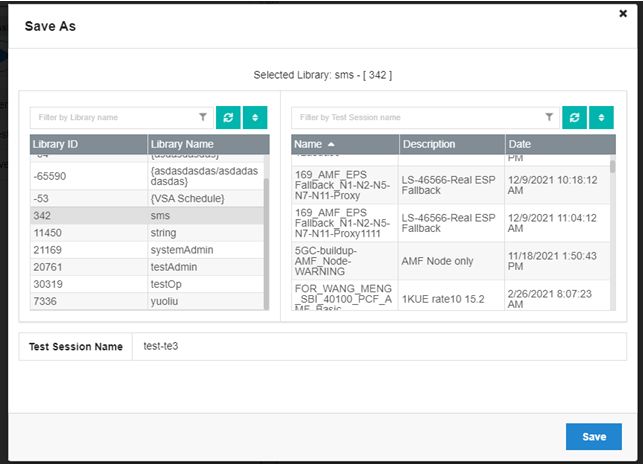 Click save and if the test session name matches any names from the selected library’s test sessions, a Warning dialog will allow you to override the test session. Additionally, TEX will check if there are any unsaved overridden parameters and allow you to edit and save the Test Case parameters without clicking the Save Change Button. If there are no overridden parameters , the original test cases parameters will be applied to the "save/start" operation. The Test Case Parameters will indicate "Overriden" when parameters have been overrriden and "Original" when they have not. If the "Overriden" parameters generate a warning or an error, they will be discarted and reverted back to the "Original" parameters.
 -
Select
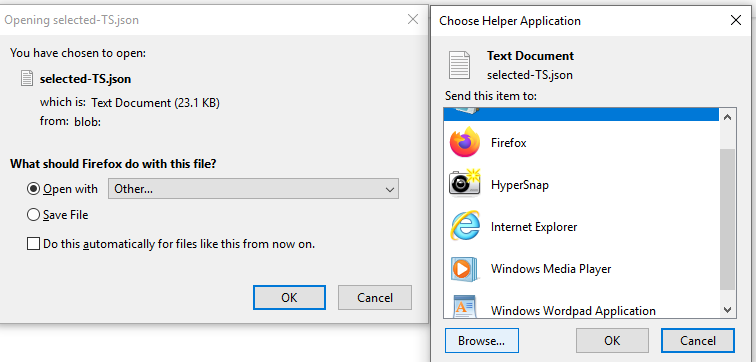
 and a pop-up will allow you to download the test session JSON, for use with RESTful API : The Save Test Session JSON button for selected Test Session will only be visible when the user's Privilege Level is higher than Test Administrator. TEX system will generate the download browser event for user to down the current selected test session's JSON Object. You can also do this directly from the Save dialog (In Firefox) or when you click on the saved item in Chrome. You can choose to open it in a browser or any other JSON editor to see the full data and to be able to search it.
-
Select
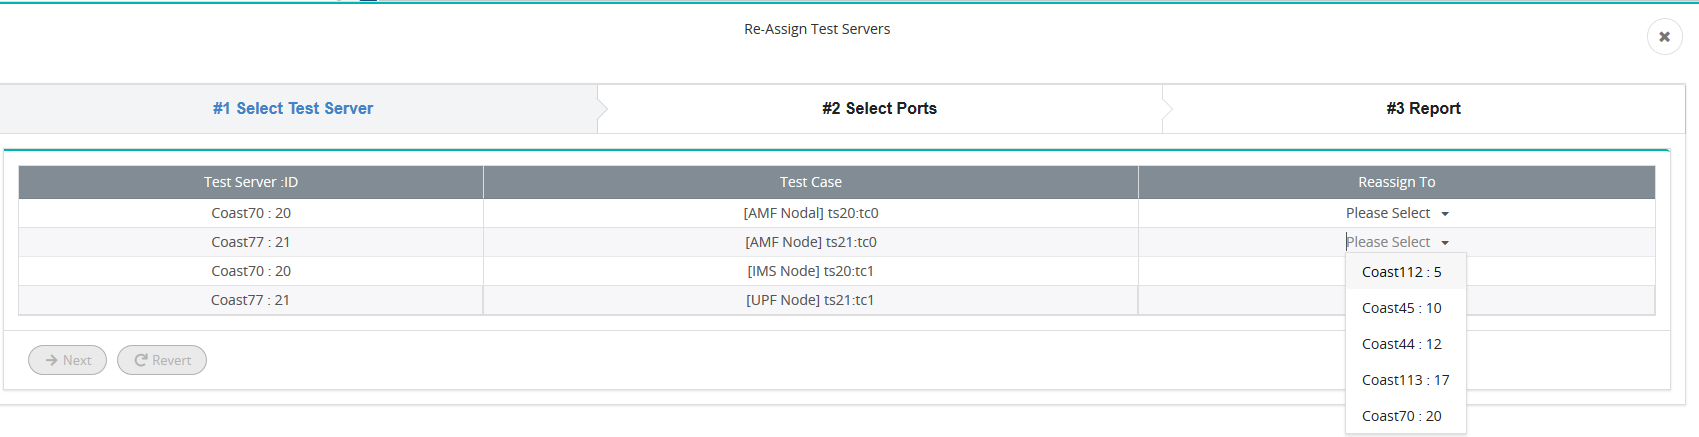
 to Reassign Test Servers. The Re-Assign Pane becomes available. #1 Select Test Server and it automatically selects the same Test Server for all Test Cases on same Test Server. #2, Next page to Select Ports, but must me done individually by TestNode. Select the new ports. The Confirmation pane will indicate change to be made. Select Finish to apply reassignment. See topic Re-Assign Test Cases to Test Servers on Landslide Client.

-
Select
 to select a different test. You are brought to the "Run Test" test selection page.
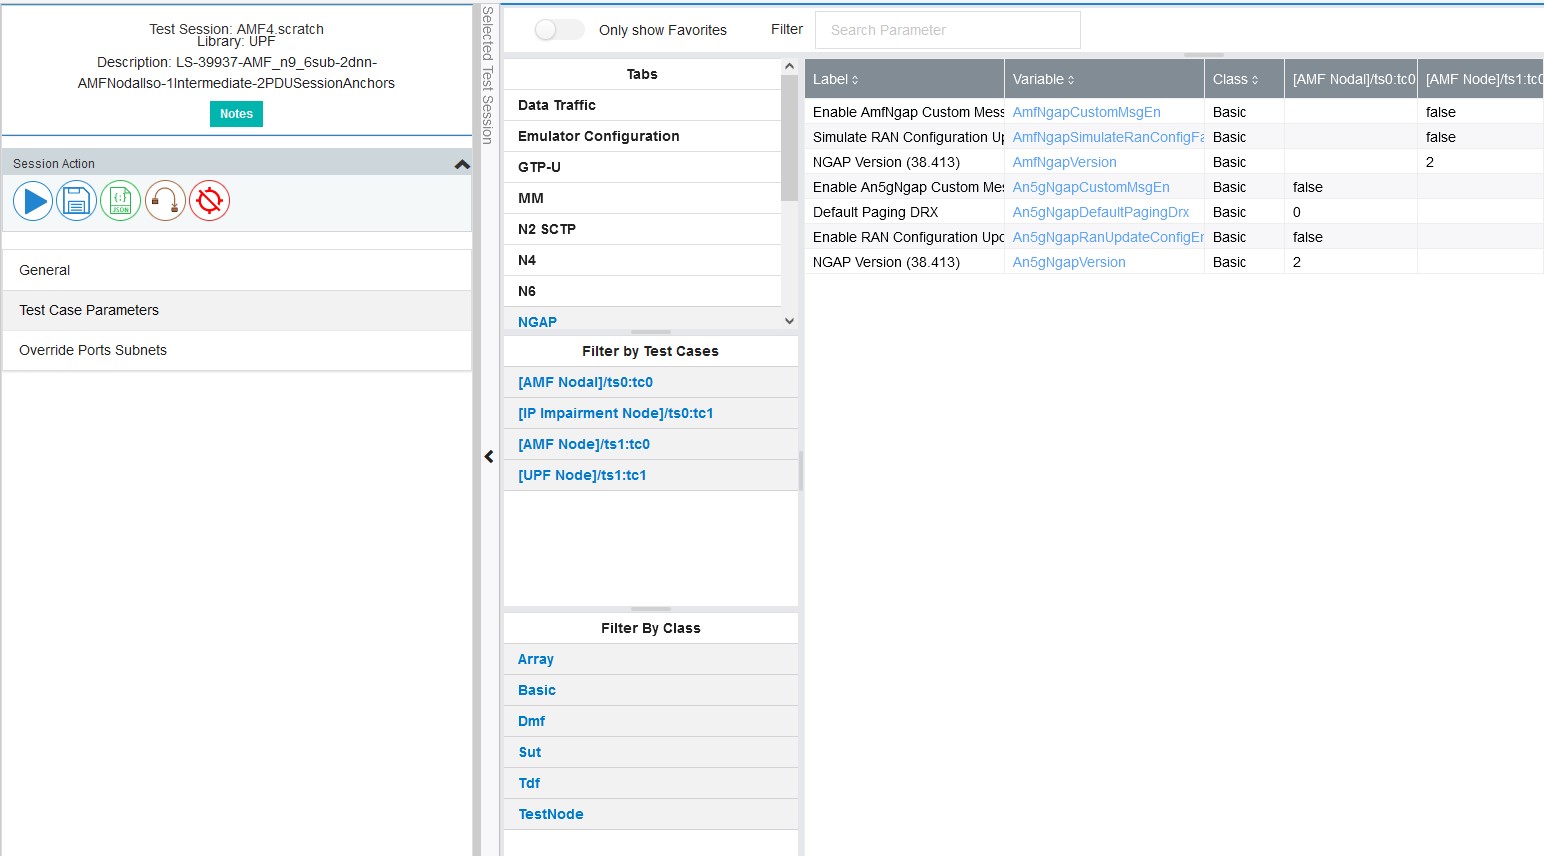
The Test Case Parameters will show you the Favorite Parameters configured for the test and allow you to override them:
To override, just edit the value (s) you want to change and click save changes. Once you click Start, the Favorite (measurements), Pass/Fail Criteria, and Charts will display. Using TEX , you can query / view much of the live information of a test, including the current value of any/all measurements.
TeX has user-readable Label for variables, the hyperlink on the Variable column items in the Test Case parameters table is available. Using the Tabs panel, users can click on different tabs to select classified variables.
Filter By Test Case Panel - users can adjust the Test Case column of the Table through this Panel.
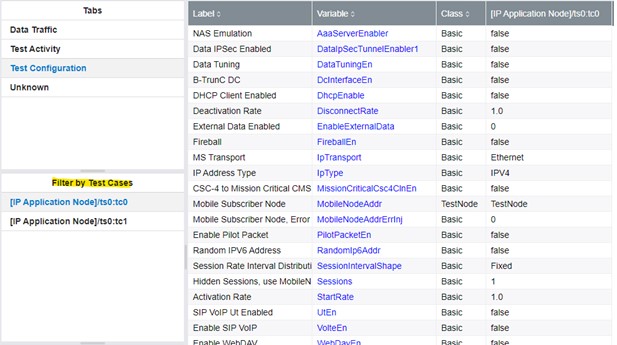
Filter By Class Panel - users can use this Panel to display only the Parameter Class types that the user is interested in. For example : Dmf
When the user clicks on the column corresponding to Test Case as the table name in the Test Case Parameter Table, the variable corresponding to the current row can be modified. The Data Profile (re:DMF Class Parameter) Editor in Tex has been enhanced to allow users to select different mainflow DMFs and update the Assignments.
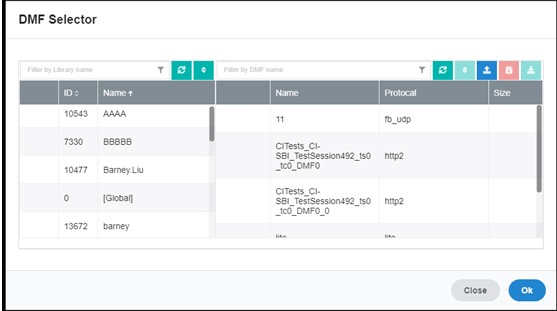
DISCLAIMER/WARNING: When it comes to editing the Data Profile from TeX, this should be kept to simple changes. If you are using Advanced Data or Lite DMFs and choose different DMFs with different numbers of Subflows, TeX will NOT handle it well. Also we still do not allow adding/removing mainflows, only changing them. For Basic Data and Native type DMFs, this should would work well, since they do not have subflows.
Use Filter User, Filter State to see just your own "My Tests" vs "All User" and/or see "RUNNING" vs "COMPLETE" vs "ALL" tests.
Select a test to see additional information on the right side and to have the ability to Delete completed tests you own and Reconnect to any test.
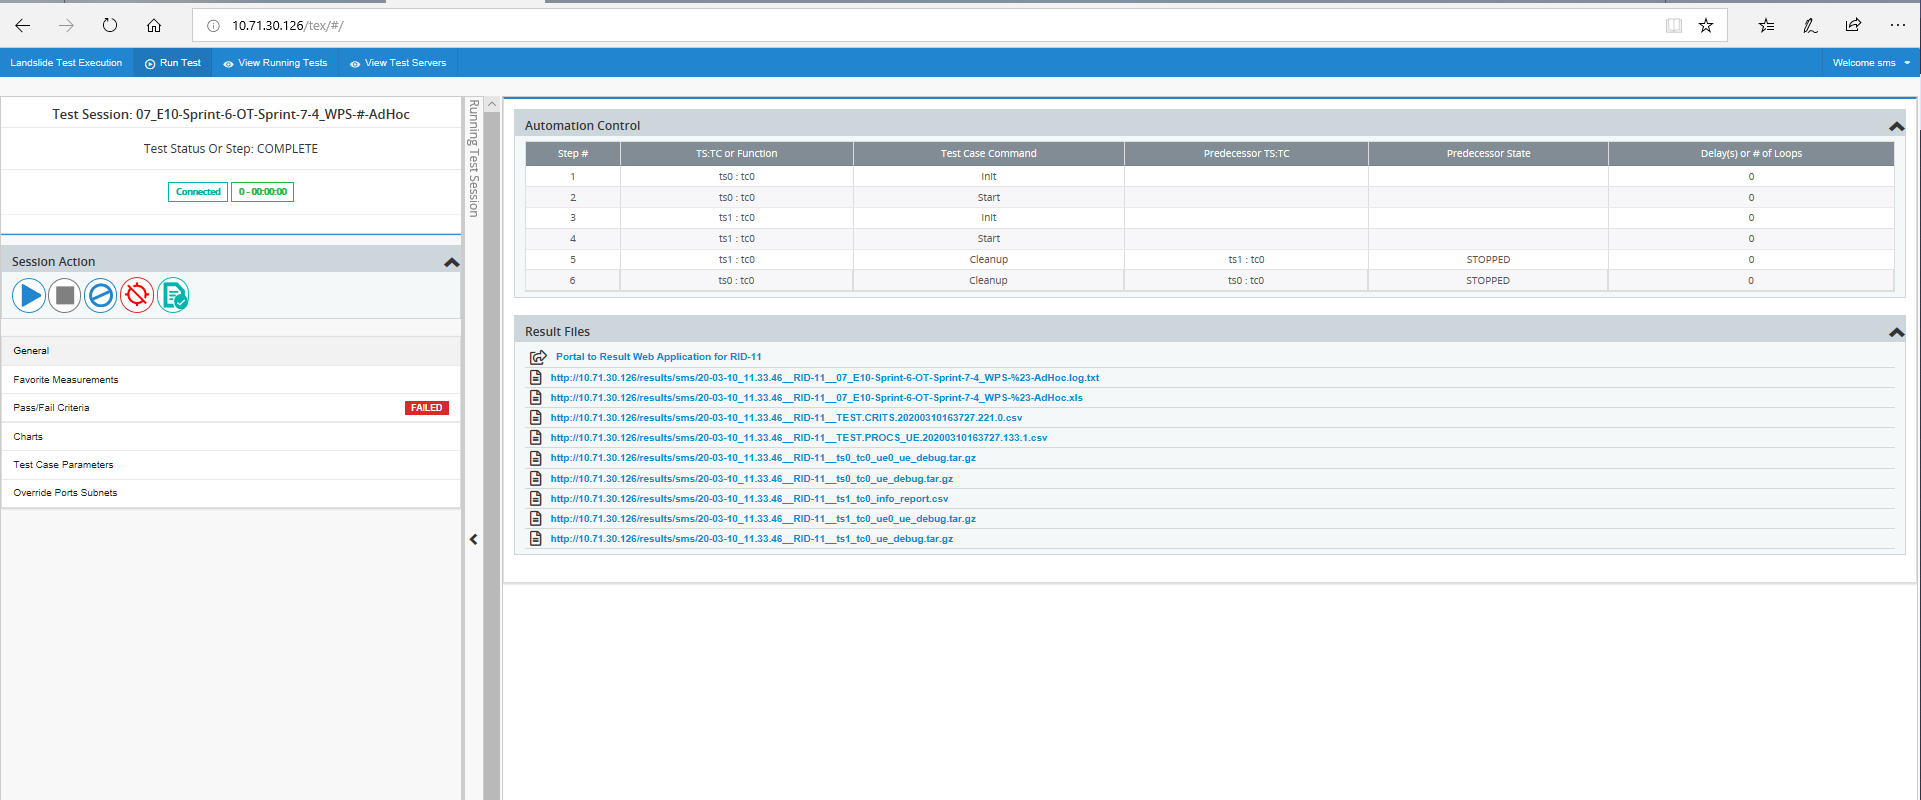
The Run Test App relies on Test Session Favorites to populate the screen with information. When you run/monitor a test from the TEX Client, there are up to 6 sections. There is always a section for displaying Overall Test State or Step, Overall Pass/Fail Criteria State, command buttons (Start/Stop/Continue/Abort/Delete), and Test Result File Links. If Favorite Measurements are defined, there is a Favorites Report table section. If any Charts/Graphs are defined, up to 5 sections are displayed, one for each of them. For starting a test, if you defined Favorite Parameters from the Cross-Reference, supported parameters can be overridden before you start the test.
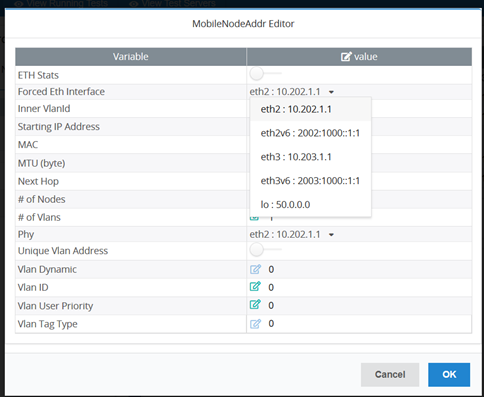
Any time a TestNode or SUT type parameter is available to override (Favorites), the list of valid choices will be provided. Click on View/Edit. The appropriate Editor Pane will become available to perform the edits.
Select "Show All Parameters" - it provides the ability to allow overriding of ALL parameters by choice. When parameters have been changed, use the ' Save As' button to override parameters and then save the test session

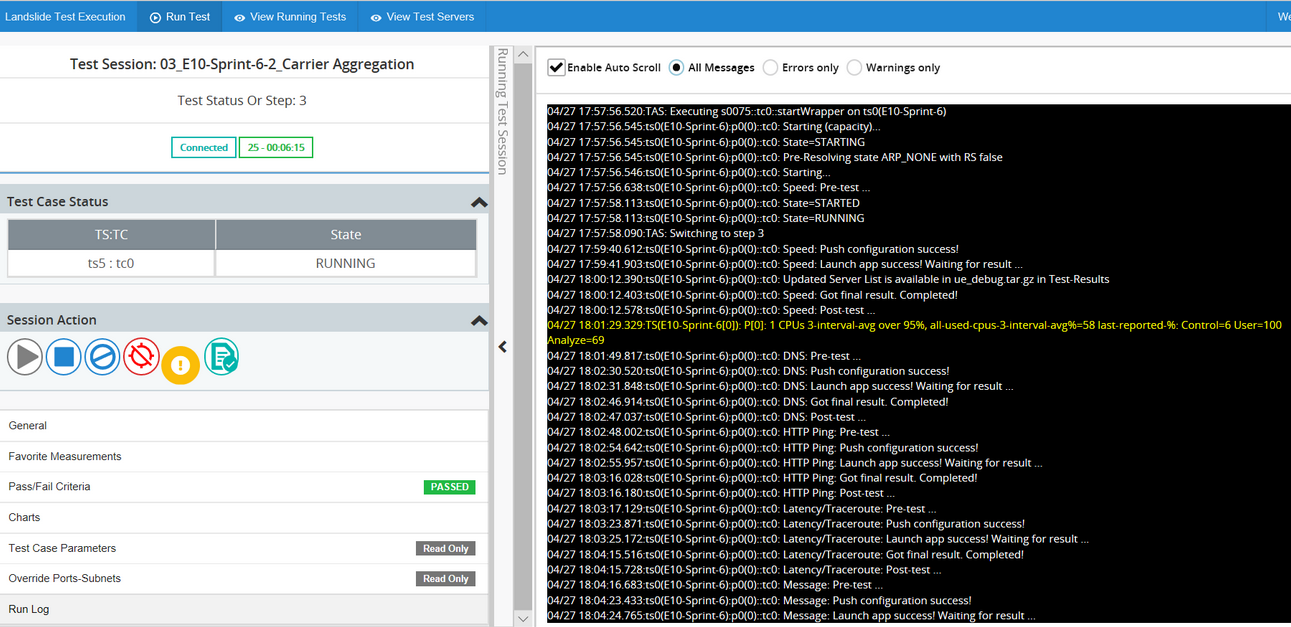
Run Log
The Run Log was added to the Run Test Pane. The run log messages are messages that the TAS, Test Server and Test case are reporting about the running tests such as Test Server Initialization, Test case State changes, Test activities, PCAP captures starting/stopping, file transfers, reports generating, Pass/Fail Criteria update messages, etc.
Message Structure
Log messages are color-coded to indicate whether the message contains informational (white), warning, (orange,yellow) or error (red) data. The messages follow a common format:
| Time stamp | month, day, hour, minute, second, millisecond, converted to the test system's local time zone |
| The message source | TS<test server index (test server name)>:P<test server process index (test process index>: TC<test case index within the test server>; TAS: |
| Message text | Begin Test Case, State=INITIALIZING, State=INITIALIZED, STARTED, DNS: Pre-test, HTTP Ping: Push configuration success!, Checking for files on ts0, etc. |
Warnings messages are things that generally something worthy of closer attention. Errors are usually an indication that something should be corrected.
- Select Enable Auto Scroll to automatically scroll the run log messages or disable if you are trying to view earlier parts of the log
- Select Errors only to display only the Error messages that are found in the Run Log. Text is usually Red in color and may also indicate 'error' in the text but not necessarily.
- Select Warnings only to display only the Warning messages that are found in the Run Log. Text is usually Orange / Yellow in color and may also indicate 'warning' in the text but not necessarily.
|
NOTE: If you the start the test from TEX you will be unable to connect to the test from the Landslide Client, nor will you be able to view the live Run Log in other TEX Clients. You can reconnect to the test in other TEX clients, but it will be in the less connected way without the Run Log. Also, if you wanted to view the test in both Landslide Client and TEX, you can either: 1) Start the test from Landslide Client, and then you can connect to it from TEX (without Run Log support). 2) Start the test from TEX, disconnect from it, reconnect to the test from Landslide Client, and then reconnect to it from TEX again. |
|
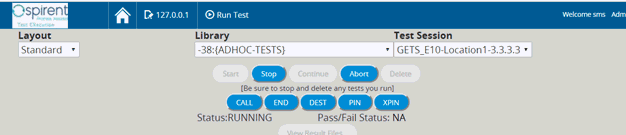
NOTE: Web based GUI for WPS and GETS scenarios in the UE Node test case are now supported. See the Voice Pane for test case parameters. Select CALL (place a call), END (end a call), DEST (enter destination phone number), PIN (enter a Pin), XPIN (enter the incorrect pin that is sent during GETS call) parameters for UE Node Voice WPS/GETS testing.
|
To Override Ports Subnets go to that pane:

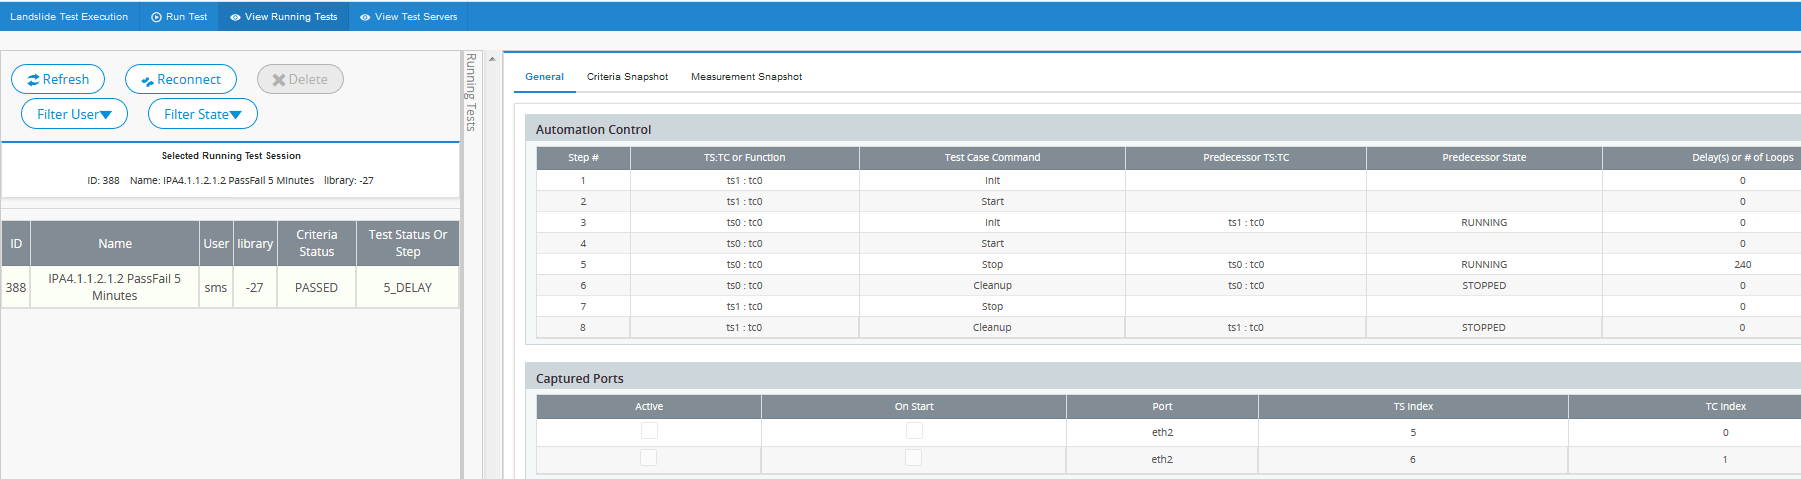
View Running Tests:
To view the details of a running test, go to the View Running Tests Pane and from the list, select the running test to view the General, Criteria Snapshot and Measurement Snapshot details. You can filter by User and running State. Buttons are available to Refresh your screen, Reconnect to a test and Delete a test.
View/Update Test Servers:
To view and update the details of a Test Server, go to the View Test Servers Pane and from the list, select the Test Server to view / update.

|
NOTE: A Refresh button has been added to several screens to refresh the data. |
Serial Test Runner (STR)
Additional details in Serial Test Runner (STRs).
When STRis selected, the following will appear:
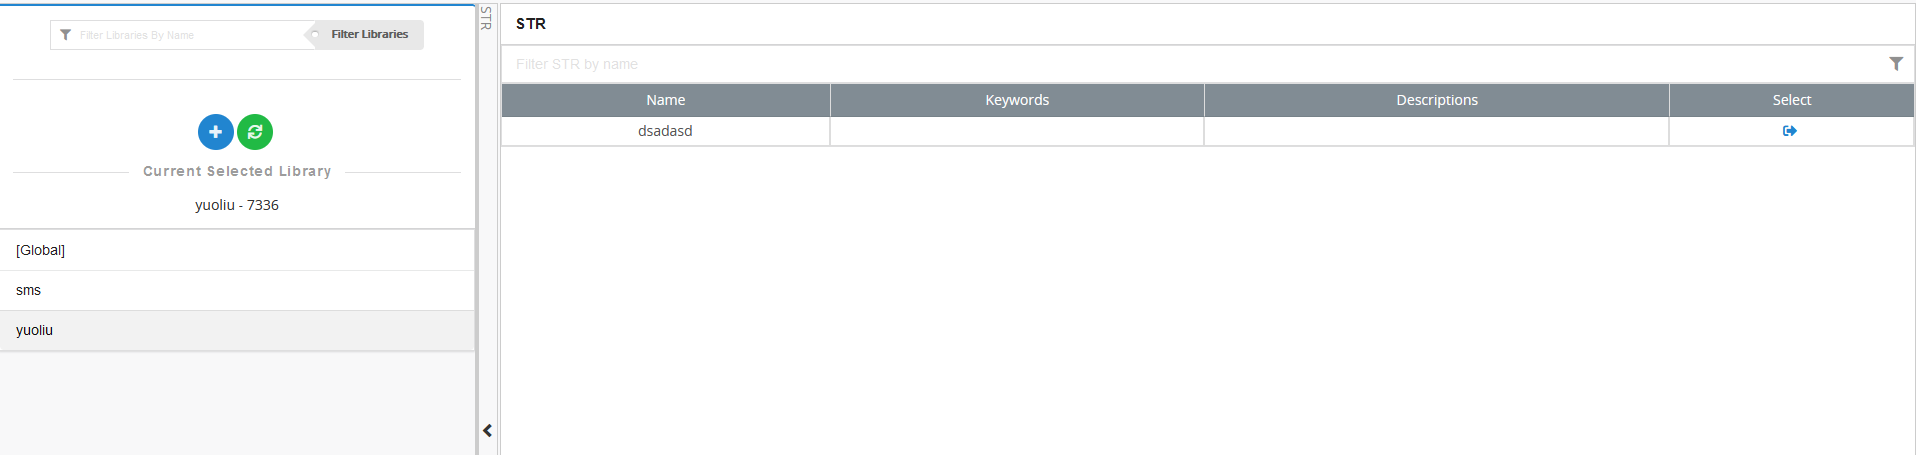
Select the library from the left panel. When a library is selected, the add STR button will be enabled. The right panel will display this :

All the STRs within that particular library will be displayed. Select an STR or click add STR button to add / Edit the STR :
If you edit STR, the following button will appear to allow you to start STR / Save STR / Delete STR / Go back to selection:

When add STR is selected, the following buttons will appear :

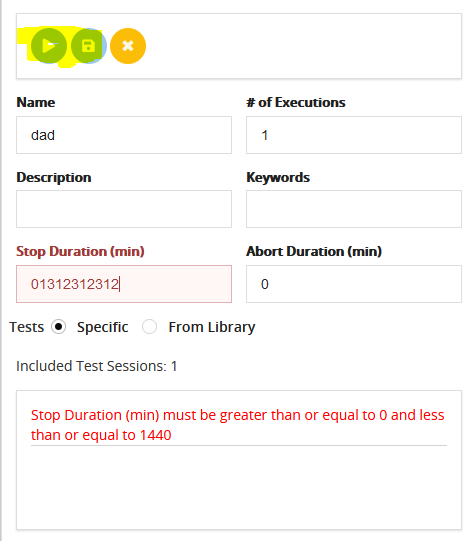
After the button group, make a customized configuration to a STR by edit the STR property via :
When a configuration is incorrect, an Error list will appear to indicate the error and the start/save button will be disabled:
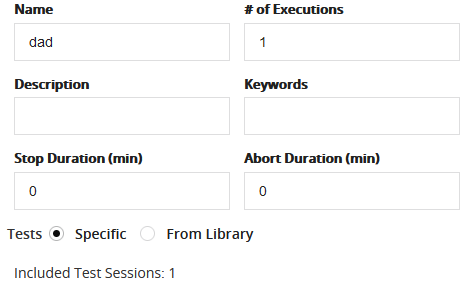
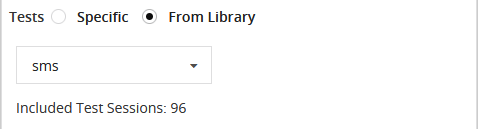
Select the STR test Session Mode : Specific or From Library
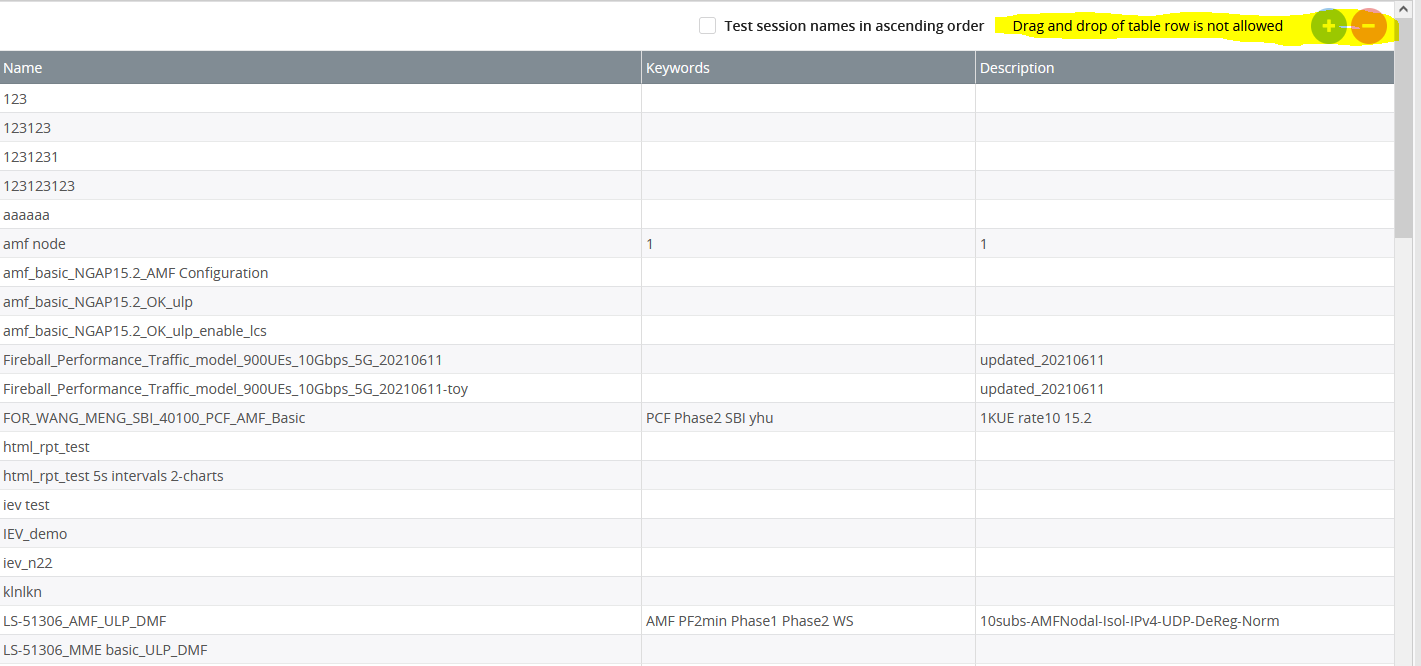
If Specific mode is selected, add / remove Test Session :

Drag and drop the table row to reorder the test session within the STR :

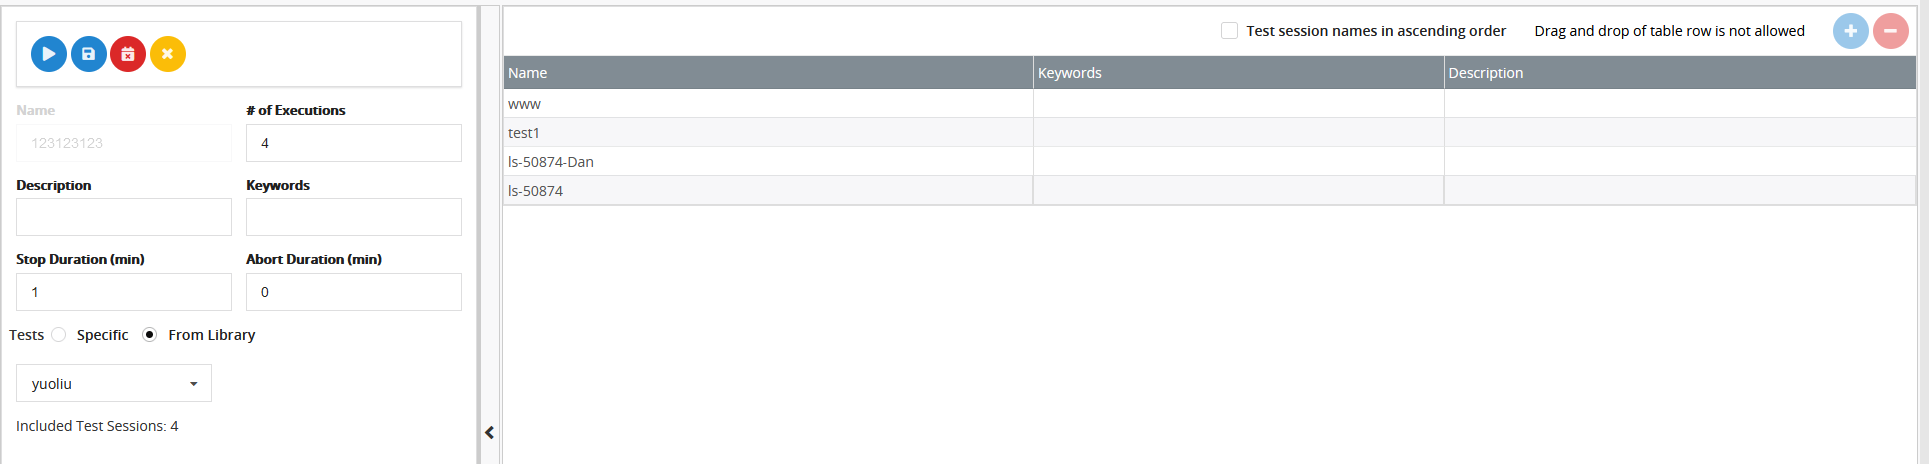
If From Library Mode is Selected, select a Library from library drop down.
Add / remove button will be disabled, as well as the drag and drop functionality, however you can reorder the test sessions by check the Test Sessions names in ascending order checkbox to sort the test session by name :
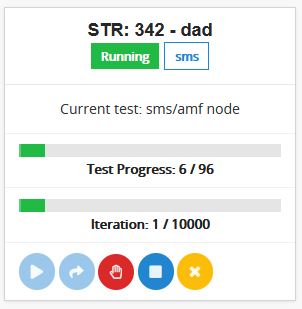
Click the start button for TEX to navigate to the Running STR page :
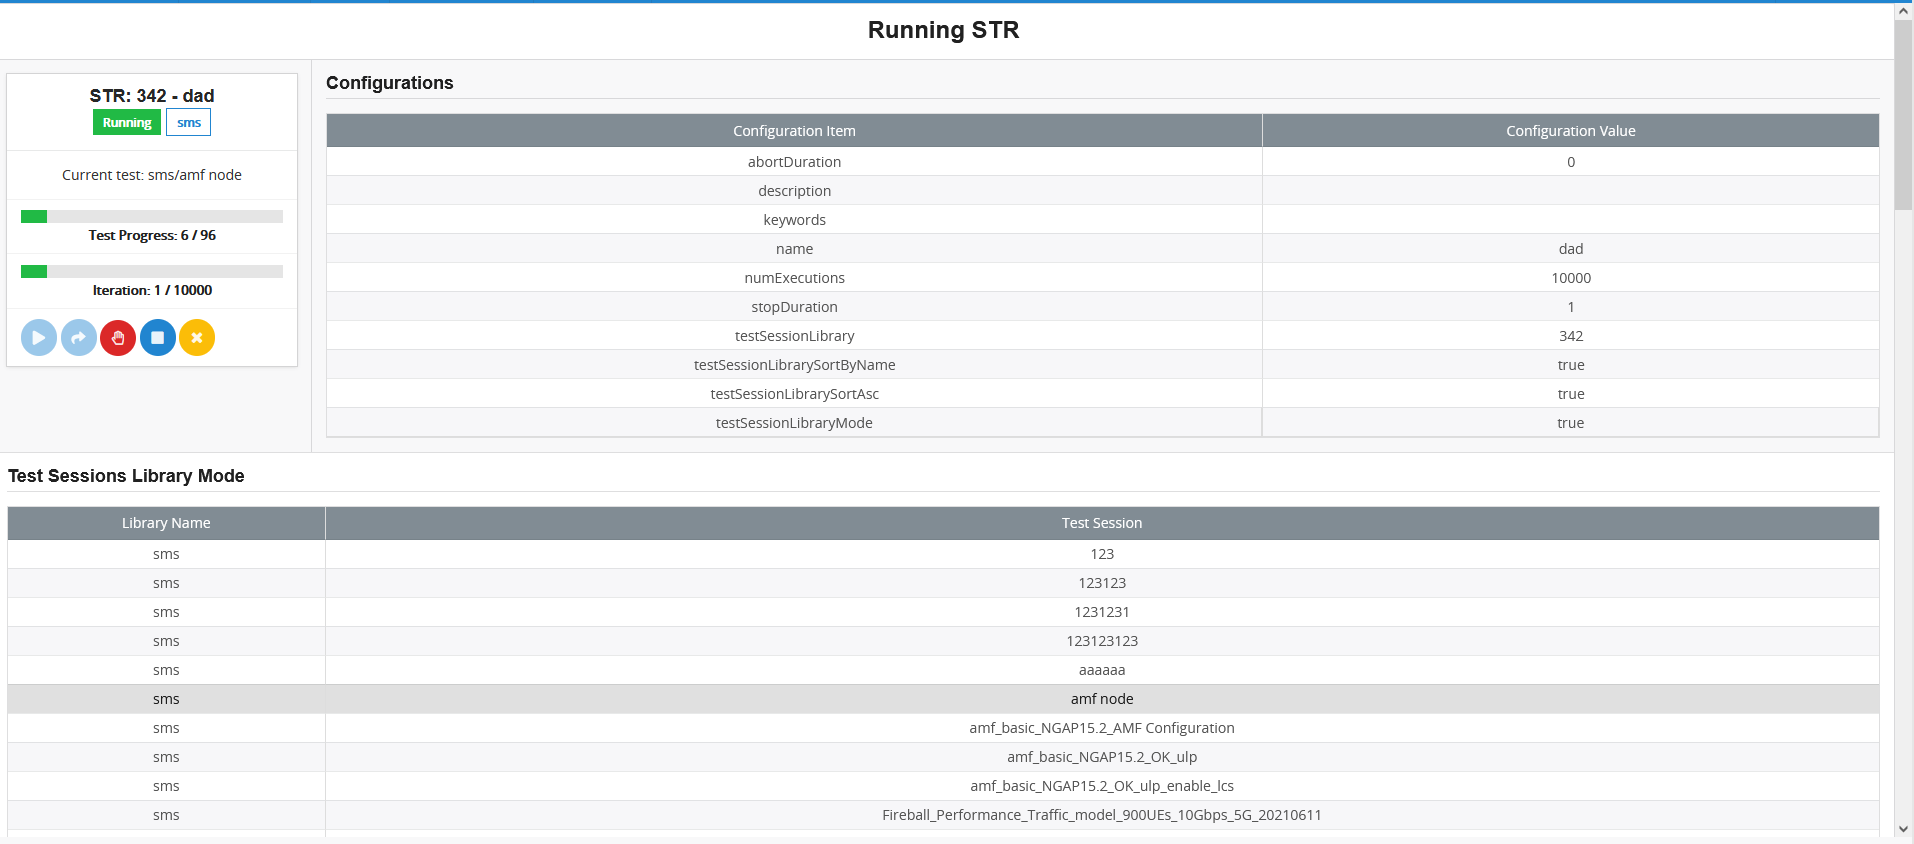
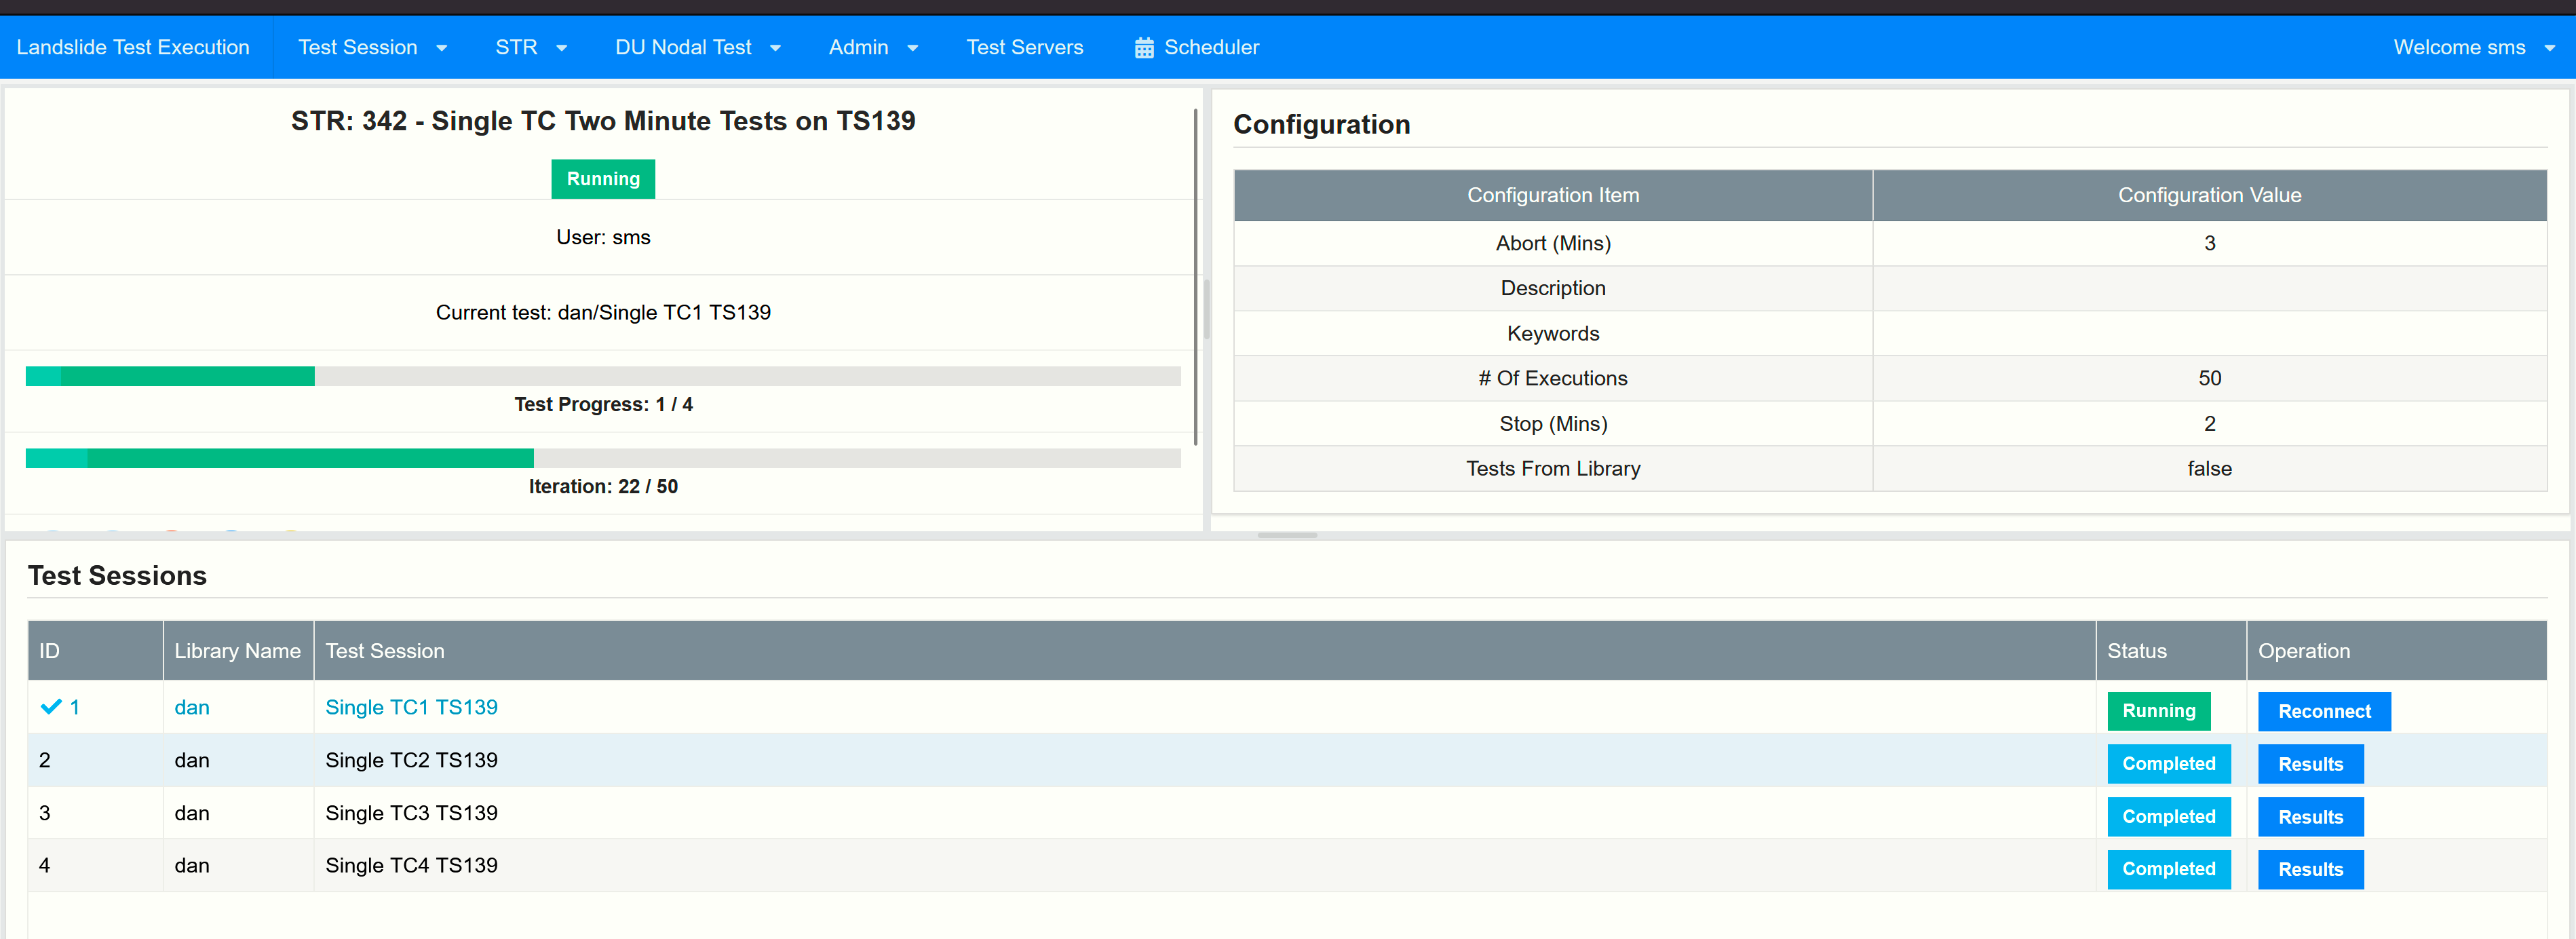
Running STR page contains :
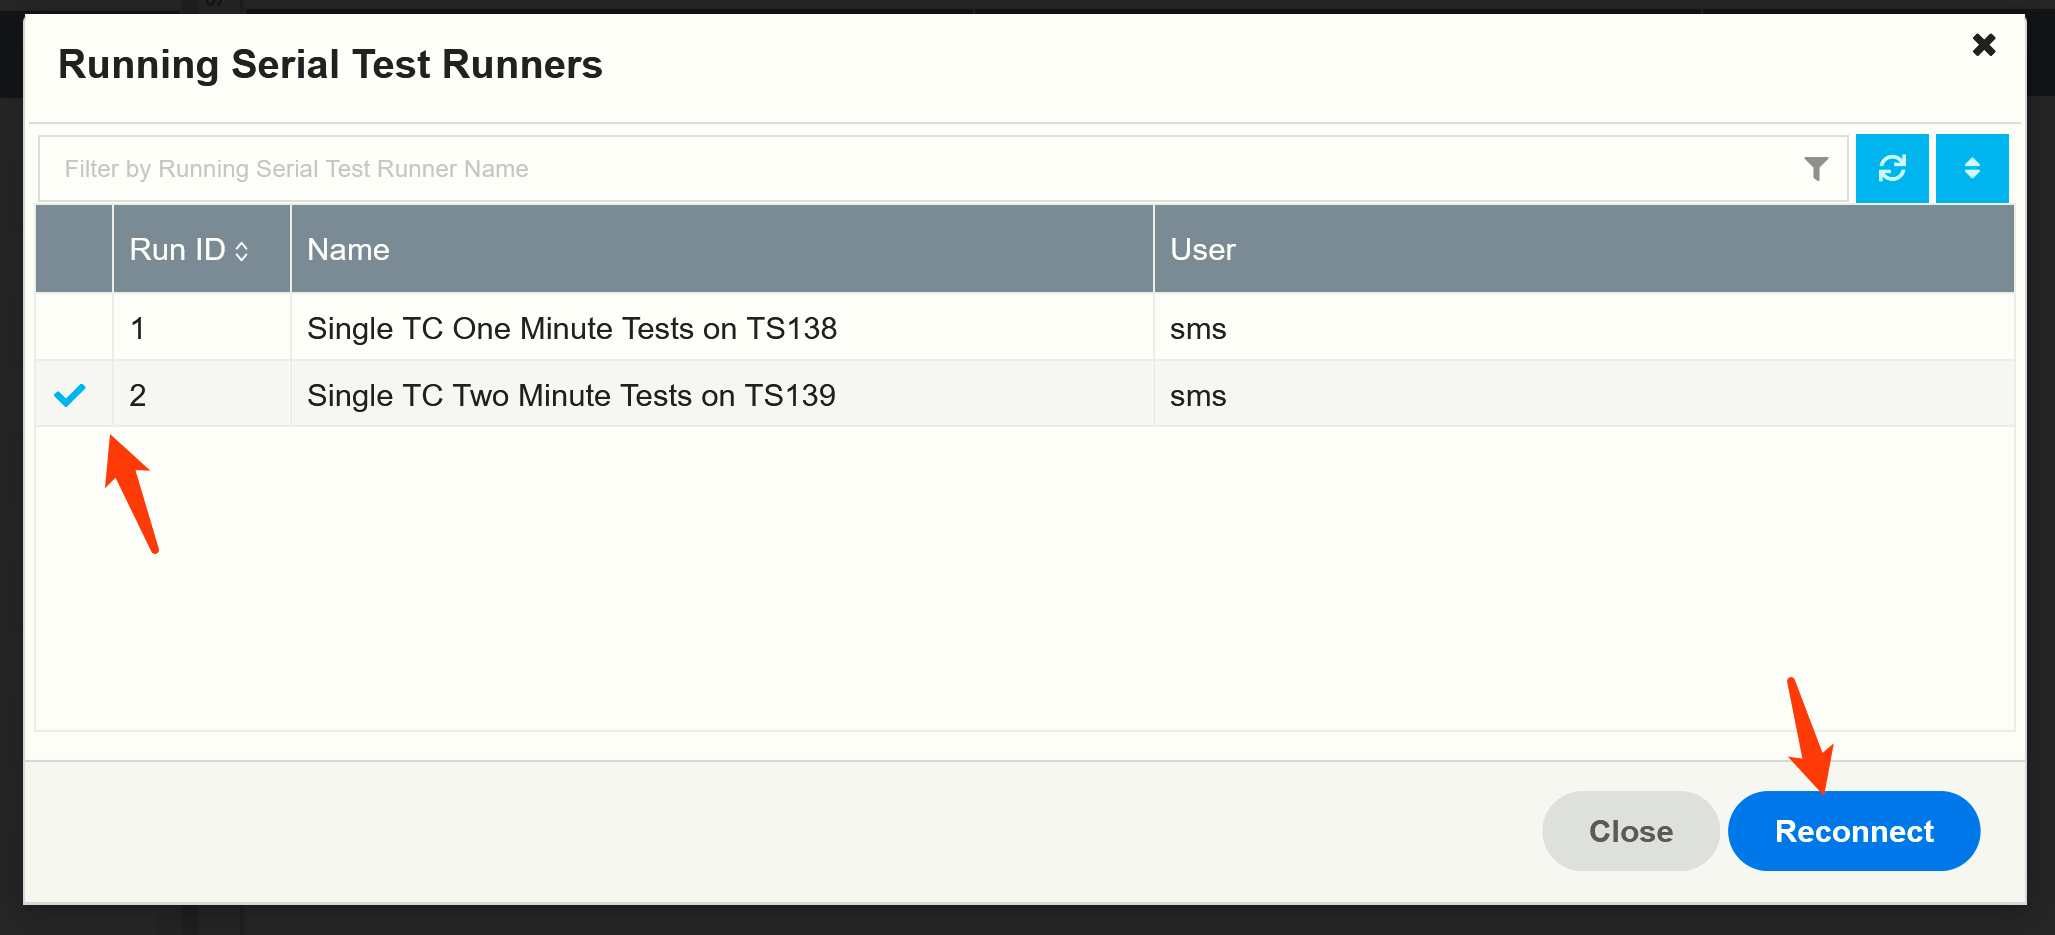
1. Status Card, to monitor the current STR status, progress, Iteration. In addition, abort / stop or un-select the Connected STR:
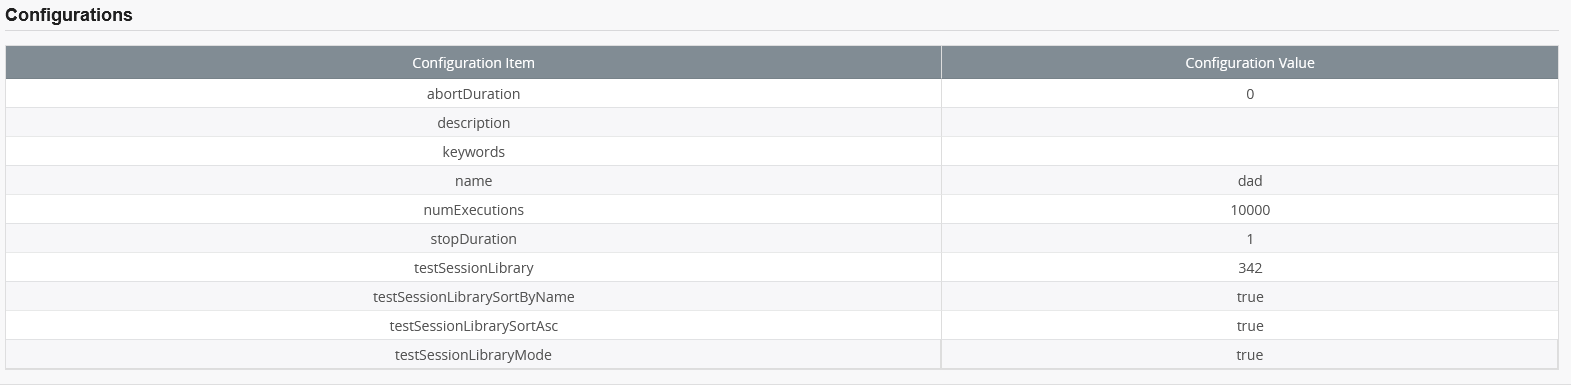
2. Configuration Panel, to display the configuration details of current STR :
3. Test Sessions within the STR, the current running test session is highlighted :

Click the close button or click Running STRs Route button without connect STR for TEX to navigate to the Running STRs page:

Note: A user can only connect their own STRs, unless the User is SMS.

Running Serial Test Runners - select to see the status of the running Test Sessions from the STR in TeX.
Status Values:
- Not Start – Test failed to start, TeX received the indicates rid as -1, If the TeX received an error message from the TAS, the error message will be put as a tooltip of the Not Start Label
- Starting - Test is currently starting, and TeX is waiting for the run id.
- Waiting – Test hasn’t run even once yet.
- Running – Test is currently runnning (Reconnect should be available and possibly Results if initial results provided)
- Completed – Test ran and completed at least once. Results should be available
- Error – Test encountered an error and failed to continue. If the TeX received the error message from the TAS, the error message will be put as a tooltip of the Error Label
From REST API, "runningStrs" includes additional information:
As the STR runs, each Test Session’s “results” and “rid” will change as it progresses. The negative RID returned in the Rest API indicates the error state of the test:
- -3 = Pausing 1 minute due to previous loop issues, results contain a message
- -2 = Failed to start, results contain error message
- -1 = Failed to load/validate STR information, Results contain error message
- 0 = Starting
- >0 a valid RID of the running test
Life Cycle updates for the Running STR auto remove: The life cycle of the completed/errored running STR has been updated. A completed running STR will stay in the TAS memory bit longer (60 seconds) in the running STR is controlled by Rest API or if there are too many completed STR(number of completed STR > 10), the oldest running STR will be deleted from TAS memory.
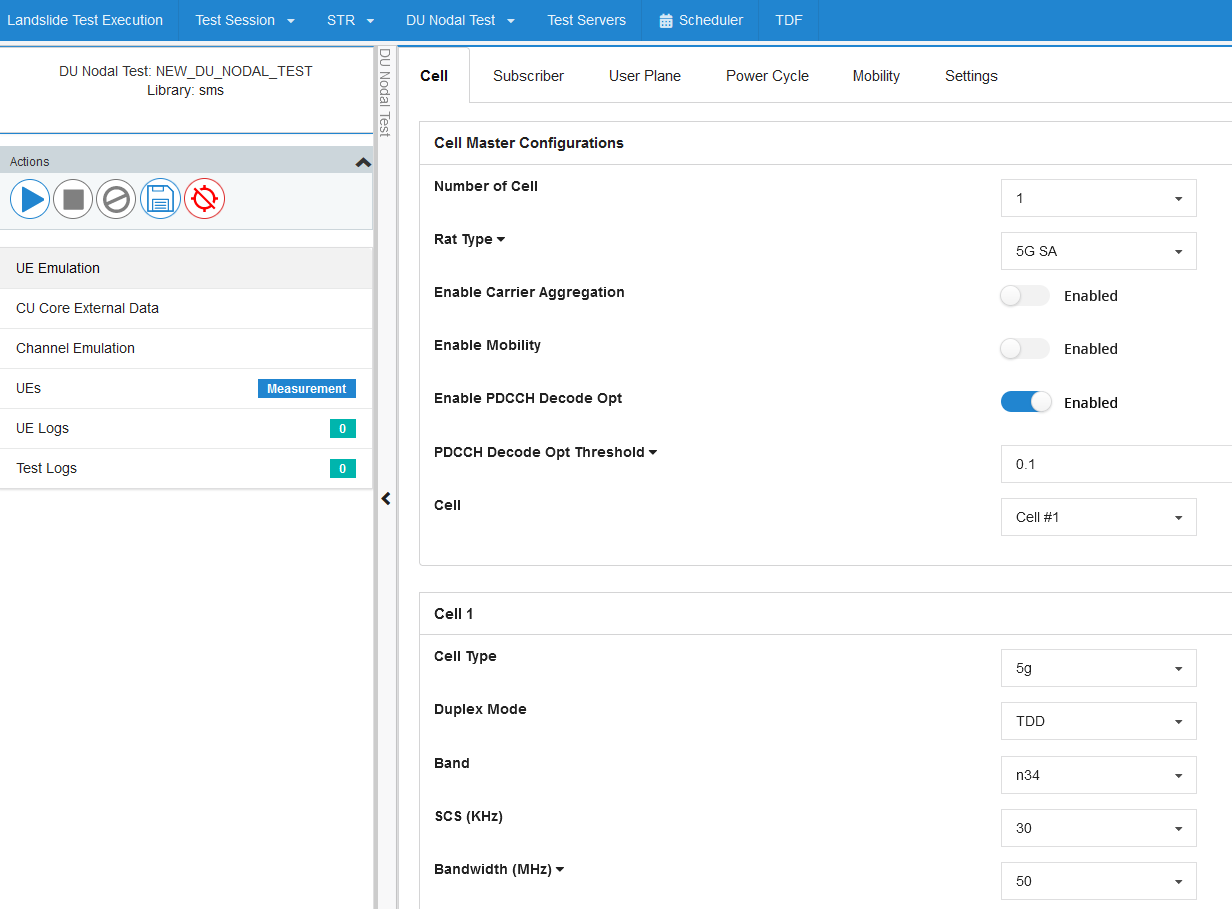
DU Nodal Test
Select DU Nodal Test - Add, Execute a DU Nodal Test.
Click on the Library listed on the left hand side to get a list of DU Nodal tests that are defined in that library. Enter a name of a library to serach for DU Nodal tests in that library :
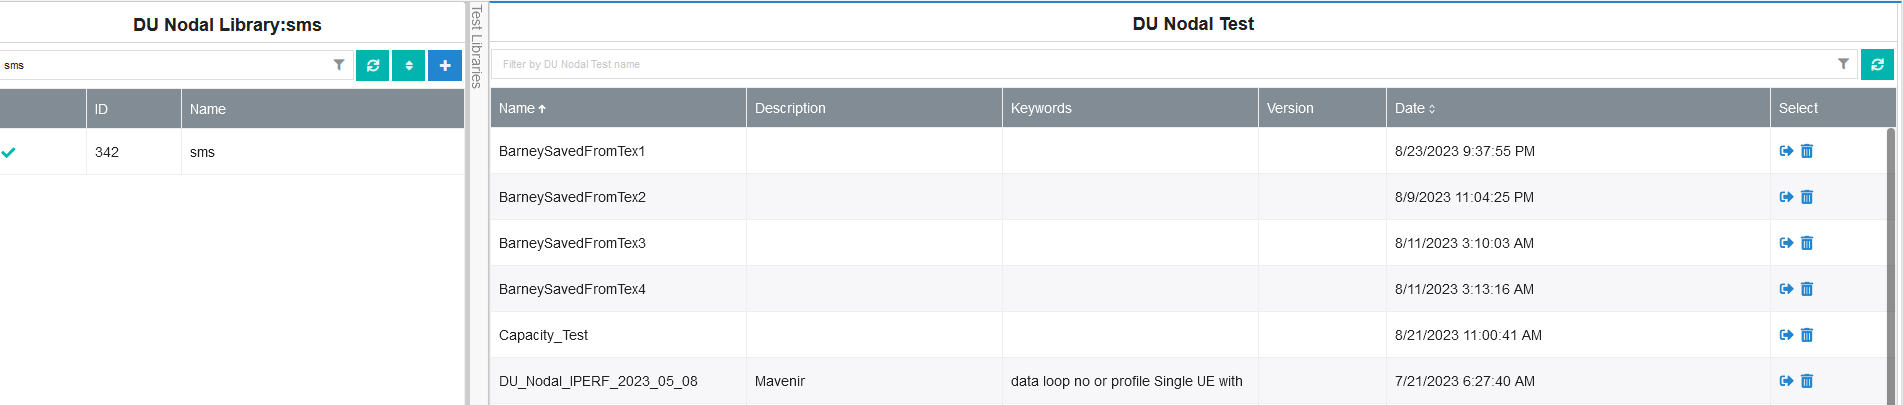
Use the Refresh, Scroll to Select and Add new DU Nodal Test in Library (xx) buttons to perform supported functions.
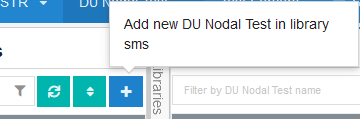
Click the "Add new DU Nodal Test in Library" to add a new DU Nodal test case.
Enter the parameter details in the Cell, Subscriber, User Plane, Power Cycle, Mobility and Settings panes for a UE Emulation test.
Enter the parameter details in the Core/CU Test, External Data Test for a CU Core External Data test.
Enter the Channel Emulation parameter details in the Channel Emulation.
View the UEs Measurement Pane, UE Logs and the Test Logs.
Additional details in DU Nodal Testing.
- Click on Start button to start the DU Nodal Test
- Click on Stop
 button to stop the DU Nodal Test
 - Click on Abort
 button to Abort the DU Nodal Test
 - Click on Save As button to save the DU Nodal Test
- Click on Select a Different Test button to select a different DU Nodal Test
Select Running DU Nodal Tests - To get a list of running DU Nodal tests. The Run ID:Library ID, Name and Status of the DU Nodal test will be provided in the Running DU Nodal Tests Pane.
Scheduler
Scheduler - Additional details in Test Scheduler.
The view of the scheduler module is made up of three panels.
Select Disable All User's Scheduled Test or Disable My Scheduled Test to disable tests. Additional details listed here.
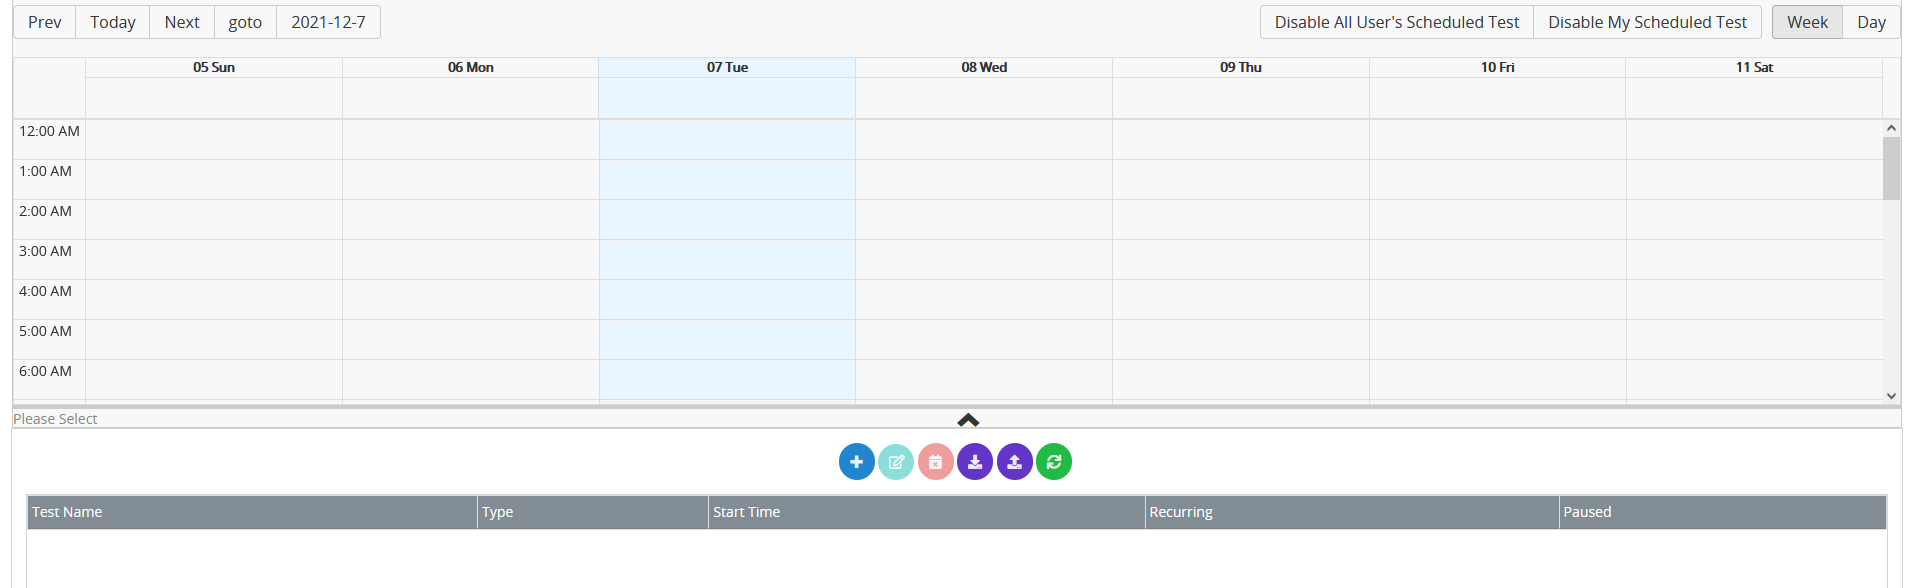
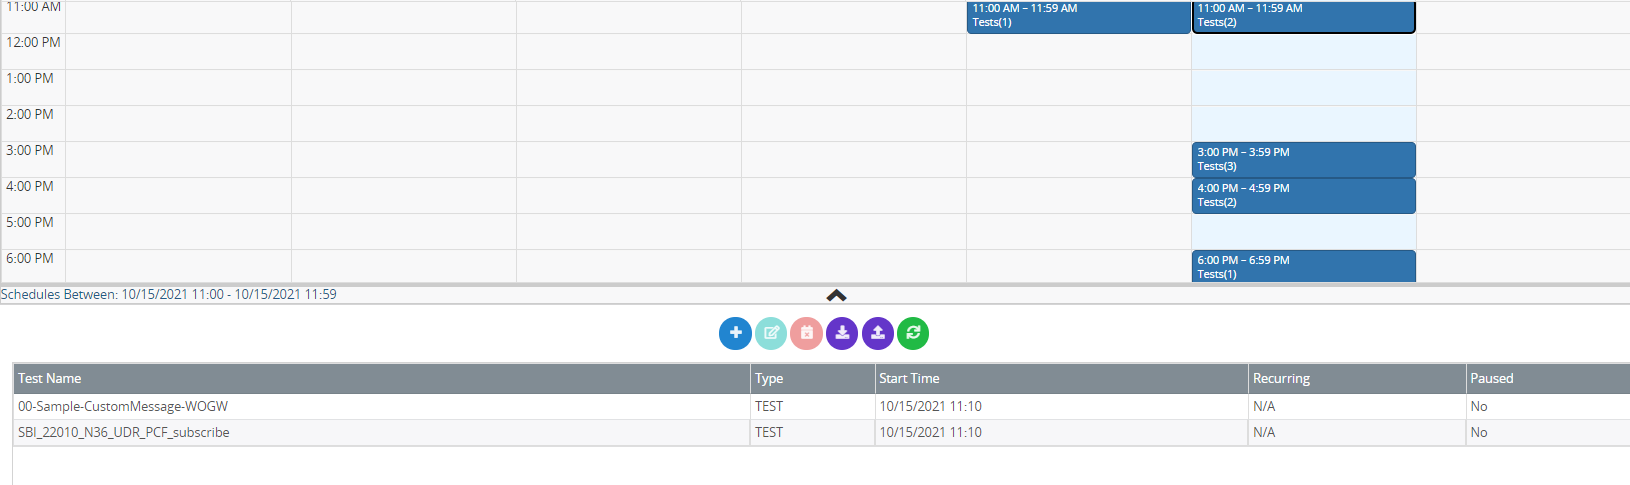
1. TEX Scheduler Time Slot Panel :
TEX Scheduler Time Slot Panel consists of two parts.
a. Header Control Panel :

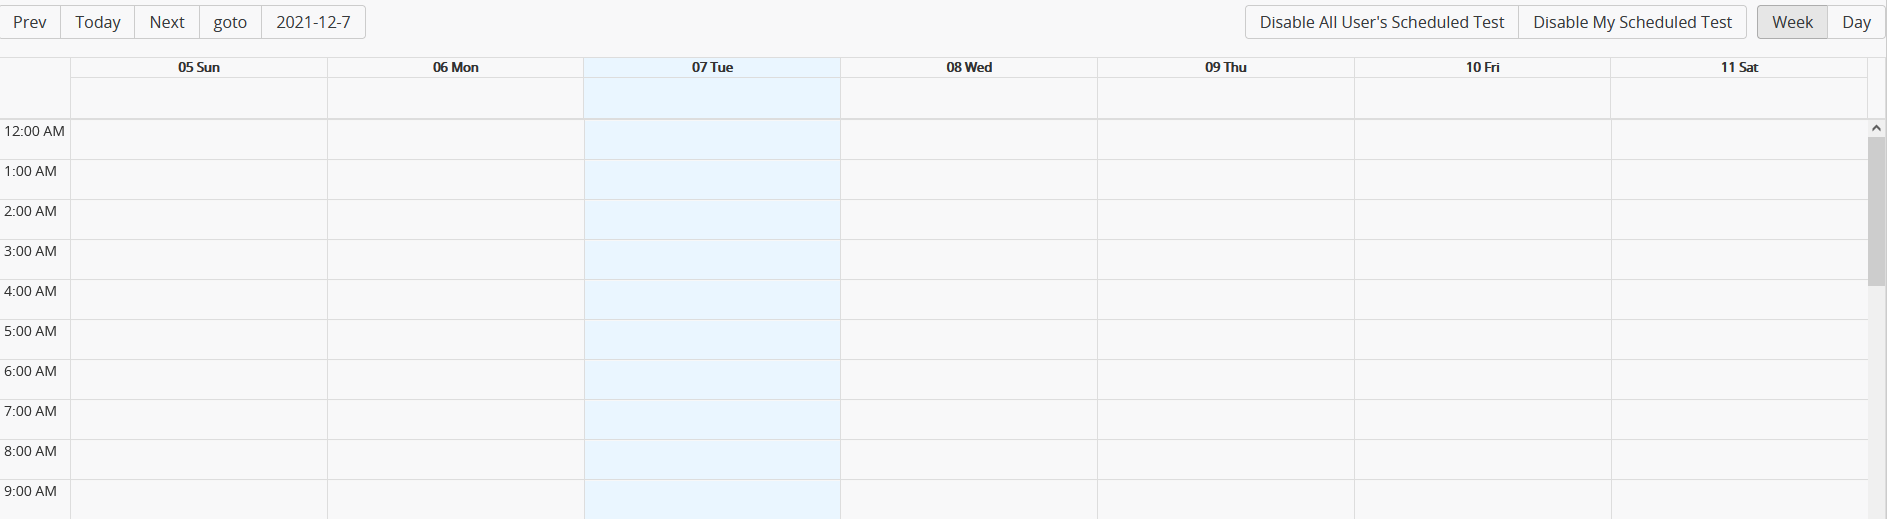
Header Control Panel contains the left and right parts. On the left side of the Header Control Panel, you can control the time interval displayed by the current TEX Scheduler Time Slot. There is an InputField that allows you to adjust the date that is currently selected. On the right side of the Header Control Panel, you can control the current Display Mode of the TEX Scheduler Time Slot Panel, which currently supports Day Mode and Mode Week.
b. Time Slot Panel :
The Time Slot Panel consists of a series of Time Slots, when in week mode, a Time Slot represents one hour, and in day mode, a Time Slot represents ten minutes. When the mouse is on the time slot, different tooltips pop up depending on the status of the time slot. When the time slot does not contain any test schedules, tooltip informs you to double-click on the new test schedule. When the time slot has and contains only one test schedule, tooltip informs you to double-click to edit the test schedule. When a time slot contains multiple test schedules, tooltip informs you about the different time schedules that are included. Click the time slot to inform TEX about the currently selected Time Slot. When you select a time slot, the TeX schedule List Panel Control control at the bottom displays the Time Slot containing the Test Schedule.
2. TEX Scheduler List Control Panel.

TEX Scheduler List Control Panel, which contains a button group and a list view.
a. Buttons: Add new Scheduler / edit selected schedule /delete selected schedule / export test schedule as csv/import test schedule by csv and refresh button.

b. List view contains a set of distinct test schedules within the selected time slot, click on a test schedule and then click edit/delete button to operate on it, can also double click a scheduler to direct edit it.
Note: Only interval type of schedule can be edited by double click, daily type of schedule can not be edited by double click.

3. TEX scheduler Edit/Add Panel.
Configure all property of a test schedule on top area of the panel, and at the bottom, a error/warning list will appear if there is an incorrect configuration.
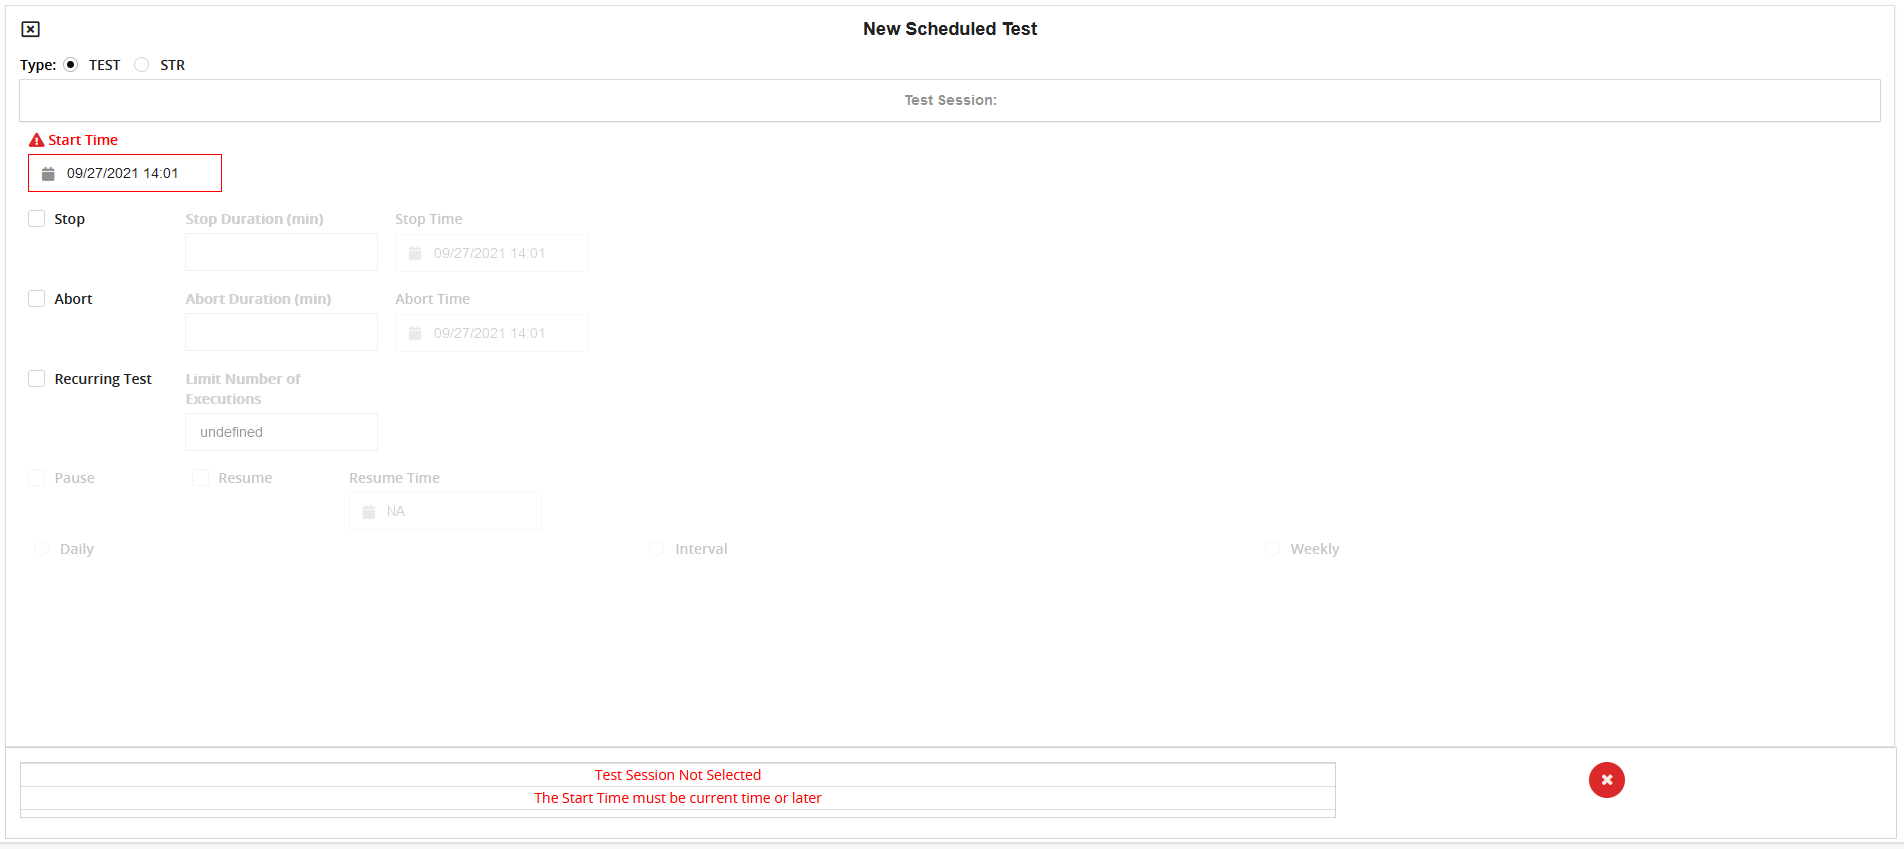
If all the configurations are correct, the following button will appear to save / save and add another test schedule
1. Click on Disable All User’s Scheduled Test (Visible when user === sms) , this screen will become available for input:
See the Scheduler topic for additional details on disabling tests.
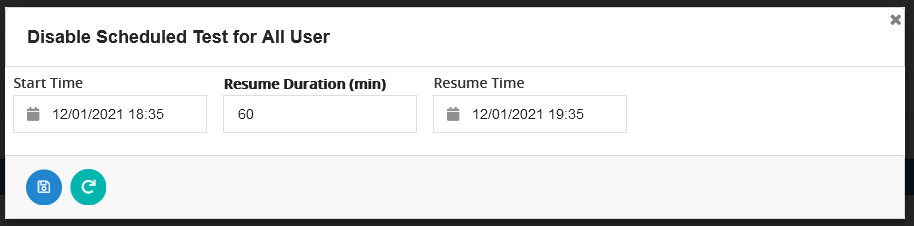
- Select Disable Test Start Time and Day.
- Select Disable Resume Test Schedule. You may select to resume test at a specific time or after the specified duration.
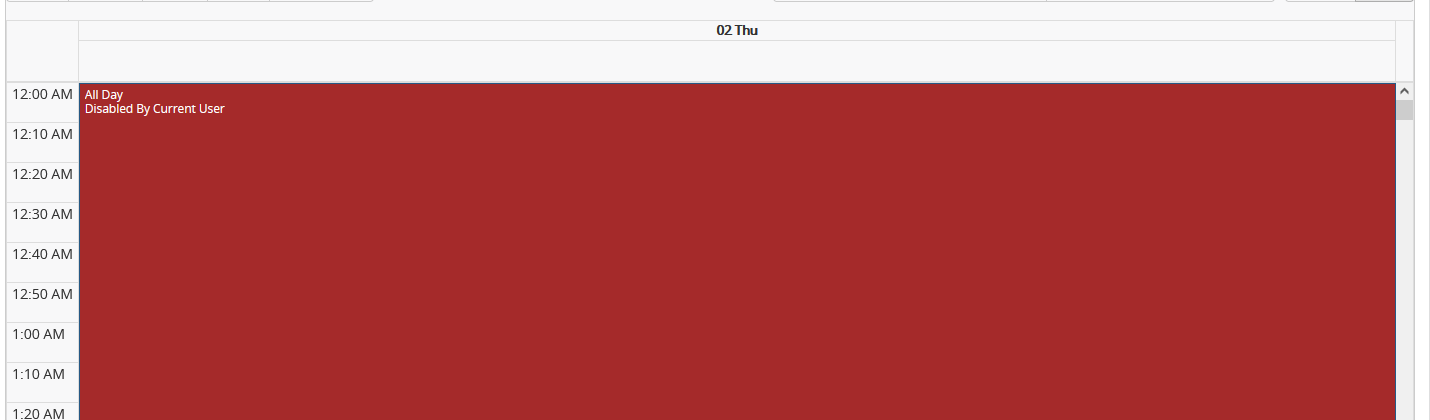
Once the tests have been disabled by the Super User, the TEX scheduler will display the corresponding schedule time slot with the color purple to represent the Disabled Test schedule range for all users.
Example :

When Disable My Scheduled Test is enabled, this screen will become available for input:
See the Scheduler topic for additional details on disabling tests.
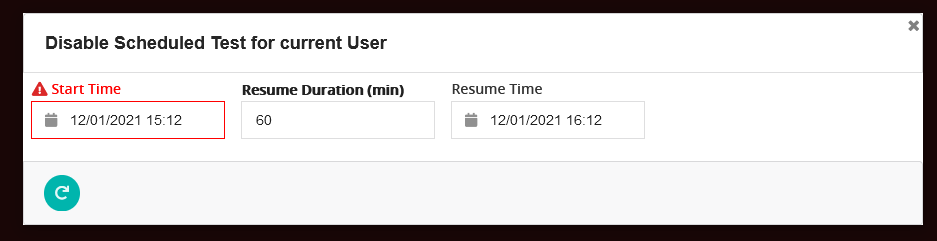
- Select Disable Test Start Time and Day.
- Select Disable Resume Test Schedule. You may select to resume test at a specific time or after the specified duration.
Once the tests have been disabled by the current User, the TEX scheduler will display the corresponding schedule time slot with the color Red to represent the Disabled Test schedule range for all users.
Example :
|
NOTE: HTTPS is supported for TEX. We recommend installing a proper SSL Certificate prior to use. For additional details on installing an SSL Certificate on the TAS, see Signed SSL Server Certificate in the TAS Manager Menu. It is especially critical if using IPv6 HTTPS to install a proper SSL Certificate. |
Test Data File (TDF)
Select to browse, upload and download Test Data Files. You will be able to list/download/upload TDFs, however, you will need to use your own editor (notepad/Excel, etc...) or Landslide's Standalone TDF-CSV Editor available from the Landslide Homepage. Editing is not supported on the TEX Web Client.
To learn more about the Landslide TDF Editor : About The TDF- CSV Editor , Parameter Features
Examples of TDF files - Example Test Data Files, MME Node - Provisioning TDF.
Many topics have examples of TDF files, such as : Nas 5G Mm, Nas 5G Sm, LPP Tab
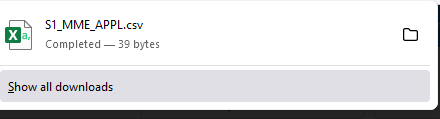
Use the 'search' box on the left hand side of the screen to enter the Library name to search for TDF files. Once a TDF file is found, 'select' it on the right hand side of the screen. It will be highlighted and the 'Retrieve' button will become available for selection. Click on the retrieve button to 'Download' the TDF file.
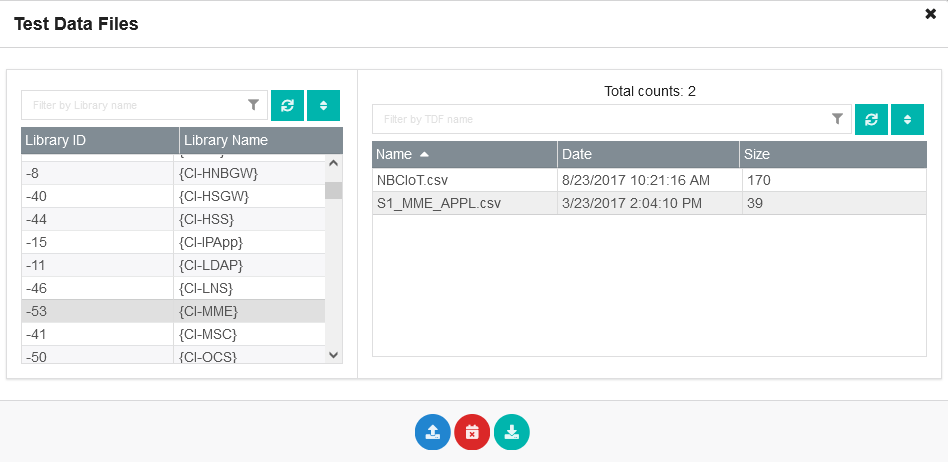
When the file is retrieved successfully, you will see it on the right hand corner of your screen :
Browse/Upload - Click on the 'Browse" button to browse and upload a file.
Select the file to upload. Once the file has been uploaded to the directory, you will see a file a message that the upload was successful.
IMPORTANT INFORMATION:
|
IMPORTANT: The TAS supports 96 simultaneous logins (i.e. connections). The combination of (Tcl API + GUI Clients <= 48) + (REST (Web) Clients <=48) must never result in more than 96 client connections to the TAS in the same instant. The TEX Web client uses the RESTful API with non-persistent HTTP, so these connections are temporary, asynchronous and quickly closed, but they still count towards the 96 logins while they are happening. You might get away with more than 96 Web Clients, but at some point if requests overlap, you will get errors back from the TAS that could affect all Client types. This is accessed via an API and you must DELETE test sessions when you are done with them, or else put your TAS at risk for running out of memory. When you are done reviewing the results of a completed test, click the DELETE button. If you accidentally left one undeleted, you can go to the View Running Tests to delete any tests you completed. |
To use Internet Explorer (Version 11), you must 'enable' or 'prompt' this setting (Access data sources across domains, see screen copy below) for the "ZONE" that the TAS is in:

Charts/Measurements are queried every 5 seconds, and chart data points only updated if the interval changes or the value changes.
Chart history is not loaded when you reconnect to a test, you will only get new data points.
Test Status is queried every 2 seconds.
Pass/Fail Criteria Details are only queried once when you open the dialog, if you leave the dialog open, nothing will change.
The only things refreshed automatically are the Test Status/Charts/Favorite Measurements.
You cannot command a test session beyond Start/Stop/Abort and Continue (Automation Control Wait step). TEX Web Client does not provide ability to interact with live TC sequencer, DMFs, ODCs, or updates. For those you can use RESTful API directly or else the standard GUI/Tcl ways.