Customizing Your Environment


You can choose whether or not to display the toolbar in the Main window... and whether or not to display names with the toolbar icons. A check next to the menu option indicates that the item is visible. All users can can customize their client via Client Settings , but only the “SMS” user can customize the TAS/System. The TAS can be customized via Server Settings and Edit Settings.

NOTE: The Client Toolbar shows names/labels on the newly installed clients. 

Client Settings

You can also specify default directories, choose which confirmation dialog boxes you wish to be displayed, and set graphing defaults with the Client Settings window. Client settings are saved in your home directory on the client platform, not on the test system. If you log in from another platform, the settings use the system defaults.

You can customize an individual Client with Client Settings: 
 

To define your settings:

1.

Select Admin > Client Settings and the Client Settings window opens.

2.

Select the Appearance option to set the GUI look and feel, Window display mode, Window Tree, Wallpaper, and Real-Time Logs Login State/Mode display.

GUI Look and Feel

The default GUI skin is the Java Metal. Select the desired look and feel from the dropdown list.

A warning message,  A complete restart of the Client may be required to apply the new look and feel, displays when you select a new look, click Apply and press OK to exit.  

Auto Window Mode

Select to specify how new windows open: Cascade, Maximize, or Tile.

NOTE: To switch windows, use the Window Tree, Window Taskbar, or click the minimized window title bar (displayed at the bottom of your screen).
  • Cascade: Select to display overlapping open windows with their title bars visible.
  • Maximized: Select to maximize all open windows.
  • Tile: Select to display open windows arranged one below the other so that they are visible.
NOTE: When your Auto Window Mode settings is Cascade (Window > Auto > Cascade), the rest of the Window Menu options: Minimize All, Tile, Cascade, and Maximize All, are not available.


Window Tree

The default option is Start Visible. You can select options to Start Hidden or Disabled. Select your desired option, click Apply and press OK to exit.

NOTE: A complete restart of the Client is required to apply the new Window Tree Option.

Wallpaper

The default option is Landslide logo. You can select None, Default, Spirent, Network or Custom. Select your desired option,  click Apply and press OK to exit.

Real-Time Logs Login State/Mode

Select the required option and press OK. Options are Start Normal, Start Minimized, Start Hidden.

  • Default is Start Minimized, where the Real-Time Logs displays as a minimized docked panel on the bottom of the window.

  • Start Normal: Select to display the Real-Time logs window. You may toggle between Start Minimized and Start Normal.

  • Start Hidden: Select to hide the Real-Time Log docked panel. When the real time logs are closed/hidden, you may reopen them by clicking on the Real-Time Logs toolbar button.

Disable Real-Time Log Error/Warning Visual Notifications

Select to disable the button/toolbar notifications when Real-Time logs are minimized or hidden.

Number of real-time log messages in client

Select the maximum number of real-time log messages stored/displayed in the client. Options are 100, 500, and 1000 log messages.

Expand Network Diagram in Test Case Editor

when selected, the Network Diagram will be expanded and displayed in all test case editor window.
 

NOTE: Since the browser requires access to all test cases the first time a test session is opened, make sure you select the Load Test Case Jars on Login checkbox, if you wish to use the network browser. This will ensure that the test cases are downloaded when the client starts and will therefore be available when the browser is initialized.


Low Client Memory Warning Notification

Select to disable the popup notification when you are running low on memory.

NOTEs:

  • Disabling the popup does not disable the RED/YELLOW coloring of the Memory Monitor in the bottom right corner.
  • Suggested use for devices where you cannot increase memory any further, such as the Edge box, and memory notifications are frequent.


3.

Select the Confirmations option to set the appropriate test case confirmations (abort, stop, etc.).

  • Test Abort Confirmation
  • Test Stop Confirmation
  • Test Continue Confirmation when TC Sequencer Pending
  • Test Server Version Confirmation on Run
  • Test Case Attention Required Confirmation
  • Test Case Administration Confirmations

Select the check-boxes of confirmations that you wish to see and clear the check-boxes of confirmations that you do not want to be displayed.

4.

Select the Directories option. You can specify the following default directories:

  • Default DMF Message Directory
  • Default Test Results and Logs Save As Directory
  • Default Test Suite Export Directory
  • Default Test Suite Import Directory
  • Default Test Server Upgrade Directory
  • Default Real-Time Log Save Directory
  • Default Test Data File Upload Directory
  • Default Test Data File Download Directory
  • Default Save AS Tcl Directory
  • Default SAPEE PCAP Directory
  • Default Test Case Administration Import Directory

In each directory option, select one of the following options:

  • Default — the system default (typically your home directory)
  • Last Used — the default will always be the directory that you used the last time you performed the activity
  • Specific — select a directory using the Browse button

NOTES:

  • The directory that you choose as the Default Test Results and Logs Save As Directory is only used when you save a test report or test log from the Test Session window. It does not affect the location of the test results that are automatically saved when the test is complete.

  • The directories that you select as defaults are only presented as defaults. You can override these selections and choose a different directory when saving, importing, or exporting.

5.

Select the Graphing option. Select the required checkbox to set the default Y-axis options on the Graph tab.

  • Hide Grid causes the grid to be invisible.

  • Keep 0 visible on Y-axis causes the 0 always visible. The checkbox is selected by default.

  • No Markers disables the data points for the measurement.

  • Requested # of axis ticks/labels. Select the required number of axis labels to be displayed.

6.

Select the Libraries option. You can specify the following default libraries:

  • Default Test Session Library (User Library)
  • Default Test Case Library (Global Library)
  • Default DMF Library (Basic Library)
  • Default Data Profile Template Library (Temp library)
  • Default ME Library (User Library)
  • Default TC Command Sequence Template Library (User Library)
  • Default TC Template Library (Basic Library)
  • Default SIP Flow Template Library (User Library)
  • Default HTTP Flow Template Library (User Library)
  • Default TDF Library (Basic Library)
  • Default Serial Test Runner Library (Basic Library)
  • Default Test Suite Import Library (User Library)
  • Default Test Suite Export Library (User Library)

In each library option, select one of the following options:

  • Last Used — the default will always be the directory that you used the last time you performed the activity

  • Specific — select a directory using the Browse button

7.

Select the Login option to set whether to load all test cases and/or check for any disconnected tests on login.  Select the check-boxes of actions that you wish to perform upon login and clear the check-boxes of actions that you do not want to be performed upon login.

Load All Test Case Jars on Login -  Select this to force the client to download all licensed test case jars/libraries upon login. Otherwise test case jars/libraries will only be downloaded when they are needed. Regardless, a test case library is only downloaded to the client one time, and not again until a new version of the Test Case is available on the TAS, either via upgrade, downgrade or official test suite import.

Check for disconnected tests on Login – Select this to force the client to query for disconnected tests and immediately display the Reconnect to Test dialog if any are found.  (This only applies to Test Sessions)

8.

Select Test Session. You can specify default values for the following:

  • Errors/Warning Occurred Indicator on Test Status Line - If unchecked, then no messages will appear on Status Line. If checked, it enables:
  • Indicator Trigger Level - options Warning (default)  or Error
  • ETH Initialization Warning ON/OFF, Test Session Setting

          Works in conjunction with new Test Session attribute

          Options: Always WARNING logs

                        Always INFO logs

                        Default WARNING logs for new test sessions

                        Default INFO logs for new test sessions

The Always options will force all tests that you run to the selected options.

The Default options will just automatically set new test sessions to the selection, but when you run tests, whatever value you set in the test session will be used.

  • Log Message limiting threshold - Allows the user to adjust how aggressive the Client should be at handling the log messages received from the TAS. If the test session reports many log messages in bursts, this can overload the client and lock it up. To prevent this, we use a queue and only display the messages at a limited rate and if the queue fills up, messages are dropped. Now you can the queue size and processing rate to meet your needs and to adjust for your systems performance. The slower/smaller choices will result in higher chance that logs will be skipped, and a lower chance of your client getting overloaded. The larger/faster choices will result in fewer logs being skipped, and a higher chance of your client getting overloaded. This setting should not be changed unless you are having issues. If are having issues, try the higher performance options first and if you see logs being skipped then lower performance options, especially if your client gets unresponsive when you run your tests.

options:

    1. Small queue size, slower dequeue rate,
    2. Normal queue size, slower dequeue rate,
    3. Normal queue size, normal dequeue rate,
    4. Large queue size, faster dequeue rate,
    5. Largest queue size, process entire queue each time
  • Number of Log messages per page - Allows the user to set the number of log messages per history page.  Prior to this option being available, when the Logs tab reached 500 messages on the current page, it moved the oldest 250 messages to a new History page, thus as your test runs, you can end up with many pages of history. As well as having only 250 messages per page. This enhancements allows you to choose to maintain larger page sizes, resulting in fewer pages of history to look through.

options: 250, 500, 1000, 5000.

9.

Select the Utilities option to execute client maintenance functions:

Reset Client Settings - Resets Client Settings to factory default values, which will remove everything you’ve saved to the settings file (settings.pro).


Cache/Temporary File Usage -  Displays the usage of the cache/temp files.


View Cache/Temporary Files - Opens the folder: USER_HOME/.tas in the System File Explorer.


Delete Cache/Temporary Files -  Deletes the files in USER_HOME/.tas. With options to include/skip the Quick Lists (*.ql) and Client Setting (*.pro). When you reset your Client Settings or delete the Client Settings file via Delete Cache/Temporary Files, you will want to restart your client for the change to fully take effect.    

9.

Click OK or APPLY to save your changes and close the window or Cancel to discard your changes.

Server Settings

You can customize the TAS with: Edit Settings , Server Settings (see options below)

User Authentication


1.

Select Admin > Server Settings and the Server Settings window opens. 

Select the User Authentication Method (User-Auth). Options : 

  • Default - Landslide Default User Authentication method. When this is enabled, regardless of LDAP or TACACS being turned on, the TAS will only perform local AA, just like sms. The local password and local level will be applied. 
  • LDAPLightweight Directory Access Protocol (LDAP)
  • TACACS+ - Terminal Access Controller Access Control Server is a security protocol used in the AAA framework to provide centralized authentication for users who want to gain access to the network. 
  • OKTA OIDC - OKTA OpenID Connect to authenticate and authorize the Landslide user. 
  • Spirent oAuth - Spirent OAuth is non-standard OAuth implementation intended to connect/use the Spirent Security Micro-Service. Connect to authenticate and authorize the Landslide user. 
  • OIDC / SSO - OpenID SSO (Single Sign-on) Connect to authenticate and authorize the Landslide user. This Auth method is intended for Secure Clients only. HTTPS, not HTTP.
2.

Select Automatic Creation of User Accounts Upon Login to enable automatic creation of Landslide user account when a new user logs in to the TAS when a 3rd Party authentication is enabled. Not available when User Authentication Method = Default. 

Breakdown of the different methods and their support for auto-adding new users and for assigning the user-levels:

Method

Auto-Create

User

User-Level Mapping Custom-User-Level_Mapping Tcl API

Insecure/HTTP 

Client

LDAP YES NO (auto-created as Test Operator) NO YES YES
TACACS+ YES YES NO YES YES
OKTA OIDC YES YES YES YES YES
Spirent OAuth YES YES YES YES YES
OIDC/SSO YES YES YES NO NO


A new User will be created automatically based on the input from the login dialog. 


For instance, if a user logins with thirdPartyUserName as the user name and if the TAS is able to authenticate the thirdPartyUserName with 3rd party authentication service, then it will automatically create an User with :

  • User Name = thirdPartyUserName
  • Password = encrypted thirdPartyUserName’s password
  • Privilege level = Test Operator

If the 3rd party authentication service is OKTA, the Privilege level can be set based on the OKTA user configuration. 
If the 3rd party authentication service is TACACS+, the TACAS+’s user setting must set the user privilege level to 1(test operator).

If the TAS successfully creates the user as part of the login, the following information will be logged to the Real-Time (System) Log:
 

3.

Select Enable Custom Privilege Level Mapping to to identify the User Privilege level. Landslide uses the user group defined in the OIDC provider/Spirent OAuth/TACACS+/OKTA OIDC Platform to identify the User Privilege level. User can provide the custom User Group Name to override the default User Group <-> Privilege Level Mapping.

The Default Privilege Level Mapping:
System Administrator =  system-administrator
Test Administrator  =  test-administrator
Test Operator =  test-operator
Group Field =  groups
 

When the User Authentication Method is selected in one of the following scopes: [OIDC, Spirent OAuth, OKTA OIDC, TACACS+].
Landslide will use Privilege Level Mapping based on user groups defined in the third party OIDC/OAuth Identity provider to determine what Landslide Level users authenticated by third-party identity providers should access Landslide.   We command that there should be ‘landslide-system-administrator’, ‘landslide-test-administrator’, and ‘landslide-test-operator’ groups defined in the “group” attribute in third-party identity providers and assigned corresponding users to each group in this example mapping below:

Below screenshot is an example group names and users info with Custom Privilege Level Mapping enabled for  OKTA OIDC’s instance and TAS Real Time log showing the users login:


landslide01           2023-05-23 10:25:16  Informational  Operations  Login     User landslide01 logged in from [email protected]:51077 as System Administrator
                                                                                Client=GUI user=jjung  timezone=America/Chicago  os=Windows 11
landslide01           2023-05-23 10:25:53  Informational  Operations  Login     User landslide01 logged out from [email protected]:51077
                                                                                Client=GUI user=jjung  timezone=America/Chicago  os=Windows 11
<system>              2023-05-23 10:26:15  Informational  System                HTTPClient:[email protected]: Privilege Level for this client updated to Test Administrator by OKTA
uid-16846             2023-05-23 10:26:15  Informational  SysAdmin    Create    HTTPClient:[email protected]: Created account for user: testadmin2
testadmin2            2023-05-23 10:26:15  Informational  Operations  Login     User testadmin2 logged in from [email protected]:51081 as Test Administrator
                                                                                Client=GUI user=jjung  timezone=America/Chicago  os=Windows 11
testadmin2            2023-05-23 10:26:34  Informational  Operations  Login     User testadmin2 logged out from [email protected]:51081
                                                                                Client=GUI user=jjung  timezone=America/Chicago  os=Windows 11
uid-11183             2023-05-23 10:27:27  Informational  SysAdmin    Create    HTTPClient:[email protected]: Created account for user: testrunner2
testrunner2           2023-05-23 10:27:27  Informational  Operations  Login     User testrunner2 logged in from [email protected]:51094 as Test Operator
                                                                                Client=GUI user=jjung  timezone=America/Chicago  os=Windows 11

If User didn’t enable the Custom Privilege Level Mapping, The Default Privilege Level Mapping will be as follows:
System Administrator    system-administrator
Test Administrator    test-administrator
Test Operator    test-operator
Group Field    groups

This means that if the username is not already defined in Landslide with a definitive Level, when the user logs in, Landslide will assign the Level based on these default mapping OR else will default to Test Operator if no match is found.
i.e., there should be ‘system-administrator’, ‘test-administrator’, and ‘test-operator groups created in third-party identity providers and assigned corresponding users to each group with default mapping.

Below screenshot is an example group names and users info with Custom Privilege Level Mapping disabled for  OKTA OIDC’s instance and TAS Real Time log showing the users login:


landslide01           2023-05-23 10:11:01  Informational  Operations  Login     User landslide01 logged in from [email protected]:50933 as System Administrator
                                                                                Client=GUI user=jjung  timezone=America/Chicago  os=Windows 11
landslide01           2023-05-23 10:15:56  Informational  Operations  Login     User landslide01 logged out from [email protected]:50933
                                                                                Client=GUI user=jjung  timezone=America/Chicago  os=Windows 11
<system>              2023-05-23 10:16:13  Informational  System                HTTPClient:[email protected]: Privilege Level for this client updated to Test Administrator by OKTA
testadmin             2023-05-23 10:16:13  Informational  SysAdmin    Create    HTTPClient:[email protected]: Created account for user: testadmin
testadmin             2023-05-23 10:16:13  Informational  Operations  Login     User testadmin logged in from [email protected]:50988 as Test Administrator
                                                                                Client=GUI user=jjung  timezone=America/Chicago  os=Windows 11
sms                   2023-05-23 10:16:32  Informational  SysAdmin    Schedule  Skipping scheduled tests, disabled for user=DISABLE_ALL_USERS, from Tue May 23 10:16:00 CDT 2023 : to Tue May 23 11:16:00 CDT 2023
testadmin             2023-05-23 10:16:42  Informational  Operations  Login     User testadmin logged out from [email protected]:50988
                                                                                Client=GUI user=jjung  timezone=America/Chicago  os=Windows 11
uid-31304             2023-05-23 10:18:20  Informational  SysAdmin    Create    HTTPClient:[email protected]: Created account for user: test-runner
test-runner           2023-05-23 10:18:20  Informational  Operations  Login     User test-runner logged in from [email protected]:51004 as Test Operator
                                                                                Client=GUI user=jjung  timezone=America/Chicago  os=Windows 11
 

4.

Select LDAP to Authenticate the Landslide users.  When LDAP is enabled, all users except 'sms' will be authenticated by the LDAP server and not the internal password. LDAP requires that users be added to Landslide, their user names should match the user names in the LDAP server, minus their domain, if any.


Primary Server

The Primary Server is required, enter the IP Address or Hostname / FQDN of the LDAP Server.  (DNS must be enabled on the TAS and Client to use FQDN). ldap:// or ldaps://URL will be added automatically to your entry.

The Secondary Server is optional, same format as Primary Server.

Range : up to 75 characters

NOTEs:

  • We support a secondary LDAP server, if the primary server does not respond (fails for reason other than authentication), the secondary server will be used. The TAS will not try the Primary Server again for 1 minute.  The next login after the 1 minute period will be attempted at the primary server, if it fails again, the secondary server will be used for at least another minute again. Once the primary server succeeds once, the primary server will be tried first each time.  
  • Primary and secondary server fields must be different. 

  • The secondary server will/must share the same settings, e.g. Port, Domain, Context, LDAPS, SSL Certificate.  


Secondary Server

Enter the IP Address or Hostname / FQDN of the secondary / backup LDAP Server.   Range : up to 75 characters

Port

Select to enter a user-specified TCP port to use for LDAP communications. 0 = use standard port.

The port is an optional override of standard ports, TAS will use ldap://<SERVER> or ldaps://<SERVER> URLs to contact LDAP Server, use of specific port would be ldap:<PORT>//<SERVER>

Range: 1 to 65535 Default: 0 = standard

0=use-standard (LDAP 389 or LDAPS 636)

0=default (LDAP 389 or LDAPS 636)

Principal

The Principal field in the LDAP configuration lets the user place the $user variable where it needs to go.

The format must include $user, e.g. uid=$user, OU=Users, DC=company, DC=com or [email protected]

Range : up to 75 characters

LDAPs (over TLS)

Enables the use of ldaps://,  instead of ldap://

Trusted Certificate

The Trusted Certificate is the Server SSL Certificate used for communicating over TLS. You must install your Server SSL Certificate, either a .crt or .cer file. Select Install and select a certificate to load. The file that is installed must contain enough certificates for the TAS to trust the LDAP server, including intermediate and root certificates if they are not standard public CAs. 

After a certificate(s) is installed, the Subject Principle Name of the primary Certificate is displayed. But if this is empty, LS will search for and display the complete Distinguished Name line starting with CN=, or the longest Subject Alternate Name, or else the first 256 characters of certificate information.  The goal is to provide some indication that the certificate(s) is installed. Ultimately testing a login will prove it correct.


LDAP does not support a mapping function from group/roles to Landslide User-Level.  The user-level will be determined by their local User Account setting or if an automatically created user, they will be assigned Test Operator.

GUI, TeX, Tcl API Login will be standard way with username/password.
REST API will use standard HTTP Basic Authentication.

Added some new/updated Real-Time Logs related to the LDAP Authentication:


If user login fails, and it was using LDAP, you will see LDAP in the message:


<system>              2018-07-26 16:39:53  Informational  System                HTTPClient:[email protected]: Login with user name: User1 failed LDAP authentication


If switched between primary and secondary server:


User1              2018-07-27 07:19:10      Informational   Operations  Login     user User1 logged out from [email protected]

sms                  2018-07-27 07:19:21      Informational   SysAdmin    Modify    [email protected]: Modified Server Settings

<system>       2018-07-27 07:19:33  Warning          SysAdmin    Login    LDAP switched to secondary server

User1               2018-07-27 07:19:33     Informational    Operations  Login     user User1 logged in from [email protected]

                                                                                                                         Client=GUI user=User1   timezone=America/New_York  os=Windows 7 CommLogged

User1               2018-07-27 07:21:00     Informational    Operations  Login     user User1   logged out from [email protected]

User1               2018-07-27 07:21:07     Informational    Operations  Login     user User1  logged in from [email protected]

                                                                                                                         Client=GUI user=User1    timezone=America/New_York  os=Windows 7 CommLogged

sms                  2018-07-27 07:21:47     Informational    SysAdmin    Modify    [email protected]: Modified Server Settings

User1               2018-07-27 07:21:55     Informational    Operations  Login     user User1   logged out from [email protected]

<system>       2018-07-27 07:22:05 Warning           SysAdmin    Login    LDAP switched back to primary server

User1              2018-07-27 07:22:05     Informational     Operations  Login     user User1   logged in from [email protected]

                                                                                                                         Client=GUI user=User1   timezone=America/New_York  os=Windows 7 CommLogged

5.

Select TACACS+ to Authenticate the Landslide users.  TACACS+ - Terminal Access Controller Access Control Server is a security protocol used in the AAA framework to provide centralized authentication for users who want to gain access to the network. 

Host

Enter the hostname/FQDN or IP address of target TACACS+ Server.  


Port

Enter specific TCP port to use for TACACS+ connection.

Range: 0 to 65535

Default: 49

Shared Secret

The Shared Secret to use with the TACACS+ Server.  

Timeout (ms)

The timeout value of TACACS+ in milliseconds.

Range : 1000-30000

Default 2000

Authentication Method

Select the Authentication method.

Options : PAP, CHAP


When sending Authorization request, the TAS sends the converted TACACS+ Privilege level for priv_lvl and expects the ICE/TACACS to confirm the user is authorized to use that level.  And for user-level assignment TACACS+ has a fixed mapping. 

Authorization Behavior:
When Logging in with TACACS+, if the user account with (username, password) as (exampleUsername, examplePassword) is not configured in Landslide and automatic creation of User Accounts Upon Login is selected. The automatically created user (exampleUsername, examplePassword) will be assigned the privilege level to the Test Operator (In Landslide 3, In TACACS+, 1). 

If the automatic creation of user accounts upon login is not selected, the login of an unknown user will be rejected by the TAS.
If the user account is configured in the TAS, the configured privilege level will be sent to TACACS+.
 

After that, during the authorization phase of TACACS+, Landslide will send the information of the user (exampleUsername, examplePassword) and the priv-level to the TACACS+ server to request authorization.
On TACACS+ Server, If user priv-level of the user (exampleUsername, examplePassword) is assigned to another value, Different TACACS+ server might behavior differently.

If the assigned Priv-level is greater than 1: 
Some TACACS+ server may grant authorization to user (exampleUsername, examplePassword), but Landslide will still treat the user as Test Operator until a Landslide Admin user changes the user (exampleUsername, examplePassword)'s privilege level in the Landslide Client.
Some TACACS+ server may directly reject the user (exampleUsername, examplePassword) and cause the authorization failure.  
If the assigned Priv-level is smaller than 1:
TACACS+ server will directly reject user (exampleUsername, examplePassword) and cause authorization failed.
 

Note : Privilege level assigned to the user is based on what is configured in Landslide Client and approved by TACACS+. TACACS+ Authorization will not modify, downgrade, or upgrade, the privilege level locally defined.


GUI, TeX, Tcl API Login will be standard way with username/password. REST API will use standard HTTP Basic Authentication.

For user-level assignment TACACS+ has a fixed mapping. 


Privilege Map

Name  Landslide Privilege Level TACACS+ Privilege Level
System Administrator 1 3
Test Administrator 2 2
Test Operator 3 1
6.

Select OKTA OIDC to Authenticate the Landslide users.  Okta is a standards-compliant OAuth 2.0 (opens new window) authorization server and a certified OpenID Connect provider

OpenID Connect extends OAuth 2.0. The OAuth 2.0 protocol provides API security via scoped access tokens, and OpenID Connect provides user authentication and single sign-on (SSO) functionality.

All users must first be provisioned in Landslide. To use OKTA with LANDSLIDE, the sign-on policy of User authentication will have to be configured as password only mode. Landslide does not support 2 factor authentication:

As with other Authentication methods, users that are Always Locally Authenticated will not use OKTA:

Sample setup document : OKTAOIDCSampleSetup.pdf

Issuer URL

Enter the URL to OKTA Authorization Server for OIDC process.

Used to retrieve the Authentication / ID tokens.


Client ID

The identifier generated in the OKTA IDP for Landslide application.

Client Secret

The secret generated in the OKTA IDP for Landslide application

Claim

The Claim which contains the information about user privilege level, defined in okta.

The TAS will use Claim to locate the landslide privilege level from OKTA OIDC response body from the Issuer URL. Normally the data type of which queried by the claim is an array.

TAS will iterate all item within the array to trying to perform the map operation on each item to parse out the valid landslide privilege level based on the map rule defined by following table. 

MAP Rule (case insensitive)    Landslide Privilege Level    Example
xxxx-system-administrator          System Administrator             landslide-system-administrator
xxxx-test-administrator               Test Administrator                  landslide-test-administrator
xxxx-test-operator                      Test Operator                         landslide-test-operator
 
When users login to Landslide, the Real-Time (System) Log message now indicates the user’s level, which can be used to confirm which level was used (local or OKTA/OIDC):

Example : privilege

Scope

The Scope Identifier used to retrieve the Claim to get the user privilege level.

It is optional.

Example : group

Email Domain

When enabled, Landslide will use {user_name}@{email_domain} to access OKTA, Format : @{email_domain}.{suffix}

The email domain, is for cases when the OKTA/OIDC requires the email domain to be included for AUTH.  Normally Landslide will send just a username as provisioned in Landslide, e.g. “sms”. However if all the users that login to OKTA/OIDC are expected to be a username@domain like an email, we do not allow email as username. But by enabling the email domain, Landslide will append it to the usernames when sending auth request to OKTA.


GUI, TeX, Tcl API Login will be standard way with username/password.
REST API will use standard HTTP Basic Authentication.

7.

Select Spirent OAuth is non-standard OAuth implementation intended to connect/use the Spirent Security Micro-Service and requires users to fill following parameters :


Once the Spirent OAuth is configured, when a user logs into Landslide by click the Login button, The login function will delegated to Spirent OAuth service. 
 

Token URL

Enter the FQDN that Landslide will use OAuth password grant type to access the token url, to get the authentication token.


Info URL Enter the FQDN that Landslide will exchange the Authentication token with the Spirent Oauth for User Info.

Client ID

Enter a string which is retrieved from the Spirent OAuth to identify the application which is using the Spirent OAuth.

Client Secret

Enter a string which is retrieved from the Spirent OAuth to identify the application which is using the Spirent OAuth.
Email Domain

When enabled, Landslide will use {user_name}@{email_domain} to access OAuth, Format : @{email_domain}.{suffix}


GUI, TeX, Tcl API Login will be standard way with username/password.
REST API will use standard HTTP Basic Authentication.

8.

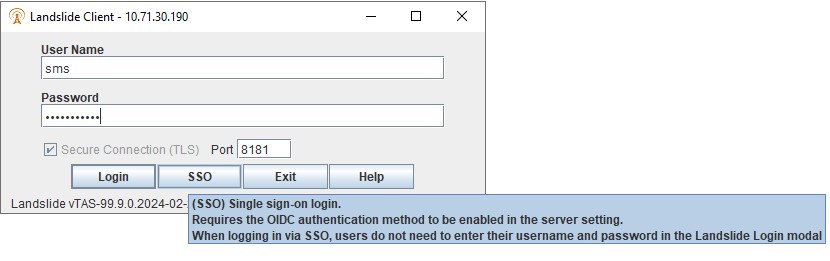
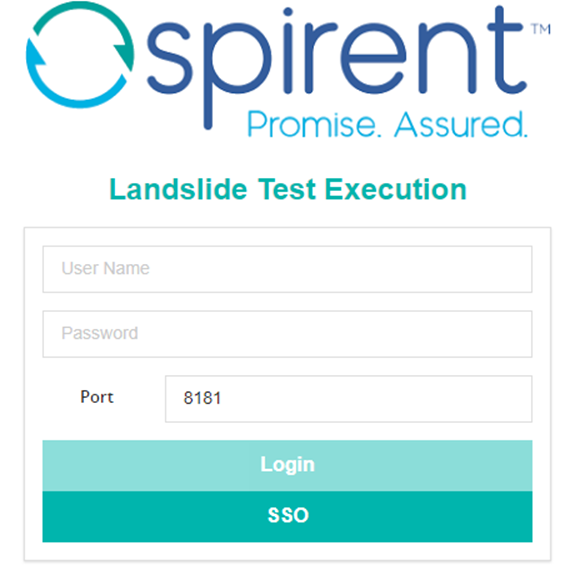
Select OIDC - OIDC OpenID SSO (Single Sign-on) Connect to authenticate and authorize the Landslide user. This Auth method is intended for Secure Clients only. HTTPS, not HTTP.

When Landslide is configured for OIDC, Automatic Creation of User Account Upon Login is recommended so that all new user logins will automatically create a user account in Landslide instead of returning an error. When OIDC enabled, SSO/OIDC users should login into the landslide by click the SSO button. Only locally authenticated users and sms should use the standard username/password login.

Once the Spirent OIDC is configured, when a user logs into Landslide by click the Login button, The login function will delegated to OIDC service. The SSO will be hidden by default and only displayed if SSO is turned on. If you are looking for SSO, hotkey Shift-Alt-S or try restarting your Client to reload the indicator from the TAS.


When Click SSO, SSO (Single Sign-on) dialog will pop out :

At the same time, Landslide client App will open a new Browser window and navigate user to the OIDC Provider’s Login page.  Once User login, Landslide Client App will automatically forward the Login function to the OIDC provider. If login success, The SSO Dialog will dispose.  Additionally Landslide will render a html page with Token information on the same Browser window:


Additionally Landslide support the Bearer Token authentication for the REST API.   The token can be taken from the GUI login confirmation page above, or the user can directly request a token using this REST API URI Path, api/ssoRedirectUrl:

http(s)://<TASIP>:<port 8080/8181>api/ssoRedirectUrl

If SSO is not enabled, the response will be a 404 with a body:
{
  "code": "404",
  "apiCode": 404082,
  "reason": "SSO: OIDC is not enabled",
  "url": "http://<TAS_IP>:8080/api"
}

Otherwise you will get the redirect URL in the body:

{
"state": "1683811575346","redirectUrl": "https:\/\/<TAS_IP>:10002\/application\/o\/authorize?response_type=code&client_id=4ca5423e628b9977dd2c9baa6a5284f14564135f&scope=openid+profile&state=1683811575346&redirect_uri=http%3A%2F%2F<TAS_IP>%3A8080%2Fcallback"}

This URL will bring you to your OIDC provider’s Login page, where, if you have not logged in, you can login, or if you are already logged in it will immediately redirect you back to the TAS to get your token like from the GUI. (see previous image).

This token can then be copied to be use as the Access Token via the API Bearer Token, which is now an option on the Swagger page:

For other REST API clients, the User can copy the Access Token to the Authorization header of the HTTP request as Bearer Token which is used to access landslide API.  
Curl Example: 
```
curl --location --request GET '127.0.0.1:8080/api/' \
--header 'Authorization: Bearer <User's Token>'
```

Same process happens on TeX, if OIDC is configured. User can login into the TeX by click the SSO button. 


TeX will open a new Browser window to navigate user to OIDC provider’s login page.  At same time, TeX will blocking with the Full screen loading spinner. 
Once User logs in, TeX will automatically forward the Login function to the OIDC provider. If login success, The TeX loading spinner will be disposed. 

Auth URL Enter the FQDN that Landslide will use OIDC’s authorization code flow to access the Auth URL of the OIDC provider, to get the authorization code. The Auth URL should be acquired from the OIDC provider.
Token URL

Enter the FQDN that Landslide will exchange the authorization code with Token URL for the authenticate token. 
The Token URL should be acquired from the OIDC Provider.

Info URL Enter the FQDN that Landslide will exchange the Authentication token with the OIDC provider for User Info. 
The Info URL should be acquired from the OIDC Provider.

Client ID

Enter a string which is retrieved from the OIDC Provider to identify the application which is using the OIDC Provider.

Client Secret

Enter a string which is retrieved from the OIDC Provider to identify the application which is using the OIDC Provider.
Redirect URL Landslide URL for receive the OIDC Provider’s Callback ,User should copy the Redirect URL to OIDC Provider’s URL white list. so the OIDC provider can access the Landslide without issue.


Enable SNMP Traps for MGMT status reporting.


1.

Select Admin > Server Settings and the Server Settings window opens.

NOTE:
  • You will need to install the MIBs to your receiver to properly receive the traps.
  • You can enable when to Send SNMP Trap on the Pass/Fail Tab. Traps are only sent if the TAS is enabled for SNMP. Use the Server Settings below enable system level traps and view the MIB.  
  • Only 1 trap will be sent at the end of the test to indicate the overall Pass or Fail status for the test session. No traps will be sent if there are no Pass/Fail criteria defined.

  • Use TAS Setting (Edit Settingstas_fqdn to set the HOST that the TAS will use for all URLs it builds in APIs and external notifications (Kafka/SNMP), in lieu of IP-Address. When the TAS is started, the startup log will print information about IP Address and Hostname: TAS FQDN set to: test.tas.spirent.com


2.

Select to Enable SNMP Traps to Address - Enter the address of the network server that is responsible for processing SNMP Traps.  Enables rest of the fields. Enter a valid IP address or FQDN of the Trap Receiver (NMS).

Enter Port of the network server that is responsible for processing SNMP Traps. Range : 1 to 65525, Default: 162. Also supported by REST (Swagger) and Tcl API (trapReceiverPort).

Secondary Destination Address

Select to enter a second receiver address for SNMP Trap collection. Enter a valid IP address or FQDN of the secondary trap receiver (NMS). Enter Port of the secondary trap receiver.  Range : 1 to 65525, Default: 162. Also supported by REST (Swagger) and Tcl API (trapSecReceiverPort).

Retransmission Period (min)

Set the period for single retransmission traps in minutes. Traps do not retransmit continuously, just once.

Default: 1  

NOTEs:

  • HD checked every 5 minutes without Retransmissions, otherwise checked every retransmission period.
  • Changes take place immediately. If retransmission time is changed, it will force a retransmission immediately,
  • Other changes take place next SNMP trap sent or next retransmission


Enable License Server Status Trap

Enables Trap sent when there is a change in License Server Licensed State. This trap will be sent only if using license server license. Addition details about License Server Status in topic About Licensing.

spirLsLicenseServerTrap NOTIFICATION-TYPE
	OBJECTS {
		spirLsLicenseStatus,
		spirLsTasAddr}
	STATUS  current
	DESCRIPTION
		"Landslide License Server Status Trap"
	-- 1.3.6.1.4.1.33824.3.500.2.0.6
	::= { spirLsTraps 6 }

TRAP STATES (spirLsLicenseStatus):   CLEARED, WARNING, LOCKED, FAILED

licensed(0)=== RUNNING i.e. nominal
warning(1) === WARNING
locked(2) === LOCKED
failed(3) === The TAS is shutting down due to long outage.

Example :

License Server Redundancy Trap 

spirLsLicenseServerRedundancyTrap NOTIFICATION-TYPE
	OBJECTS {
		spirLsLicenseServerRedundancyTransition,
		spirLsTasAddr}
	STATUS  current
	DESCRIPTION
		"Landslide License Server Redundancy Transition Trap"
	-- 1.3.6.1.4.1.33824.3.500.2.0.9
	::= { spirLsTraps 9 }

SNMP Server Settings allow user to enable this trap by same option as License Server status

Issued whenever a TAS checkout fails on the active License Server and successful switches to the backup license server with the spirLsLicenseServerRedundancyTransition indicating whether from Primary --> Secondary or Secondary --> Primary

If SNMP and License Server traps are enabled, then anytime a successful checkout is processed after switching from Primary → Secondary or vice-versa, the spirLsLicenseServerRedundancyTrap will be sent with spirLsLicenseServerRedundancyTransition set to primaryToSecondary 0 (Secondary active) or secondarytoPrimary 1 (Primary active).

Enable TAS Started Trap

Enables Trap sent when TAS fully/successfully starts.

spirLsTasStarted NOTIFICATION-TYPE
	OBJECTS {
		spirLsResultYesNo,
		spirLsTasAddr}
	STATUS  current
	DESCRIPTION
		"Trap sent when the TAS starts up"
	-- 1.3.6.1.4.1.33824.3.500.2.0.3
	::= { spirLsTraps 3 }

Issued during a successful startup via TAS Start (TAS Manager) or tasrun (command line) with a result value (spirLsResultYesNo) of 1 (indicating enabled) and during graceful shutdown of TAS with a result value of 0 (indicating cleared).

Example:

Enable TAS Stopping Trap

Enables Trap sent when TAS is gracefully shutdown. Issued during a graceful shutdown via TAS Stop (TAS Manager) or tasstop (command line) with a result value (spirLsResultYesNo) of 1 (indicating enabled) and during successful startup of TAS with a result value of 0 (indicating cleared).

spirLsTasStopping NOTIFICATION-TYPE
	OBJECTS {
		spirLsResultYesNo,
		spirLsTasAddr}
	STATUS  current
	DESCRIPTION
		"Trap sent when the TAS is shutdown gracefully"
	-- 1.3.6.1.4.1.33824.3.500.2.0.4
	::= { spirLsTraps 4 }

Example :

NOTE: The "spirLsTasStopping" TRAP will be sent when the TAS is started, with a value of cleared (0). It will be controlled by the TAS Stopping Trap being enabled.

Enable TAS Hard Drive Full Trap

Enables System disk utilization traps. Warning and Error level traps.   Warning/1 Level (% full) - Default = 7.  The % full that triggers Warning/1 Level, must be between 0% and error % error/2 Level (% full) - Default = 99.  The % full that triggers error/0 Level, must be between warning % and 100 %

spirLsTasHdTrap NOTIFICATION-TYPE
	OBJECTS {
		spirLsTasHdPct,
		spirLsTasHdGBytesLeft,
		spirLsErrorWarningLevels,
		spirLsTasAddr}
	STATUS  current
	DESCRIPTION
		"Sent when HD is low"
	-- 1.3.6.1.4.1.33824.3.500.2.0.1
	::= { spirLsTraps 1 }

Checked every 5 minutes by default otherwise overwritten by snmp_hd_trap_check_period_mins (range 1-10 mins)
SNMP Server Settings allow user to enable this trap and to configure the percentage levels for error and warning.

Trap includes information about the hard drive percentage full, gigabytes remaining, and warning level
Levels
Error(2) – used if hard drive level is equal to or greater than % set in error/2 Level
Warning(1) - used if hard drive level is equal to or greater than % set in warning/1 Level and less than % set in error/2 Level
Clear(0) – used if hard drive level is less % set in warning/1 Level and had exceeded it in previous check.

Example:

Enables Test Server READY/NOT_READY Trap

Enables Test Server READY/NOT_READY traps. NOT_READY traps will not be sent until the TS is first in a READY state.

spirLsTestServerStatusTrap NOTIFICATION-TYPE
	OBJECTS {
		spirLsTsTableTsId,
		spirLsTsTableTsName,
		spirLsTsTableTsState,
		spirLsErrorWarningLevels,
		spirLsTasAddr}
	STATUS  current
	DESCRIPTION
		"Test Server Status Trap"
	-- 1.3.6.1.4.1.33824.3.500.2.0.2
	::= { spirLsTraps 2 }

NOTE:

  • Test Server traps will include separate traps for each Test Server, but using the same Trap ID.  The Trap Receiver must manage the state of each TS separately from same Trap ID
  • When the TAS starts all the TSs are initially in the NOT_READY state, thus cannot get NOT_READY traps when the TAS starts.
  • Enable the READY level to get a trap with a "cleared/0" value when the TS goes in a READY state to get confirmation that the TS is READY
  • Any TS that is not being used will never go in a READY state and therefore will never send a NOT_READY trap.
  • After a fresh TAS startup, there will be a NOT_READY trap for each TS that registers with the TAS.
  • There will not be a READY trap until a TS actually goes READY. Any TS State other than READY or RUNNING is considered to be in a "NOT_READY" state. Thus, the TAS will not send a READY trap if the TS state is NEEDS_LICENSE,  NOT_SUPPORTED, OBSOLETE_HARDWARE or NEEDS_UPGRADE.

TS Goes Ready Level - Options: Cleared/0, Warning/1, error/1 TS Goes NOT_Ready Level - Options: Cleared/0, Warning/1, error/1


Enables Test Server Hard Drive Full Trap

Enables Test Server Hard Drive Full Trap. Select for SNMP Traps generated by the TAS when the test server hard disk usage reaches the limits set below. 

spirLsTestServerHdTrap NOTIFICATION-TYPE
	OBJECTS {
		spirLsTsTableTsId,
		spirLsTsTableTsName,
		spirLsTasHdGBytesLeft,
		spirLsErrorWarningLevels,
		spirLsTasAddr}
	STATUS  current
	DESCRIPTION
		"Test Server Low HD Trap"
	-- 1.3.6.1.4.1.33824.3.500.2.0.8
	::= { spirLsTraps 8 }

Checked every TS Status that includes Remaining Disk value different than previous. See - Managing Your Test Servers

Trap includes information about the test server id, test server name, megabytes left, and warning level :
Error – used if test server has less than or equal to than the gigabyte threshold set in error/2 Level
Warning – used if test server has less than or equal to than the gigabyte threshold set in warning/1 Level and greater than gigabyte threshold set in error/2 Level
Clear – used if hard drive level is greater than gigabyte threshold set in warning/1 Level and had less than it in previous check

There are two limits :

1. warning/1 Level (GB remaining) - Enter the remaining hard drive space that triggers a warning/1 level. The value must be greater than the error/2 level and less than 100. 

2. error/2 Level (GB remaining) - Enter the remaining hard drive space that triggers a error/2 level. The value must be greater than or equal to "2" and and less than the warning/1 level.


Note that Test Server traps will include separate traps for each Test Server, but using the same Trap ID.  The Trap Receiver must manage the state of each TS separately from same Trap ID.

Enables UE State Change Trap

Enables UE State Change traps notifications.

spirLsUeStatusTrap NOTIFICATION-TYPE
	OBJECTS {
		spirLsUeMake,
		spirLsUeModel,
		spirLsUeSerial,
		spirLsUeMeid,
		spirLsUeAppVersion,
		spirLsUeState,
		spirLsTsTableTsName,
		spirLsTasAddr}
	STATUS  current
	DESCRIPTION
		"UE Status Trap"
	-- 1.3.6.1.4.1.33824.3.500.2.0.7
	::= { spirLsTraps 7 }

SNMP trap rules:

  1. Send SNMP UE State Change trap (spirLsUeStatusTrap) for transitions of states: online, offline, unauthorized, unknown, deleted, setup, upgrading (no trap sent if state is empty)
  2. Send Trap when there is a state change and it persists for next 1 min. The 60 secs only applies to these state transitions :
    1. setup to online
    2. upgrading to online
    3. online to offline

UE states will be checked for changes anytime TAS receives a TS-Registration or TS-Status message. Most UE state changes will trigger a trap immediately, but the following UE state transitions (online→offline, setup→online, upgrading→online) will require the new state to be constant for at least 60s.   The trap These traps might be triggered by the first TS-Status received after 60s time expires or via the normal TS Heartbeat timer the TAS has.  The trap will not be exactly 60s after it first knows the new state. 


Send SNMP UE State Change trap (spirLsUeStatusTrap) for transitions of states: online, offline, unauthorized, upgrading, setup, unknown, deleted (no trap sent if state is empty). 

Also supported by RESTful API - /api/settings/snmp - ueStateChangeEnabled

online

Notify when UE associated with Test Server is showing connected (from adb devices list)

offline

Notify when UE associated with Test Server is showing offline (from adb devices list - if the device is previously online and then adb devices list shows either offline or missing)

unauthorized Notify when UE associated with Test Server is showing unauthorized (from adb devices list - fingerprint mismatch)
unknown Notify when Test server state is not ready
deleted 

notify when UE associated with Test Server is deleted or when UE is no longer included in UE list from Test Server

upgrading Notify when UE associated with Test Server is installing DTA app
setup Notify when UE associated with Test Server is running Setup


spirLsUeStatusTrap content

spirLsUeMake UE Manufacturer
spirLsUeModel UE Product/Device
spirLsUeSerial UE Serial Number
spirLsUeMeid UE MEID
spirLsUeAppVersion UE App Version
spirLsUeState UE State (online, offline, upgrading, unauthorized, unknown, setup, deleted)
spirLsTsTableTsName Test Server name (existing OID)
spirLsTasAddr TAS IP Address (existing OID)


Trap includes information about the make, model, serial, meid, application version, and state

Issued when UE added/deleted or when UE State changes (there is a 1 min delay for transitions from upgrading or setup states to online state and for online state to offline state).

Note that UE traps will include separate traps for each tethered UE, but using the same Trap ID.  The Trap Receiver must manage the state of each UE separately from same Trap ID.

UE Status Change Trap Example:


Enables License Expiring Trap

Select Enables License Expiring Trap for SNMP Server Settings that allow user to enable this trap along with the minor, major, critical levels based on number of days remaining.

spirLsLicenseExpiringTrap NOTIFICATION-TYPE
	OBJECTS {
		spirLsTrapSeverity,
		spirLsLicenseId,
		spirLsLicenseName,
		spirLsLicenseExpirationDate,
        spirLsLicenseExpirationInfo	}
	STATUS  current
	DESCRIPTION
		"License Expiring Trap"
	-- 1.3.6.1.4.1.33824.3.500.2.0.11
	::= { spirLsTraps 11 }

When enabled, enter the number of day remaining in the three input boxes below used to define the level of the trap (minor, major, critical) notification:

Enter minor/1 Level (Days remaining) - Enter the remaining days before license expiration that triggers a minor/1 level notification. Range : greater than the major/2 level and less than 100. Default = 30

Enter major/2 Level (Days remaining) - Enter the remaining days before license expiration that triggers a major/2 level notification. Range : greater than the critical/2 level and less than minor/1 level. Default = 7

Enter critical/3 Level (Days remaining) - Enter the remaining days before license expiration that triggers a critical/3 level notification. Range : greater than or equal to 1 and less than the major2 level. Default = 1

Issued at TAS startup, if modifications to thresholds affect severity, and at the beginning of each day.
There are 2 types of expiring traps - for the overall license expiring and for features expiring.
Depending if days to expiration is > 1, =1, =0, <0, expiration info will be in the format
License is expiring in X days
License is expiring in 1 day
License is expiring today
License is expired
One or more features are expiring in X days
One or more features are expiring in 1 day
One or more features are expiring today
Severities
Critical(3) - used if days to expiration is less than or equal to critical threshold
Major(2) - used if days to expiration is less than or equal to major threshold and greater than critical threshold
Minor(1) - used if days to expiration is less than or equal to minor threshold and greater than major threshold
Info(0) - used if days to expiration exceeds minor threshold after changing thresholds or at startup

Example :

Also supported in REST API /api/settings/snmp - licExpiringEnabled, licExpiringMinorThreshold, licExpiringMajorThreshold, licExpiringCriticalThreshold

Enables SIM Server Trap

Enables SIM Server Trap notifications. Additional details about SIM Server in topic vSIM Administration

Provides notifications when a SIM Server data has changed or when SIM Server becomes unreachable.

Query Statuses spirLsSimServerQueryStatus :
changed(0) === The TAS successfully queried the SIM Server and the data has changed from previously known.  Consider this will always happen when SIM Server is first queried.
failed(1) === The TAS was unable to query the SIM Server for some reason.

Note that SIM Server traps will include separate traps for each SIM Server, but using the same Trap ID.  The Trap Receiver must manage the state of each SIM Server separately from same Trap ID.

spirLsSimServerTrap NOTIFICATION-TYPE
	OBJECTS {
		spirLsSimServerAddr,
		spirLsSimServerName,
		spirLsSimServerQueryStatus }
	STATUS  current
	DESCRIPTION
		"SIM Server Change Trap"
	-- 1.3.6.1.4.1.33824.3.500.2.0.10
	::= { spirLsTraps 10 } 

Version  SNMPv2  SNMPv3

Select version SNMPv2 or SNMPv3.

Community

Available only when version = SNMPv2. Default = public

Context Name

Context Engine Id

User Name

Authentication Protocol

Authentication Password

Privacy Protocol

Privacy Password

Available only when version = SNMPv3.   Enter Context Name, Enter Context Engine Id, Enter User Name, Authentication Protocol - Options: none, MD5 or SHA, Enter encryption protocol Password, Enter Privacy Protocol - Options: none, DES,  AES128,   Enter Privacy protocol Password  
 
NOTE: Current settings of Authoritative Engine ID do not comply with RFC3411 standard. However, we are currently only supporting traps.
 

Get MIBs

Opens browser to URLs required to configure NMS. When the Get MIBs button is selected, two browser windows will open which show the two MIB files in text format. These files can be saved as files on your system. The MIB file  "SPIRENT-LANDSLIDE-MIB.mib" requires the "SPIRENT-MIB.mib" file to be already installed on your system, thus load the "SPIRENT-MIB.mib" first. 

When adding the MIBs to a Network Management System for monitoring, the "SPIRENT-MIB.mib" should be loaded first.

/TASIP/SPIRENT-MIB.mib , /TASIP/SPIRENT-LANDSLIDE-MIB.mib


TroubleShooting notes: snmp_file_logging is available on the TAS to turn on logging of the SNMP Traps communications on the TAS to help debug problems. This will turn on logging of the raw data being sent in the traps into /usr/sms/data/SNMP_comm_0.log file. Monitor this file to see exactly what the TAS is sending on the network. 

The next thing to do, is to use tcpdump or wireshark or other capture tool, to capture the packets based on the Destination IP Address(es) and Port that the SNMP was configured for.   As with any network troubleshooting you might do this on both the TAS and the destination SNMP receiver to make sure messages are being transported properly.

For general testing and viewing the Traps being received, there are many freeware SNMP tools out there, we use SnmpB to do our testing, as seen in examples above in this page:  https://sourceforge.net/projects/snmpb/


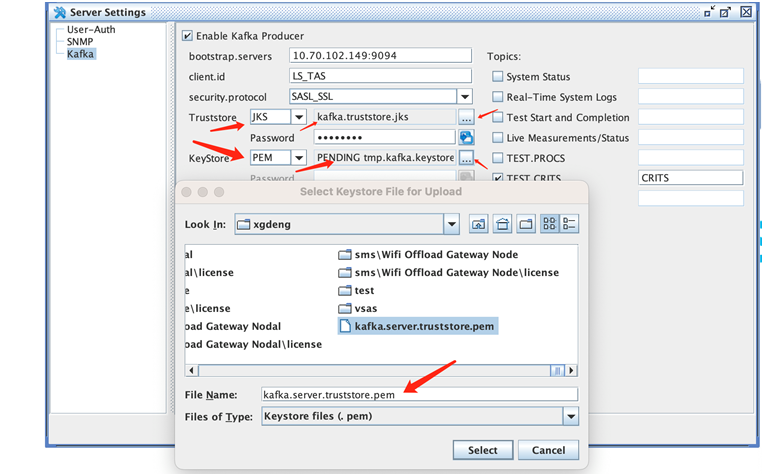
Kafka is a monitoring tool that a customer can setup with their own configuration. Landslide TAS works as a Kafka Producer, which is a message provider to the Kafka server. https://kafka.apache.org

Enable the Kafka Producer on the TAS to select from the following data sources in Landslide with a user-defined topic for each:

Once this option is enabled, the TAS will keep sending each of Topics to the configured bootstrap.server (Kafka server). 

The left side configurations are 100% matched up with Kafka Producer configuration:
https://docs.confluent.io/platform/current/installation/configuration/producer-configs.html#value-serializer
https://kafka.apache.org/26/javadoc/org/apache/kafka/clients/producer/ProducerConfig.html

To support Secure Kafka, several changes were made to the Kafka configuration in the TAS Server Settings. Our design follows directly from the Kafka APIs. Please see https://kafka.apache.org/intro and https://kafka.apache.org/33/documentation.html.

Note that Landslide is using Kafka 3.3, while the latest version is 3.4.

TroubleShooting notes: kafka_file_logging is available on the TAS to turn on logging of the Kafka communications on the TAS to help debug problems. This will turn on logging of the Kafka component to /usr/sms/data/KafkaSend_0.log. Monitor this file to see details about the Kafka setup, broker connection and messaging sent to the network. 
For deeper messaging details use tcpdump or wireshark or other capture tool, to capture the packets based on the Destination IP Address(es) and Port that the Kafka is using. As with any network troubleshooting you might do this on both the TAS and the destination Kafka broker to make sure messages are being transported properly.

1.

Select Admin > Server Settings - Kafka and the Server Settings Kafka window opens.

All consumers/producers have a type for a key and a value, even if the event never has a key (in this case, the consumer/producer could use String type to avoid using a generic Object).

Depending on the client's needs, Landslide use below to produce events:

NOTE:
  • The minimum required fields are the bootstrap.servers and the client.id, security.protocol  and at least one Topic.
    The rest of optional configurations can be added in the Other Settings as name=value on each line
  • The right side Topics provide the ability to turn on individual data streams from Landslide.
  • Some nuances about Landslide Kafka:

    When you start the TAS it will check for Kafka being enabled and start the Producer if enabled. The Producer starts late in the startup sequence and therefore some Real-Time Logs related to TAS startup may not be included in the Kafka output.  

    If you modify the Server Settings to change Kafka settings, if the Kafka Producer is already running it will be stopped, then a new Kafka Producer will be created/started with the new configuration. If Kafka was running when you modified the settings, there will be a small interruption to the messaging, some data will be lost.

    If while Kafka is enabled the Kafka Bus goes down (messages not sending), the TAS will queue up messages for a time (500 messages), if Kafka Bus comes back quickly, queued up messages will be sent. If the Kafka Bus goes down for a while or definitely reports error to our Producer, the Kafka Producer will be disabled for 10s before it retries. It will stay in this mode until it reconnects or the user re-configures things. If the queue gets filled up, new messages will be dropped.

    Landslide internal Kafka send queue is currently configured for up to 500 messages. If a TAS that runs 100’s of tests at the same time and turned on the test session based topics, then your Kafka Bus/Network must be fast to be able to support the traffic. 


2.

Select to Enable Kafka Producer - Enter the details below for Kafka Producer - https://kafka.apache.org/26/javadoc/org/apache/kafka/clients/producer/ProducerConfig.html

https://kafka.apache.org/26/javadoc/org/apache/kafka/clients/producer/ProducerConfig.html#ACKS_CONFIG

CloudEvents Headers

When enabled, the following header fields will be added to each Kafka record as part of data forwarding to Snowflake IEBUS receiver.

Note: This has been redesigned from 23.3 to move the CloudEvents fields into the body of the Kafka Records and embed the actual record data to send in a “data” attribute.
This is an example from the Spec: https://github.com/cloudevents/spec/blob/main/cloudevents/spec.md#example

Landslide kafka will include the following header fields as defined in cloudevent specification :

  • Id: Unique identifier for the event
  • datacontenttype: Format of the data like application/json
  • specversion: Version of the format of the data (schema version). You may want to use the specversion to maintain the backward compatibility
  • type: The type of event data like 4G-PDN-ATTACH-WITH-USER-PLANE-DATA-TRAFFIC
  • Time: Event generation time (Optional)
  • Source: Identifies the source of the event

Landslide specific Descriptions for each field listed above :

time - standard UTC Timestamps of when our code queues up the Record to be sent.
source - TAS Hostname
datacontenttype - application/json, application/text, text/csv and others as applicable to each Topic type we have.
specversion - Landslide A.B.C version, 23.3.2
id - combination of a Timestamp and an auto-incremented value
type - one of (SYSTEM-STATUS, SYSTEM-LOGS, TEST-START-COMPLETION-EVENTS, TEST-LIVE-MEASUREMENTS, END-OF-TEST-PROCS-FILE, END-OF-TEST-CRITS-FILE, END-OF-TEST-RESULT-FILES)

Example for a System Status update:

  "datacontenttype": "application/json",
  "id": "2023-03-30T07:19:39.574-222",
  "source": "https://10.71.30.42",
  "specversion": "23.3.0",
  "time": "2023-03-30T07:19:39.574",
  "type": "SYSTEM-STATUS",

The the CloudEvents Headers are now embedded into the message directly.

For example a TAS status message would normally look like this:


  "adminMessage": "",
  "advancedSecurity": false,
  "landslideVersion": "TAS-99.9.0.2022-10-15.1pv-(internal)",
  "licenseExpires": "05/28/2023",
  ...
 "testServers": 
 

With CloudEvents Headers turned on,  it will look like this:


  "datacontenttype": "application/json",
  "id": "2023-03-30T07:19:39.574-222",
  "source": "https://10.71.30.42",
  "specversion": "23.3.0",
  "time": "2023-03-30T07:19:39.574",
  "type": "SYSTEM-STATUS",
  "data": {
    "adminMessage": "",
    "advancedSecurity": false,
    "landslideVersion": "TAS-99.9.0.2022-10-15.1pv-(internal)",
    "licenseExpires": "05/28/2023",
    ...
   "testServers": 
 

Use TAS Setting (Edit Settingstas_fqdn to set the HOST that the TAS will use for all URLs it builds in APIs and external notifications (Kafka/SNMP), in lieu of IP-Address. 

When the TAS is started, the startup log will print information about IP Address and Hostname: TAS FQDN set to: test.tas.spirent.com

bootstrap.servers

Enter the Kafka broker's IP address. If Kafka is running in a cluster, you can provide comma (,) separated addresses.

Example : localhost:9091, localhost9092

client.id

Enter the ID producer so that the broker can determine the source of the request.

Example : LS_TAS

security protocol

Select a security.protocol for Kafka. 

Options : PLAINTEXT, SSL, SASL_PLAINTEXT, SASL_SSL

If either SASL_PLAINTEXT or SASL_SSL is selected, you must configure the password that will be used to authenticate.

When security.protocol set to PLAINTEXT, it is the same as the prior version of Kafka, no security enabled.

When set to SSL or SASL_SSL, Truststore and Keystore, and/or SSL Key password are now optional which is a change from previous releases. 

Note: Truststore and Keystore when uploaded to TAS, which is located: /usr/sms/data, they are kafka.truststore.jks and kafka.keystore.jks.


As shown below, when click … which will launch the File Chooser to for the cert file (ending with .jks). After the upload, the file to TAS under /usr/sms/data, name as tmp.kafka.truststore.jks or tmp. kafka.keystore.jks.

When password along with the private key (if entered) pass the validation, the the tmp.* file will be renamed to kafka.*.jks. if you cancel during the process, then the tmp file will stay on the TAS but will not be used unless you re-do it.

When the Truststore/Keystore field is EMPTY that means no store has ever been uploaded. 

When the Truststore/Keystore field has tmp.Xyz.jks that means a store has been uploaded to be saved when the user clicks OK or Apply. If the user clicks Cancel, that tmp file will stay on the TAS but reverts to previous state (could be empty/not stored, or leave current store alone/active).
If user clicks OK/Apply and there are validation issues, it remains but reverts to previous state (could be empty/no store, or leave current store alone/active).

When you connect to any secure server (Broker) using TLS you expect a Server Certificate to be Trusted, by having a Certificate(s) in your local TrustStore, you should always expect the TrustStore to be configured. A Server can optionally be configured to do Client Authentication,

and in this case the client (TAS) should have a KeyStore containing the Client’s Private Key and Certificate to respond to query from the Server (Broker). When saving the configuration, the TrustStore and KeyStore and optional private key password will all be checked before accepting the change.

If the TAS can’t load the store and key, the configuration will be failed with an error message. Check the Real-Time Logs for the confirmation or errors :  


We support 3 format of certificates, JKS, P12, and PEM. Older versions of Kafka required the certificates and private keys inside truststore/keystore, we support both JKS (old java format), and PKCS12 formats for these files. We also accept the files in .pem format directly. 

When using the PEM format, the user only needs to provide two files:

The key.pem file should contain the Private Key, Certificate and optionally CA/ROOT Certificate of the TAS, indicating to the Broker the Identity of the TAS.
The trust.pem file should contain the Certificate and/or CA/ROOT Certificate of the Broker, indicating to the TAS which Broker to trust.
The order of the file contents matters and should be as mentioned above.
Currently, we do not support Encrypted Private key via the PEM file. Use Keystore instead.

Once you install a JKS, P12, PEM file it will remain on the TAS, we did not provide a way to delete them.  But they just won’t be used if not set for that mode or no password is configured.  We require passwords for the stores.

The password become a indicator, if with some security.protocol, the certs are optional, so you can just remove the password field then it will not use the certs.

Real-time log examples:
sms                   2024-02-14 18:14:05  Informational  SysAdmin    Modify    [email protected]: Modified Server Settings
<system>         2024-02-15 07:04:47  Error          SysAdmin    Modify    KeyStore tmp.kafka.keystore.jks: Private key password does not match, Error: Cannot recover key
sms                   2024-02-15 07:04:47  Error          SysAdmin    Modify    Keystore: Private key password does not match, Error: Cannot recover key
sms                   2024-02-15 07:04:59  Error          SysAdmin    Modify    Keystore: Private key password does not match, Error: requested entry requires a password
<system>          2024-02-15 07:04:59  Error          SysAdmin    Modify    KeyStore tmp.kafka.keystore.jks: Private key password does not match, Error: requested entry requires a password
<system>          2024-02-15 07:05:37  Error          System      Modify    Kafka Producer Startup Exception: org.apache.kafka.common.KafkaException: Failed to construct kafka producer
                                                                                 Caused by: Failed to load PEM SSL keystore /usr/sms/data/kafka.keystore.pem
<system>              2024-02-15 12:58:31  Informational  System      Kafka     Stopping
<system>              2024-02-15 12:58:52  Informational  System      Kafka     Starting
 

Truststore


Password

Available when security.protocol = SSL, SASL_PLAINTEXT, SASL_SSL

Select a certificate for Truststore. 3 format of certificates are supported, JKS, P12, and PEM.

Older versions of Kafka required the certificates and private keys inside truststore/keystore, both JKS (old java format), and PKCS12 formats for these files are supported.  


We also accept the files in .PEM format directly.

It must contain just one alias which is the specific Certificate (truststore) or Private Key (keystore).

To generate a truststore JKS file from your PEM files, you can follow these steps:

  1. Convert the client certificate and private key into a PKCS12 file format:
    openssl pkcs12 -export -in client_cert.pem -inkey client_key.pem -out client.p12
  2. Convert the CA certificate into a Java truststore file format (JKS):
    keytool -import -alias ca -file ca_cert.pem -keystore truststore.jks
  3. Import the client certificate and private key from the PKCS12 file into the JKS truststore:
    keytool -importkeystore -srckeystore client.p12 -srcstoretype PKCS12 -destkeystore truststore.jks -deststoretype JKS
  4. Enter a password for the JKS truststore when prompted.

After following these steps, you should have a JKS truststore file named truststore.jks that contains both the CA certificate and the client certificate/private key. You can then use this truststore file in your Kafka producer configuration.

Keystore


Password

Available when security.protocol = SSL, SASL_PLAINTEXT, SASL_SSL

Select a certificate for KeyStore. 3 format of certificates are supported, JKS, P12, and PEM.

Older versions of Kafka required the certificates and private keys inside truststore/keystore, both JKS (old java format), and PKCS12 formats for these files are supported.  

We also accept the files in .PEM format directly.


To generate a Java Keystore (.jks) file from the three PEM files (CA certificate, client certificate, and client private key), you can use the following steps:

  1. Convert the PEM files to DER format:
    openssl x509 -outform der -in ca_cert.pem -out ca_cert.der
    openssl x509 -outform der -in client_cert.pem -out client_cert.der
    openssl pkcs8 -topk8 -nocrypt -in client_key.pem -out client_key.der -outform der
  2. Import the CA certificate into a Java TrustStore:
    keytool -importcert -alias ca_cert -keystore truststore.jks -file ca_cert.der
  3. Create a PKCS12 file containing the client certificate and private key:
    openssl pkcs12 -export -in client_cert.der -inkey client_key.der -out client.p12 -name client_alias
  4. Import the client certificate and private key from the PKCS12 file into a Java KeyStore:
    keytool -importkeystore -destkeystore keystore.jks -srckeystore client.p12 -srcstoretype PKCS12 -alias client_alias

You will need to enter a password for the TrustStore and KeyStore when prompted by the keytool command.

Make sure to use the same password when configuring your Kafka client or server to use these files.

ssl.key.password Enter the key password (ssl.key.password)
sasl.mechanism

Select the sasl.mechanism. Options : PLAIN, SCRAM-SHA-256, SCRAM-SHA-512, GSSAPI, OAUTHBEARER

When set to SASL_PLAINTEXT and SASL_SSL, truststore and keystore are optional, but sasl.mechanism and sasl.jaas.config need to be configured.
 

sasl.jaas.config

Enter the Java Authentication and Authorization Service (jaas) configuration property which is used to specify the authentication configuration for

SASL (Simple Authentication and Security Layer) in Kafka.

When set to SASL_PLAINTEXT and SASL_SSL, truststore and keystore are optional, but sasl.mechanism and sasl.jaas.config need to be configured.


Other Settings

Enter a collection of key=value pairs, one on each line, which provides configuration parameters for the clients.

 
To disable hostname verification in SSL connections for a Kafka client, you can set the ssl.endpoint.identification.algorithm property to an empty string in Other Settings.

This property controls the endpoint identification algorithm used by the client, and setting it to an empty string disables the hostname verification check. 

Topics : 

System Status

Enter a valid kafka Topic Name. The topic name can be up to 255 characters in length, and can include the following characters: a-z, A-Z, 0-9, . (dot), _ (underscore), and - (dash). 


The TAS will send a status update every 30 seconds which includes Test Server details.  The equivalent of our REST API Status query.

Schema: 

{

    "type": "object",

    "description": "TAS Status object",

    "properties": {

        "adminMessage": {

            "type": "string",

            "description": "The Admin Message, empty string if not set"

        },

        "advancedSecurity": {

            "type": "boolean",

            "description": "Indicates if the TAS has Advanced Security enabled"

        },

        "landslideVersion": {

            "type": "string",

            "description": "The Landslide full product version"

        },

        "licenseFile": {

            "type": "string",

            "description": "The last license file properly installed"

        },

        "licenseServerLastCheckout": {

            "type": "string",

            "description": "Reported only when using License Server License, the last time TAS successfully made checkout with server"

        },

        "licenseServerMaxTas": {

            "type": "integer",

            "description": "Reported only when using License Server License, if provided by license server it will be greater than 0, indicating number of TASs allowed on the license"

        },

        "licenseServerMaxTs": {

            "type": "integer",

            "description": "Reported only when using License Server License with Max-TSs, if provided by license server it will be greater than 0, indicating number of TSs allowed on the license"

        },

        "licenseServerReservedTs": {

            "type": "integer",

            "description": "Reported only when using License Server License with Max-TSs, indicates the number of TSs reserved for use by this TAS"

        },

        "licenseServerRemainingTs": {

            "type": "integer",

            "description": "Reported only when using License Server License with Max-TSs, if provided by license server it will be greater than 0, indicating number of TSs available for reserving, as of the time of the licenseServerLastCheckout"

        },

        "licenseServerState": {

            "type": "string",

            "description": "Reported only when using License Server License, the License Server Connection state: Running, Warning, Locked"

        },

        "numLoggedInUsers": {

            "type": "integer",

            "description": "The number of GUI or Tcl users (persistently) logged in"

        },

        "numRunningTests": {

            "type": "integer",

            "description": "The number of running test sessions"

        },

        "numRunningTestServers": {

            "type": "integer",

            "description": "The number of test servers in the RUNNING state"

        },

        "remainingDisk": {

            "type": "integer",

            "description": "The number of MiB of disk space remaining for the Test Manager. May be -1 if not known yet"

        },

        "remainingMemory": {

            "type": "integer",

            "description": "The number of MiB memory remaining for the TAS service. May be -1 if not known yet"

        },

        "resultsSizeMiB": {

            "type": "integer",

            "description": "The current size of all the stored result files in MiB. May be -1 if not known yet"

        },

        "rslHighMiB": {

            "type": "integer",

            "description": "The rsl_high threshold in MiB that will trigger a cleanup."

        },

        "rslLowMiB": {

            "type": "integer",

            "description": "The rsl_low threshold in MiB of size to keep after a cleanup."

        },

        "tasVersion": {

            "type": "string",

            "description": "The software version of the TAS"

        },

        "testServers": {

            "type": "array",

            "description": "List of TSs provisioned on the TAS",

            "items": {

                "type": "object",

                "description": "Information about specific TS",

                "title": "testServer",

                "properties": {

                    "advancedSecurity": {

                        "type": "boolean"

                    },

                    "id": {

                        "type": "integer"

                    },

                    "managementIp": {

                        "type": "string"

                    },

                    "name": {

                        "type": "string"

                    },

                    "requestedLicense": {

                        "type": "integer",

                        "description": "The user provisioned license ID"

                    },

                    "remainingMemory": {

                        "type": "integer",

                        "description": "The reported MiB of memory remaining on the TS"

                    },

                    "reservedLicenseState": {

                        "type": "integer",

                        "description": "Reported only when using License Server License with Max-TSs, indicates if the TS is reserved for running or not"

                    },

                    "runningLicense": {

                        "type": "string",

                        "description": "The descriptive name of the license actually running on the TS"

                    },

                    "state": {

                        "type": "string"

                    },

                    "url": {

                        "type": "string"

                    },

                    "version": {

                        "type": "string"

                    }

                }

            }

        }

    }

}

Example: 

{

  "adminMessage": "",

  "advancedSecurity": false,

  "landslideVersion": "TAS-99.9.0.2022-10-15.1pv-(internal)",

  "licenseExpires": "05/28/2023",

  "licenseFile": "vwlic.sql",

  "licenseId": "11932",

  "licenseName": "UI Team vTASs",

  "licenseServerLastCheckout": "Tue Oct 18 12:11:44 CDT 2022",

  "licenseServerMaxTas": 11,

  "licenseServerState": "Running",

  "numLoggedInUsers": 0,

  "numRunningTests": 0,

  "numRunningTestServers": 0,

  "remainingDisk": 11891,

  "remainingMemory": 3662,

  "resultsSizeMiB": 527,

  "rslHighMiB": 10000,

  "rslLowMiB": 9000,

  "tasVersion": "99.9.0.2022-10-15.1pv",

  "testServers": [

    {

      "url": "http://10.71.16.74:8080/api/testServers/1",

      "advancedSecurity": false,

      "id": 1,

      "managementIp": "10.71.16.32",

      "name": "TS32",

      "requestedLicense": 0,

      "remainingMemory": -1,

      "runningLicense": "No License",

      "state": "NOT_READY",

      "version": "",

      "warningsCount": 0

    },

    {

      "url": "http://10.71.16.74:8080/api/testServers/2",

      "advancedSecurity": false,

      "id": 2,

      "managementIp": "10.71.16.38",

      "name": "TS38",

      "requestedLicense": 0,

      "remainingMemory": -1,

      "runningLicense": "No License",

      "state": "NOT_READY",

      "version": "",

      "warningsCount": 0

    }     

Topics : 

Real-Time System Logs

Enter a valid kafka Topic Name. The topic name can be up to 255 characters in length, and can include the following characters: a-z, A-Z, 0-9, . (dot), _ (underscore), and - (dash). 

TAS will send Real-Time Logs live as they are reported, in the same format as REST API: GET api/systemlogs

Schema :

{

    "type": "object",

    "description": "Log Message",

    "properties": {

        "msg": {

            "type": "string",

            "description": "The actual log message"

        },

        "severity": {

            "type": "string",

            "description": "Informational, Warning, Error, or Fatal"

        },

        "timestamp": {

            "type": "string",

            "description": "TAS Timezone Timestamp: yyyy-MM-dd HH.mm.ss zzz"

        },

        "type": {

            "type": "string",

            "description": "Operations, SysAdmin, System"

        },

        "userId": {

            "type": "string"

        },

        "verb": {

            "type": "string"

        }

    },

    "required": [

        "msg",

        "severity",

        "timestamp",

        "type",

        "userId",

        "verb"

    ]

}

Example : 

Example #1:

{

   "msg":"Id(9): Completed (FAILED), result files:22-11-03_16.45.00__RID-9__DataFlow_AWS_Sprint-7_3-1.5_4k.log.txt",

   "severity":"3",

   "timestamp":"1667512040637",

   "type":"0",

   "userId":"342",

   "verb":"Run"

}

Example #2:

{
"msg": [email protected]: Modified Server Settings,"severity": 3,"timestamp": 1668723228844,"type": 1,"userId": 342,"verb": "Modify"
}
{
"msg": "Id(414): <scheduler>: Preparing Resources for Sierra-IPv4 from the user's library","severity": 3,"timestamp": 1668723300075,"type": 0,"userId": 342,"verb": "Run"
}
{
"msg": "Started STR test RID=125 for user sms\nTest: DataFlowTesting","severity": 3,"timestamp": 1668723300078,"type": 0,"userId": 342,"verb": "Schedule"
}
{
"msg": "Id(125): Starting STR 'DataFlowTesting', 1 of 1 total executions","severity": 3,"timestamp": 1668723300080,"type": 0,"userId": 342,"verb": "STR"
}
{
"msg": "Id(125): Starting Test 1 of 3: DataFlow_AWS_Sprint-7_3-1.5_4k","severity": 3,"timestamp": 1668723300081,"type": 0,"userId": 342,"verb": "STR"
}


Topics : 

Test Start and Completion

Enter a valid kafka Topic Name. The topic name can be up to 255 characters in length, and can include the following characters: a-z, A-Z, 0-9, . (dot), _ (underscore), and - (dash). 

Test Start and Completion will send a JSON message for Test Session that fully starts and then again when it completes.   

This will NOT include tests that fail to be started on the TS, those can be determined via the Real-Time System Log.

If Test Start and Completion are enabled, the Topic name must match what is configured in the Kafka server, e.g., if in kafka server topic name is ‘start_complete’ then he needs put ‘start_complete’ in the gui as well. 

Schema :

{

    "type": "object",

    "description": "Measurement reporting object",

    "properties": {

        "executionId": {

            "type": "string",

            "description": "The unique ID for the test session, <START_TIME>__<RUN_ID>, e.g. 22-10-18_03.49.24__RID-336"

        },

        "reportTime": {

            "type": "string",

            "description": "Timestamp when message was created by the TAS, e.g. 2022-10-18T08:51:43Z"

        },

        "test": {

            "type": "string",

            "description": "The Library/Name of the test session"

        },

        "user": {

            "type": "string",

            "description": "The username that started the test"

        },

        "status": {

            "type": "string",

            "description": "Either STARTED or COMPLETED"

        }

    }

}

Example : 

Example #1:

{

      "executionId": "22-09-21_03.49.24__RID-336",

      "reportTime": "2021-09-21T08:13:58Z",

      "test": "5G/VoNR/Special_VoNR_Test",

      "user": "billybob",

      "status": "STARTED"

 }

Example #2:

{"executionId": "22-11-17_16.15.00__RID-414","reportTime": "2022-11-17 22:15:03Z","test": "the user's library/Sierra-IPv4","user": "sms","status": "Started"
{"executionId": "22-11-17_16.15.00__RID-415","reportTime": "2022-11-17 22:15:06Z","test": "the user's library/VoLTE-Bluetooth-MOS_Sprint-6-1_MT_Sprint-7-1_MO","user": "sms","status": "Started"
{"executionId": "22-11-17_16.15.00__RID-416","reportTime": "2022-11-17 22:15:06Z","test": "the user's library/VoLTE-Bluetooth-MOS_Sprint-16-3_MT_Sprint-17-3_MO","user": "sms","status": "Started"

Topics : 

Test Configuration

Enter a valid kafka Topic Name. The topic name can be up to 255 characters in length, and can include the following characters: a-z, A-Z, 0-9, . (dot), _ (underscore), and - (dash). 

Test Configuration to forward test configuration for each test run to Kafka receiver. Message sent after a test is fully started, KAKFA records take on this schema:

This will NOT include tests that fail to be started on the TS, those can be determined via the Real-Time System Log.

{

  "datacontenttype": "application/json",

  "id": "2023-03-30T07:19:39.574-222",

  "source": "https://10.71.30.42",

  "specversion": "23.3.0",

  "time": "2023-03-30T07:19:39.574",

  "type": "TEST-CONFIG",

  "data": <MESSAGE_CONTENT>

}

Topics : 

Live Measurements/Status

Enter a valid kafka Topic Name. The topic name can be up to 255 characters in length, and can include the following characters: a-z, A-Z, 0-9, . (dot), _ (underscore), and - (dash). 

Landslide TAS kafka is sending Live Measurements events every second to the Kafka Broker. For some systems this is reporting events to fast to process, An option is provided to throttle the measurements and only send the measurement values every X seconds. The Test Session will still be reporting all the changed values to the TAS Kafka component, but only the most recently reported values for each measurement will be cached/queued. Once X second have passed, the current set of values will be sent to Kafka Broker. Additionally when a test completes, the final message will be sent asynchronously (forced). Customer will lose precision/granularity of changes every second or possibly interval, but they will at least get the cumulative values. Advanced users: If you run multi-iteration tests, if you do not set a small enough interval, you may lost some “(final results)”.  Same issue could affect other forms of testing too.
In addition, individual Test Session Control is allowed.

Use the Kafka Settings (this section) to choose the default test session mode . Select the Test Session Default : default mode of ON, OFF or Throttled. These will take effect as long as the Test Session does not “force” a different mode. From Test Session you can Force the measurements to be ON, OFF or Throttled. This gives flexibility to have all tests report measurements except for a few, or all tests do not report measurements except for a few, etc….

ON = Works like original feature.
OFF = Requires individual Test Session override for measurements to be sent.
Throttled = If Throttling is enabled and a test session completes before timer expires, we will force send that final message asynchronously. Enter the Throttling Interval in seconds. 

Go to Test Session Report Options - Customizing Report Options  (Kafkato enable an override of default mode to ON/OFF/Throttled. Test Session override will replace default mode (set here in this section). For Throttled mode, it will cache the measurements data, before the timer out, the cache data will be updated if it has the measurement data or it will add a new one based on the measurement id. This the is way to merge the coming measurements, just to keep the latest ones. When configured timer run out, it will send the merged one to Kafka. If Throttling is enabled and a test session completes before timer expires, we will force send that final message asynchronously. 

Kafka Settings (this section) Test Session Settings (Kafka) Result
Meas topic disabled ANY (Not forced/default/disabled, ON, OFF, Throttled) No Meas Kafka Messages
Meas Topic ON Not forced Standard Kafka Messages
Meas Topic ON Forced OFF No Meas Kafka Messages
Meas Topic ON Forced ON Standard Kafka Messages
Meas Topic ON Forced Throttled Throttled Kafka Messages
Meas Topic OFF Not forced No Meas Kafka Messages
Meas Topic OFF Forced OFF No Meas Kafka Messages
Meas Topic OFF Forced ON Standard Kafka Messages
Meas Topic OFF Forced Throttled Throttled Kafka Messages
Meas Topic Throttled Not forced Throttled to Kafka Settings Interval  Kafka Messages
Meas Topic Throttled Forced OFF No Meas Kafka Messages
Meas Topic Throttled Forced ON Standard Kafka Messages
Meas Topic Throttled Forced Throttled Throttled to Test Session Interval  Kafka Messages


Live Measurements/Status will send a JSON message each second with each live measurement that has changed. 

Schema :

{

    "type": "object",

    "description": "Measurement reporting object",

    "properties": {

        "executionId": {

            "type": "string",

            "description": "The unique ID for the test session, <START_TIME>__<RUN_ID>, e.g. 22-10-18_03.49.24__RID-336"

        },

        "reportTime": {

            "type": "string",

            "description": "Timestamp when message was created by the TAS, e.g. 2022-10-18T08:51:43Z"

        },

        "results": {

            "type": "array",

            "description": "List of Measurements reported at this time",

            "items": {

                "type": "object",

                "description": "Individual Measurement Value",

                "properties": {

                    "id": {

                        "type": "string",

                        "description": "Namespace and name of measurement, e.g. ts0::tc0::UeMmRegRej"

                    },

                    "value": {

                        "type": "sring"

                    }

                }

            }

        }

    }

}

Example :

Example #1.

{

      "executionId": "22-09-21_03.49.24__RID-336",

      "reportTime": "2021-09-21T08:13:58Z",

      "results": [

        {

          "id": "ts0::tc0::UeMmRegCmp",

          "value": "2"

        },

        {

          "id": "ts0::tc0::UeMmRegRej",

          "value": "0"

        },

        {

          "id": "ts0::tc0::UeSmPduEstAccp",

          "value": "2"

        },

        {

          "id": "tsX::tcY::UeSmPduEstRej",

          "value": "0"

        },

        {

          "id": "ts0::tc0::PingHostIp_1",

          "value": "142.251.32.132"

        },

        {

          "id": "ts0::tc0::PingHost_1",

          "value": "www.google.com"

        },

        {

          "id": "ts0::tc0::PingStatus_1",

          "value": "Pass"

        },

        {

          "id": "ts0::tc0::PingMin_1",

          "value": "8107"

        },

        {

          "id": "ts0::tc0::PingMDev_1",

          "value": "280"

        },

        {

          "id": "ts0::tc0::PingMax_1",

          "value": "9093"

        },

        {

          "id": "ts0::tc0::PingCount_1",

          "value": "10"

        },

        {

          "id": "ts0::tc0::PingTime_1",

          "value": "8690"

        },

        {

          "id": "ts0::tc0::PingFirst_1",

          "value": "8460"

        },

        {

          "id": "ts0::tc0::PingJitter_1",

          "value": "306.6666667"

        },

        {

          "id": "ts0::tc0::PingLoss_1",

          "value": "0"

        }

      ]

    }

}

Example #2.

{"executionId": "22-11-17_16.15.00__RID-415","reportTime": "2022-11-17 22:16:32Z",
"results": [

{   "id": "_ElapsedTime_",  "value": "85"},
{   "id": "_ActualTime_",  "value": "1668723392922"}
]
}
{"executionId": "22-11-17_16.15.00__RID-416","reportTime": "2022-11-17 22:16:32Z",
"results": [

{   "id": "_ElapsedTime_",  "value": "85"},
{   "id": "_ActualTime_",  "value": "1668723392960"}
]
}
 

Topics : 

TEST.PROCS

Enter a valid kafka Topic Name. The topic name can be up to 255 characters in length, and can include the following characters: a-z, A-Z, 0-9, . (dot), _ (underscore), and - (dash). 

TAS will send the TEST.PROCS csv file as soon as they are generated.

Schema :

FIELD,FIELD,FIELD...

VALUE,VALUE,VALUE...

Topics : 

TEST.CRITS

Enter a valid kafka Topic Name. The topic name can be up to 255 characters in length, and can include the following characters: a-z, A-Z, 0-9, . (dot), _ (underscore), and - (dash). T

AS will send the TEST.CRITS csv file as soon as they are generated.

Schema :

FIELD,FIELD,FIELD...

VALUE,VALUE,VALUE...

Topics : 

Test Result Files

Enter a valid kafka Topic Name. The topic name can be up to 255 characters in length, and can include the following characters: a-z, A-Z, 0-9, . (dot), _ (underscore), and - (dash). 

TAS will send a list of URLs for each/all test result files when Test Sessions are completed. :

Schema :

{

    "type": "object",

    "description": "Measurement reporting object",

    "properties": {

        "executionId": {

            "type": "string",

            "description": "The unique ID for the test session, <START_TIME>__<RUN_ID>, e.g. 22-10-18_03.49.24__RID-336"

        },

        "reportTime": {

            "type": "string",

            "description": "Timestamp when message was created by the TAS, e.g. 2022-10-18T08:51:43Z"

        },

        "results": {

            "type": "array",

            "description": "List of URLs",

            "items": {

                "type": "string",

                "description": "URL to specific result file, e.g. https://1.1.1.1/results/sms/2022-02-22__RID-2_TestName.log.txt"

            }

    }

}

Example :

{

   "executionId":"22-11-03_16.32.24__RID-5__",

   "reportTime":"2022-11-03 21:34:46Z",

   "results":[

      "https://10.71.30.126/results/sms/22-11-03_16.32.24__RID-5__DataFlow_AWS_Sprint-7_3-1.5_DTLS.log.txt",

      "https://10.71.30.126/results/sms/22-11-03_16.32.24__RID-5__DataFlow_AWS_Sprint-7_3-1.5_DTLS.xls",

      "https://10.71.30.126/results/sms/22-11-03_16.32.24__RID-5__TEST.CRITS.20221103213446.142.0.csv",

      "https://10.71.30.126/results/sms/22-11-03_16.32.24__RID-5__TEST.PROCS_UE.20221103213446.116.1.csv",

      "https://10.71.30.126/results/sms/22-11-03_16.32.24__RID-5__ts0_tc0_info_report.csv",

      "https://10.71.30.126/results/sms/22-11-03_16.32.24__RID-5__ts0_tc0_ue0_BasicDataFlow.csv",

      "https://10.71.30.126/results/sms/22-11-03_16.32.24__RID-5__ts0_tc0_ue0_PingTest.csv",

      "https://10.71.30.126/results/sms/22-11-03_16.32.24__RID-5__ts0_tc0_ue0_ue_debug.tar.gz"

   ]

}