TLS
In VoLTE/IMS Node, MME Nodal, PGW Nodal, SGW Nodal, Wifi Offload Gateway Nodal, and IP application testing, the TLS tab on the Gm tab will allow securing of SIP signaling by authentication, encryption, and authorization through the exchange of certificates and verifications against a certificate authority. TLS will allow the user to select the cipher suites, private key, and certificate to be used during the TLS handshaking procedure. TLS will be supported on TCP and will be implemented via RADVISION SIP stack that utilizes OpenSSL.
TLS is available in IP Application node, MME Nodal and Network Host when WebRTC is enabled for WebRTC load testing and when Ut/Ub Interface.
TLS is available in AAA Nodal, AAA Node, IP Application node, and Wifi Offload Gateway Nodal when Transmission Protocol = TCP in the RADIUS Tab for RADSEC (RADIUS over TLS) testing.
TLS Tab is available on the DRA Nodal for HSS|S6a/S6d, S6a, PCRF, Rx and S9. It's available when Enable TLS is checked in the Diameter Tab. Transmission Protocol must be TCP.
TLS Tab is available on AMF Nodal Test Cnfg, AMF Node Emulator Cnfg, Service Based Nodal , Service Based Node , SMF Nodal Test Cnfg and SMF Node Emulator Cnfg test cases when Enable TLS is checked in the HTTP/2 Tab.
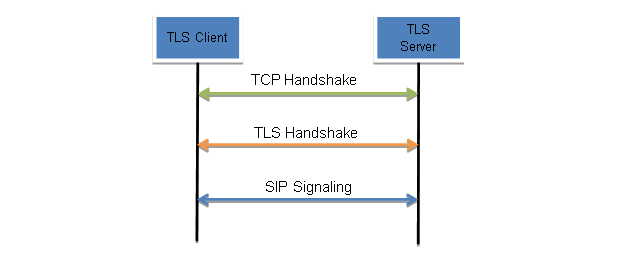
Each test server has its own certificate authority, which can be used to generate the private/public keys. When TLS is enabled, the TCP connection must be established first, followed by the TLS handshake procedure between client and server. In the process of the TLS handshake, public keys and certificate will be exchanged between client and server. Once the TLS handshake is complete and the cipher suite is agreed upon, SIP signaling can occur. To support TLS on existing VoLTE solution, the private key, certificate, and cipher suites must be configurable on both the client and server (proxy) side.
TLS Version(s) or Protocol Version (s)
|
|
|
|
|
|
The private key must be generated using the private key generating tools. It will be generated in a .pem file. Used for decrypting messages. Tcl Parameter: RadPrivateKeyFile |
||
|
The X.509 certificate, which contains the public key, along with other information, must be generated using the generating tools. Tcl Parameter: RadX509CertFile |
||
|
Trusted CA |
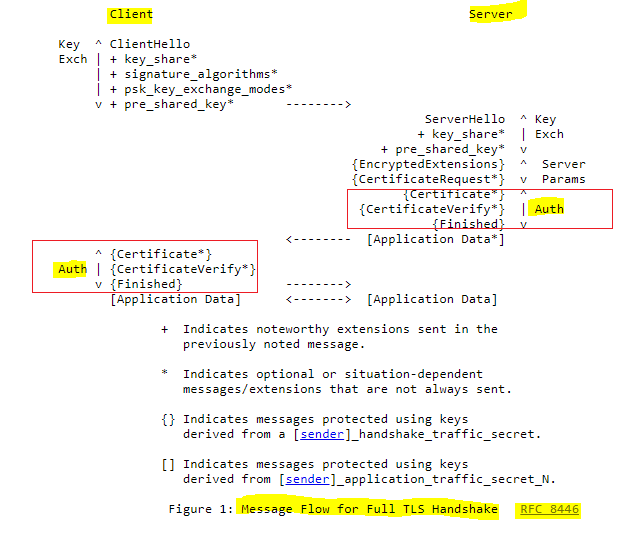
Select for Transport-Layer Security Mutual-Authentication (mTLS). Authentication is optional part of TLS for allowing the 2 endpoints (client/server) of a TLS connection to authenticate during TLS Handshake phase. The below message diagram (taken from RFC 8446) shows a complete TLS handshake with with highlighted authentication in red boxes. For completing a successful TLS authentication, TLS client and server is required to have a right type of key-pair consisting of a private key, a public key in form of X.509 certificate and a X.509 certificate of a trusted CA for the job. See additional details below.
Configure a Trusted CA File - additional details listed below (Certificate Authority).
Available in the following interfaces in AMF Nodal Test Cnfg:
Available in the following interfaces in AMF Node Emulator Cnfg:
Available in the following interfaces in DRA Nodal Test Cnfg:
Available in Nudm in HSS Node Emulator Cnfg when UDM (Nudm) is enabled. Available in AF-PCF in IMS Node Emulator Cnfg when N5 Interface is enabled. Available in the following interfaces in SMF Nodal Test Cnfg :
Available in the following interfaces in SMF Node Emulator Cnfg :
Available in the following interfaces in Service Based Nodal and Service Based Node test cases for Transport-Layer Security Mutual-Authentication (mTLS):
Tcl Parameter: NnrfClnAuthenticationEn Tcl Parameter: NnrfAuthenticationEn Tcl Parameter: NamfAuthenticationEn Tcl Parameter: N11NamfAuthenticationEn Tcl Parameter: N14NamfAuthenticationEn Tcl Parameter: N15NamfAuthenticationEn Tcl Parameter: N20NamfAuthenticationEn Tcl Parameter: N50NamfAuthenticationEn Tcl Parameter: N51NamfAuthenticationEn Tcl Parameter: NlsNamfAuthenticationEn Tcl Parameter: NlgNamfAuthenticationEn Tcl Parameter: NausfAuthenticationEn Tcl Parameter: N12NausfAuthenticationEn Tcl Parameter: NchfAuthenticationEn Tcl Parameter: N28NchfAuthenticationEn Tcl Parameter: N40NchfAuthenticationEn Tcl Parameter: NsmsfNchfAuthenticationEn Tcl Parameter: NpcfAuthenticationEn Tcl Parameter: N5NpcfAuthenticationEn Tcl Parameter: N7NpcfAuthenticationEn Tcl Parameter: N15NchfAuthenticationEn Tcl Parameter: NsmfAuthenticationEn Tcl Parameter: N11NsmfAuthenticationEn Tcl Parameter: N29NsmfAuthenticationEn Tcl Parameter: NudmAuthenticationEn Tcl Parameter: N8NudmAuthenticationEn Tcl Parameter: N10NudmAuthenticationEn Tcl Parameter: N13NudmAuthenticationEn Tcl Parameter: N21NudmAuthenticationEn Tcl Parameter: N52NudmAuthenticationEn Tcl Parameter: NudrAuthenticationEn Tcl Parameter: N35NudrAuthenticationEn Tcl Parameter: N36NudrAuthenticationEn Tcl Parameter: N37NudrAuthenticationEn Tcl Parameter: NrfNudrAuthenticationEn Tcl Parameter: NsmsfAuthenticationEn Tcl Parameter: NnssfAuthenticationEn Tcl Parameter: N22NnssfAuthenticationEn Tcl Parameter: N20NsmsfAuthenticationEn Tcl Parameter: NgmlcAuthenticationEn Tcl Parameter: NlgNgmlcAuthenticationEn Tcl Parameter: NbsfAuthenticationEn Tcl Parameter: NpcfNbsfAuthenticationEn Tcl Parameter: NafNbsfAuthenticationEn Tcl Parameter: PseppN32cAuthenticationEn Tcl Parameter: CseppN32cAuthenticationEn Tcl Parameter: PseppN32fAuthenticationEn Tcl Parameter: CseppN32fAuthenticationEn Tcl Parameter: SeppSrvAuthenticationEn Tcl Parameter: Sepp2NfAuthenticationEn Tcl Parameter: NnrfClnTrustedCaTestDataFileEn Tcl Parameter: NnrfClnTrustedCaFile Tcl Parameter: NnrfTrustedCaTestDataFileEn Tcl Parameter: NnrfTrustedCaFile Tcl Parameter: NamfTrustedCaTestDataFileEn Tcl Parameter: NamfTrustedCaFile Tcl Parameter: N11NamfTrustedCaTestDataFileEn Tcl Parameter: N11NamfTrustedCaFile Tcl Parameter: N14NamfTrustedCaTestDataFileEn Tcl Parameter: N14NamfTrustedCaFile Tcl Parameter: N15NamfTrustedCaTestDataFileEn Tcl Parameter: N15NamfTrustedCaFile Tcl Parameter: N20NamfTrustedCaTestDataFileEn Tcl Parameter: N20NamfTrustedCaFile Tcl Parameter: N50NamfTrustedCaTestDataFileEn Tcl Parameter: N50NamfTrustedCaFile Tcl Parameter: N51NamfTrustedCaTestDataFileEn Tcl Parameter: N51NamfTrustedCaFile Tcl Parameter: NlgNamfTrustedCaTestDataFileEn Tcl Parameter: NlgNamfTrustedCaFile Tcl Parameter: NlsNamfTrustedCaTestDataFileEn Tcl Parameter: NlsNamfTrustedCaFile Tcl Parameter: NausfTrustedCaTestDataFileEn Tcl Parameter: NausfTrustedCaFile Tcl Parameter: N12NausfTrustedCaTestDataFileEn Tcl Parameter: N12NausfTrustedCaFile Tcl Parameter: NchfTrustedCaTestDataFileEn Tcl Parameter: NchfTrustedCaFile Tcl Parameter: N28NchfTrustedCaTestDataFileEn Tcl Parameter: N28NchfTrustedCaFile Tcl Parameter: N40NchfTrustedCaTestDataFileEn Tcl Parameter: N40NchfTrustedCaFile Tcl Parameter: NsmsfNchfTrustedCaTestDataFileEn Tcl Parameter: NsmsfNchfTrustedCaFile Tcl Parameter: NpcfTrustedCaTestDataFileEn Tcl Parameter: NpcfTrustedCaFile Tcl Parameter: N5NpcfTrustedCaTestDataFileEn Tcl Parameter: N5NpcfTrustedCaFile Tcl Parameter: N7NpcfTrustedCaTestDataFileEn Tcl Parameter: N7NpcfTrustedCaFile Tcl Parameter: N15NpcfTrustedCaTestDataFileEn Tcl Parameter: N15NpcfTrustedCaFile Tcl Parameter: NsmfTrustedCaTestDataFileEn Tcl Parameter: NsmfTrustedCaFile Tcl Parameter: N11NsmfTrustedCaTestDataFileEn Tcl Parameter: N11NsmfTrustedCaFile Tcl Parameter: N29NsmfTrustedCaTestDataFileEn Tcl Parameter: N29NsmfTrustedCaFile Tcl Parameter: NudmTrustedCaTestDataFileEn Tcl Parameter: NudmTrustedCaFile Tcl Parameter: N8NudmTrustedCaTestDataFileEn Tcl Parameter: N8NudmTrustedCaFile Tcl Parameter: N10NudmTrustedCaTestDataFileEn Tcl Parameter: N10NudmTrustedCaFile Tcl Parameter: N13NudmTrustedCaTestDataFileEn Tcl Parameter: N13NudmTrustedCaFile Tcl Parameter: N21NudmTrustedCaTestDataFileEn Tcl Parameter: N21NudmTrustedCaFile Tcl Parameter: N52NudmTrustedCaTestDataFileEn Tcl Parameter: N52NudmTrustedCaFile Tcl Parameter: NudrTrustedCaTestDataFileEn Tcl Parameter: NudrTrustedCaFile Tcl Parameter: N35NudrTrustedCaTestDataFileEn Tcl Parameter: N35NudrTrustedCaFile Tcl Parameter: N36NudrTrustedCaTestDataFileEn Tcl Parameter: N36NudrTrustedCaFile Tcl Parameter: N37NudrTrustedCaTestDataFileEn Tcl Parameter: N37NudrTrustedCaFile Tcl Parameter: NlmfTrustedCaTestDataFileEn Tcl Parameter: NlmfTrustedCaFile Tcl Parameter: NlsNlmfTrustedCaTestDataFileEn Tcl Parameter: NlsNlmfTrustedCaFile Tcl Parameter: NsmsfTrustedCaTestDataFileEn Tcl Parameter: NsmsfTrustedCaFile Tcl Parameter: N20NsmsfTrustedCaTestDataFileEn Tcl Parameter: N20NsmsfTrustedCaFile Tcl Parameter: NnssfTrustedCaTestDataFileEn Tcl Parameter: NnssfTrustedCaFile Tcl Parameter: N22NnssfTrustedCaTestDataFileEn Tcl Parameter: N22NnssfTrustedCaFile Tcl Parameter: NgmlcTrustedCaTestDataFileEn Tcl Parameter: NgmlcTrustedCaFile Tcl Parameter: NlgNgmlcTrustedCaTestDataFileEn Tcl Parameter: NlgNgmlcTrustedCaFile Tcl Parameter: NbsfTrustedCaTestDataFileEn Tcl Parameter: NbsfTrustedCaFile Tcl Parameter: NafNbsfTrustedCaTestDataFileEn Tcl Parameter: NafNbsfTrustedCaFile Tcl Parameter: NpcfNbsfTrustedCaTestDataFileEn Tcl Parameter: NpcfNbsfTrustedCaFile Tcl Parameter: NrfTrustedCaTestDataFileEn Tcl Parameter: NrfTrustedCaFile Tcl Parameter: PseppN32cTrustedCaTestDataFileEn Tcl Parameter: PseppN32cTrustedCaFile Tcl Parameter: CseppN32cTrustedCaTestDataFileEn Tcl Parameter: CseppN32cTrustedCaFile Tcl Parameter: PseppN32fTrustedCaTestDataFileEn Tcl Parameter: PseppN32fTrustedCaFile Tcl Parameter: CseppN32fTrustedCaTestDataFileEn Tcl Parameter: CseppN32fTrustedCaFile Tcl Parameter: SeppSrvTrustedCaTestDataFileEn Tcl Parameter: SeppSrvTrustedCaFile Tcl Parameter: Sepp2NfTrustedCaTestDataFileEn Tcl Parameter: Sepp2NfTrustedCaFile |
|
|
Select to use an Alternate CA (Certificate Authority) File. Support for RSA encryption (sha256RSAEncryption). See additional details listed below (Certificate Authority). Alternate CA File - The Certificate Authority (CA) private key must be generated using the Certificate Authority key generating tools. It will be generated in a .pem file. Tcl Parameter: WebRtcAltCaEn Tcl Parameter: GmAltCaEn Tcl Parameter: AltCaTestDataFileEn Tcl Parameter: AltCaFile |
||
|
Select the version of TLS or SSL that you want to emulate - Landslide supports SSLv2, SSLv3, TLSv1.0, TLSv1.1, TLSv1.2 and TLSv1.3.
Tcl Parameter: GmTlsV1En Tcl Parameter: GmTlsV1_1En Tcl Parameter: GmTlsV1_2En Tcl Parameter: WebRtcTlsV1En Tcl Parameter: WebRtcTlsV1_1En Tcl Parameter: WebRtcTlsV1_2En Tcl Parameter: RadTlsV1En |
||
|
|
Enabling Mutual TLS Auth will cause the TLS server (Proxy) to request for the client certificate to authenticate. If it fails, then the TLS handshake will also fail. This will only apply in the case of IMS Node and MME Nodal/SGW Nodal when local IMS is enabled. Tcl Parameter: GmMutualTlsAuthEn Tcl Parameter: WebRtcMutualTlsAuthEn |
|
If you no longer wish to use a cipher, clear the selection.
The available ciphers are as follows: SSLv2 : DES-CBC-MD5, DES-CBC3-MD5, EXP-RC2-CBC-MD5, EXP-RC4-MD5, IDEA-CBC-MD5, RC2-CBC-MD5, RC4-64-MD5, RC4-MD5 SSLv3 : ADH-DES-CBC-SHA, ADH-DES-CBC3-SHA, ADH-RC4-MD5, DES-CBC-SHA, EDH-DSS-DES-CBC-SHA, EDH-DSS-DES-CBC3-SHA, EDH-RSA-DES-CBC-SHA, EDH-RSA-DES-CBC3-SHA, EXP-ADH-DES-CBC-SHA, EXP-ADH-RC4-MD5, EXP-DES-CBC-SHA, EXP-EDH-DSS-DES-CBC-SHA, EXP-EDH-DSS-RSA-CBC-SHA, EXP-RC2-CBC-MD5, EXP-RC4-MD5, IDEA-CBC-SHA, NULL-MD5, NULL-SHA, RC4-MD5 TLSv1 : ADH-AES128-SHA, ADH-AES256-SHA, ADH-DES-CBC-SHA, ADH-DES-CBC3-SHA, ADH-RC4-MD5, AES128-SHA, AES256-SHADES-CBC-SHA, DES-CBC3-SHA, DHE-DSS-AES128-SHA, DHE-DSS-AES256-SHA, DHE-DSS-RC4-SHA, DHE-RSA-AES128-SHA, DHE-RSA-AES256-SHA, EDH-DSS-DES-CBC-SHA, EDH-DSS-DES-CBC3-SHA, EDH-RSA-DES-CBC-SHA, EDH-RSA-DES-CBC3-SHA, EXP-ADH-DES-CBC-SHA, EXP-ADH-RC4-MD5, EXP-DES-CBC-SHA, EXP-EDH-DSS-DES-CBC-SHA, EXP-EDH-DSS-RSA-CBC-SHA, EXP-RC2-CBC-MD5, EXP-RC4-MD5, EXP1024-DES-CBC-SHA, EXP1024-DHE-DSS-DES-CBC-SHA, EXP1024-DHE-DSS-RC4-SHA, EXP1024-RC2-CBC-MD5, EXP1024-RC4-MD5, EXP1024-RC4-SHA, IDEA-CBC-SHA, NULL-MD5, NULL-SHA, RC4-MD5, RC4-SHA TLSv1.1 :NULL-MD5, NULL-SHA, RC4-MD5, RC4-SHA, IDEA-CBC-SHA, EXP-DES-CBC-SHA, DES-CBC-SHA, DES-CBC3-SHA, AES-128-SHA, DHE-RSA-AES128-SHA, AES-256-SHA, DHE-RSA-AES256-SHA, AES-128-SHA, 256AES-256-SHA, 256EXP1024-DES-CBC-SHA, EXP1024-RC4-SHA, DHE-RSA-AES128-SHA256, DHE-RSA-AES256-SHA256, ECDHE-RSA-NULL-SHA, ECDHE-RSA-AES256-SHA TLSv1.2 : AES-128-GCM-SHA256, AES-128-SHA256, AES-256-GCM-SHA384, AES-256-SHA256, DHE-RSA-AES128-GCM-SHA256, DHE-RSA-AES128-SHA256, DHE-RSA-AES256-GCM-SHA384, DHE-RSA-AES256-SHA256, ECDHE-RSA-AES128-GCM_SHA256, ECDHE-RSA-AES128-SHA256, ECDHE-RSA-AES256-GCM_SHA384, ECDHE-RSA-AES256-SHA384, ECDHE-ECDSA-AES256-GCM-SHA384, ECDHE-ECDSA-CHACHA20-POLY1305, ECDHE-RSA-CHACHA20-POLY1305, DHE-RSA-AES256-CCM, ECDHE-ECDSA-AES128-GCM-SHA256 TLSv1.2 with Pre-Shared Key Cipher Suites : DHE_PSK_AES128_GCM_SHA256, PSK_NULL_SHA256 TLSv1.3 : TLS_AES_256_GCM_SHA384, TLS_CHACHA20_POLY1305_SHA256, TLS_AES_128_GCM_SHA256, TLS_AES_128_CCM_8_SHA256, TLS_AES_128_CCM_SHA256 Tcl Parameter: GmCiphers Tcl Parameter: WebRtcCiphers Tcl Parameter: RadCiphers |
TLS authentication - additional information
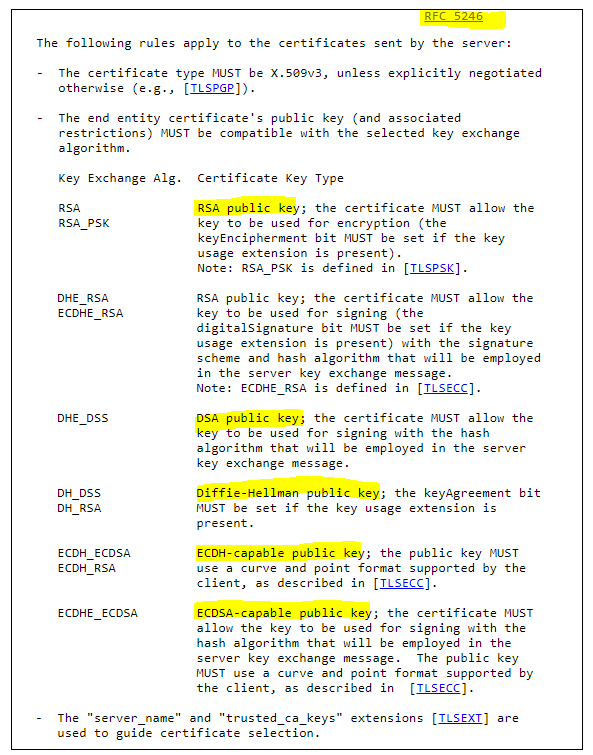
1. In general: For completing a successful TLS authentication, TLS client and server is required to have a right type of key-pair consisting of a private key, a public key in form of X.509 certificate and a X.509 certificate of a trusted CA for the job. The following screenshot highlights different key types needed for different key-exchange algorithm from IETF RFC 5246 TLS specification. Key-exchange algorithm is used for telling client/server how or which info needed to exchange for deriving a final session-key.
TLS client and server agrees on a same key-exchange algorithm during the negotiation of cipher-suite at a start of TLS connection (see the following diagram). Thus, to know which type of key-pair we need to know which cipher-suite we offer for used in a connection (a negotiated suite is chosen from the offer suite). The following sessions help explaining how client/server construct and negotiate cipher-suites.. its goal is to help users to choose a right type of key-pair for their selected cipher-suites.
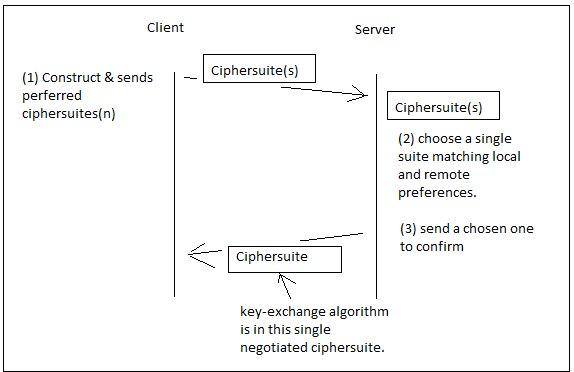
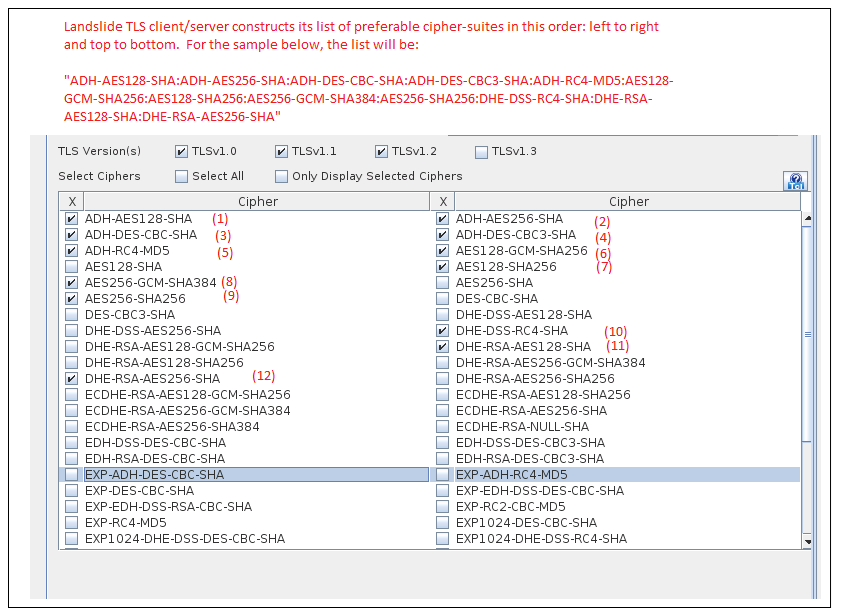
TLS client constructs a list of supported cipher-suites from most to least preferable and sends it to a TLS server for negotiation; and, similarly, a TLS server constructs its own list of preferable suites but selects only one single cipher-suite which is most fit/preferred for both sides and sends the selected cipher-suite to client for using in a connection.
Specific for Landslide TLS client/server, it constructs its list of preferable cipher-suites from selected cipher-suites on its GUI in this order: left to right, top to bottom (SEE THE EXCEPTION#1 BELOW).
See one sample in the screenshot below:
EXCEPTION#1: if TLSv1.3 is selected but none of its cipher-suites is selected, landslide will add TLSv1.3 mandatory cipher-suites to the top of its cipher lists; as the result, TLSv1.3 mandatory cipher-suites become the most preferable one and more likely to be chosen for a connection. (IETF RFC 8446 TLSv1.3 session 9.1, TLS_AES_128_GCM_SHA256, TLS_AES_256_GCM_SHA384, TLS_CHACHA20_POLY1305_SHA256). However, if you select any of its cipher-suite, then the selected one will be added to the preferred list according to the above rule: left to right and top to bottom. If you don’t want to test TLSv1.3 cipher-suite, then don’t check the TLSv1.3 option to avoid TLSv1.3 mandatory cipher-suites becoming most preferred one over taking all your other selected cipher-suites.
2) How to determine which key exchange algorithm from a name of a cipher-suite?
Landslide uses the same cipher-suites names defined in openssl (link: https://www.openssl.org/docs/man1.1.1/man1/ciphers.html)
A name often consist of the following 4 fields separated by a dash (-) with EXCEPTION#2:
<key-exchange-algo>-<certificate-signing-algo>-<encryption-algo>[-<encrypt-param>]*-<MAC-algo>
Key-exchange-algo: RSA, ADH, DHE, EDH, ECDH, ECDHE,
Certificate-signing-algo: RSA, DSS, ECDSA,
EXCEPTION#2: if no key-exchange-algo is present in a cipher-suite, then it implies that RSA is the key-exchange-algo. For instance, use RSA as key-exchange algorithm for the following cipher-suites: AES128-SHA, AES256-SHA.
The openssl’s ciphers manual page (https://www.openssl.org/docs/man1.1.1/man1/ciphers.html) has a one-to-one mapping between its cipher-suite names and names in TLS specifications. You can get key-exchange algorithms from that mapping if there is any doubt.
3) How to choose key-pair for key-exchange algorithms?
The following screenshot shows a mapping table of key-exchange algorithm (plus certificate-signing algorithm) to the certificate key type. NOTE: if a certificate-signing-algorithm is included, it will be appended to the key-exchange algorithm separated with an underline (i.e. _RSA, _PSK, _DSS, etc.)
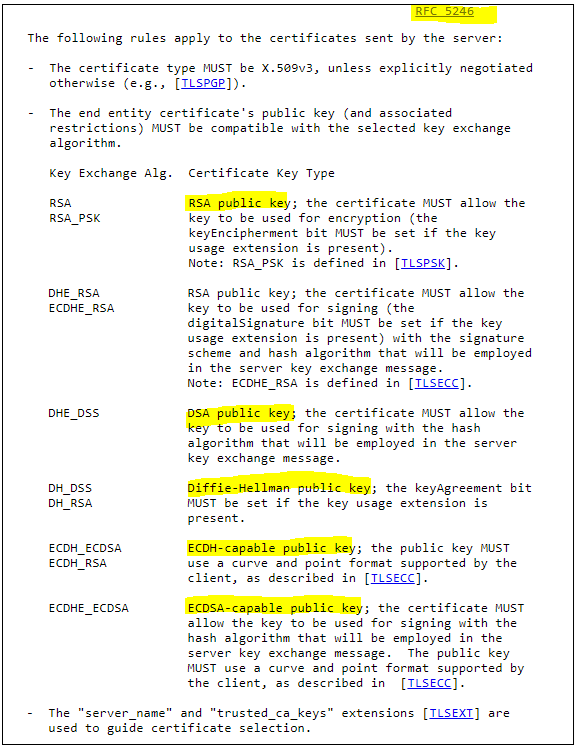
After determining your certification key type, you need to provide correct key pair in order for getting TLS authentication working properly. Landslide provides some default key pairs with different key type as follows:
• RSA public key: private-rsa-key.pem, x509-certificate.pem, cacert.pem (other variants for different key sizes)
• DSA public key: private-dhe-dsa-key.pem, x509-dhe-dsa-certificate.pem, ca-x509-dhe-dsa-certificate.pem
• Diffie-Hellman (DH) public key: Not applicable (see EXCEPTION#3)
• ECDH-capable public key: Not applicable (see EXCEPTION#3)
• ECDSA-capable public key: private-ecdhe-ecdsa-key.pem, x509-ecdhe-ecdsa-certificate.pem, ca-x509-ec-certificate.pem
EXCEPTION#3: landslide has support for “ephemeral” Diffie-Hellman (such as EDH, DHE, ECDHE) but it does not have support for “static” DH (such as DH, ECDH); There is no configuration for static DH at this time.
4) Anonymous Diffie-Hellman (ADH, DHA)
If anonymous DH cipher-suite is chosen for a TLS connection, TLS authentication is not possible because it’s designed to run anonymously (no identity exposed nor certificates exchanged). Anonymous DH suite starts with either “ADH” or “DHA” such as ADH-AES128-SHA, ADH-DES-CBC-SHA. Please do not select the authentication option if any anonymous DH included in cipher-suites.
5) Some recommendation for testing TLS authentication:
• Avoid using anonymous cipher-suites because authentication is not possible by designed.
• Be careful with default mandatory TLS v1.3 Cipher-suites becoming most preferable (discussion the EXCEPTION#1 above)
• Choose one or multiple cipher-suites which has a same key-exchange type because you can configure only type of key-pair in your test.
• We list all possible cipher-suites in openssl; Some older cipher-suites may be deprecated due to weak cipher or known exploitation
To import a Landslide generated TLS secret for viewing in Wireshark, see Landslide_TLS_SecretImport_Into_Wireshark.
Alternate CA File
SSL/TSL Handshake
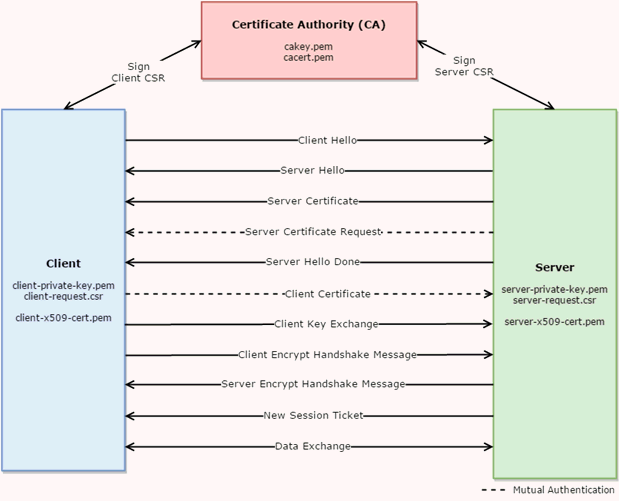
Certificate Authority (CA)
cakey.pem
Certificate Authority Private Key (root Key), this is often kept private and NEVER shared with a third party.
cacert.pem
Certificate Authority Certificate (root certificate OR trusted CA), often shared with Client/Server as part of trusted certificate chain. Client/Server will use this certificate to verify Server’s x509 certificate.
Client
client-private-key.pem
Client private key. Client will use this key to decrypt messages sent by the Server.
client-request.csr
Client Certificate Sign Request. Client will generate CSR using its private key (client-private-key.pem).
client-x509-cert.pem
Client x509 Certificate. Generated by Certificate Authority using its private key (cakey.pem) and certificate (cacert.pem) and Client CSR (client-request.csr).
Server
server-private-key.pem
Server private key. Server will use this key to decrypt messages sent by the Client.
server-request.csr
Server Certificate Sign Request. Server will generate CSR using its private key (server-private-key.pem).
server-x509-cert.pem
Server x509 Certificate. Generated by Certificate Authority using its private key (cakey.pem) and certificate (cacert.pem) and Server’s CSR (server-request.csr).
Create Client/Server Certificate
Sign Client CSR
Certificate Authority (CA) will use its private key (cakey.pem) and certificate (cacert.pem) to sign Client’s CSR (client-request.csr) and generate Client’s certificate (client-x509-cert.pem).
Sign Server CSR
Certificate Authority (CA) will use its private key (cakey.pem) and certificate (cacert.pem) to sign Server’s CSR (server-request.csr) and generate Server’s certificate (server-x509-cert.pem).
Handshake Message Exchange
Client Hello
Client request new encrypted session with server. Client provides list of supported Ciphers and TLS version.
Server Hello
Server agrees to a Cipher suite from Client’s list and confirms support to Client’s TLS version.
Server Certificate
Server send its x509 Certificate (server-x509-cert.pem) which includes its public key. Plus, Server also includes its CA certificate (cacert.pem) as part of trusted chain.
Server Certificate Request
Server requests Client to send it's certificate for Mutual Authentication.
Server Hello Done
Server completes Hello Message.
Client Certificate
Client sends its x509 Certificate (client-x509-cert.pem) which includes its public key. Plus, Client also includes its CA certificate (cacert.pem) as part of trusted chain.
Client Key Exchange
-
Client verifies Server’s certificates (server-x509-cert.pem and cacert.pem). If Server’s certificate is issued/signed by the same Certificate Authority (CA), Client then extracts the public key from Server’s certificate (server-x509-cert.pem) and uses it to encrypt a new pre-master key, and then sends it to the Server.
-
When it receives “Client Key Exchange”, the Server will use its private key (server-private-key.pem) to decrypt the pre-master key.
-
The Client and Server now both use the pre-master key to compute a shared secret key.
Client Encrypt Handshake Message
Client sends encrypted message (encrypt using shared secret key) to Server indicating: “Server! Try to decrypt this and verify that it’s up to specification. Also, all messages I (Client) send from this point forward will be encrypted using our shared secret key.”
Server Encrypt Handshake Message
Server will decrypt and verify Client’s Encrypted Handshake Message. If everything is OK, Server will send an encrypted message (encrypt using shared secret key) to Client indicating: “Client! Your encrypted message checks out, also, try to decrypt this and verify if it’s up to specification. Also, all messages I (Server) send from this point forward will be encrypted using our shared secret key.”
New Session Ticket
Server sends Session ticket to client.
Data Exchange
If everything OK, all data exchanged between Client and Server will be encrypted using the shared secret key for the rest of this session.
Landslide TS Generate Cert Command
1. makeCert.sh
“makeCert.sh” will be located in TS “/home/cfguser/sseworks” directory.
Usage: ./makeCert.sh [ Command ] { Options }
makeCert.sh ca { --config=<val> | [ --CAKey=<val> --CA=<val> --size=<val> --encrypt=<val> --expire=<val> --policy=<val> ] }
makeCert.sh csr { --config=<val> | [ --private=<val> --csr=<val> --size=<val> --policy=<val> ] }
makeCert.sh x509 { --config=<val> | [ --CAKey=<val> --CA=<val> --csr=<val> --cert=<val> --encrypt=<val> --expire=<val> --serial=<val> ] }
makeCert.sh example
makeCert.sh help
Commands:
ca [Options] - Create trusted CA (Certificate Authority) key and certificate.
csr [Options] - Create client/server CSR (Certificate Sign Request).
x509 [Options] - Sign request CSR with trusted CA.
example - Show example usage.
help - Display this message.
Options
--config=<value> - Configuration file (Default: makeCert.conf)
--CAKey=<value> - CA private key (Input or Output)
--CA=<value> - CA Certificate (Input or Output)
--private=<value> - Request private key (Input or Output)
--csr=<value> - Request CSR (Input or Output)
--cert=<value> - Request Certificate
--size=<value> - Key size (Ex. 1024, 2048, 4096, ...)
--expire=<value> - Number of days before expired.
--encrypt=<value> - Encryption type (Ex. md5, sha, sha128, sha256, ...)
--policy=<value> - Subject line (Ex. /C=<val>/ST=<val>/L=<val>/O=<val>/OU=<val>/CN=<val>/subjectAltName=<val>)
/C - Country Name (Ex. US)
/ST - State or Province Name (Ex. Texas)
/L - Locality Name (Ex. Plano)
/O - Organization Name (Ex. Spirent)
/OU - Organization Unit Name (Ex. Landslide)
/CN - Common Name (Ex. CAcert)
/subjectAltName - Subject Alternate Name (Ex. support.spirent.com)
2. makeCert.sh
[ca]
ca_private_path=/home/cfguser/private/caKey.pem
ca_cert_path=/home/cfguser/cacert.pem
ca_size=2048
ca_expiration=7300
ca_encryption=sha256
[req]
req_private_path=/home/cfguser/private/private-rsa-key.pem
req_csr_path=/home/cfguser/csr/request.csr
req_cert_path=/home/cfguser/certs/x509-certificate/pem
req_size=1024
req_expiration=256
req_encryption=md5
[policy]
countryName=US
stateOrProvinceName=Texas
localityName=Plano
organizationName=Spirent
organizationalUnitName=Landslide
[ca_policy]
ca_commonName=CACert
ca_subjectAltName=support.spirent.com
[req_policy]
req_commonName=X509Cert
req_subjectAltName=support.spirent.com
3. Create root CA Private Key and Certificate
$> makeCert.sh ca
$> makeCert.sh ca --config=somefile.conf
$> makeCert.sh ca --CAKey=caKey.pem --CA=cacert.pem \
--size=2048 --encrypt=sha256 --expire=7300 \
--policy= /C=US/ST=Texas/L=Plano/O=Spirent/OU=Landslide/CN=CACert/subjectAltName=support.spirent.com
Private Key (--CAKey)
Create private key and store in this location: /home/cfguser/sseworks/private/cakey.pem
Certificate (--CA)
Create certificate and store in this location: /home/cfguser/rsa/cacert.pem
Key size (--size)
Private Key will have length of 2048 bytes.
RSA Encryption (--encrypt)
Certificate will be encrypted with sha256.
Expiration (--expire)
Certificate will expire in 7300 days.
Requestor Config (--config)
Using “makeCert.conf” file for configuration.
Policy (--policy)
Certificate subject
4. Create Client/Server Certificate Sign Request (CSR)
$> makeCert.sh csr
$> makeCert.sh csr --config=somefile.conf
$> makeCert.sh csr --private=private-rsa-key.pem --csr=request.csr --size=2048 \
--policy= /C=US/ST=Texas/L=Plano/O=Spirent/OU=Landslide/CN=X509Cert/subjectAltName=support.spirent.com
Private Key (--private)
Create private key and store in this location: /home/cfguser/rsa/private-rsa-key.pem
Certificate Sign Request (--csr)
Create Client/Server CSR and store in this location: /home/cfguser/sseworks/rsa-request.csr
Requestor Config (--config)
Using “makeCert.conf” file for configuration.
Policy (--policy)
Certificate subject
5. Sign Client/Server CSR using CA Key and Cert
$> makeCert.sh x509"
$> makeCert.sh x509 --config=somefile.conf
$> makeCert.sh x509 --CAKey=caKey.pem --CA=cacert.pem --csr=request.csr \
--cert=x509-certificate.pem --encrypt=md5 --expire=256 --serial=01
CA Private Key (--CAKey)
Using Certificate Authority (CA) Private Key at: /home/cfguser/sseworks/private/cakey.pem
CA Certificate (--CA)
Using Certificate Authority (CA) Certificate at: /home/cfguser/rsa/cacert.pem
Client/Server CSR (--csr)
Client/Server Certificate Sign Request (CSR) to be signed.
Client/Server Certificate (--cert)
Signed Client/Server x509 Certificate at: /home/cfguser/rsa/x509-certificate.pem
RSA Encryption (--encrypt)
Certificate will be encrypted with sha256.
Expiration (--expire)
Certificate will expire in 256 days.
Serial Number (--serial)
Set Client/Server Certificate serial number to 01.
Requestor Config (--config)
Using “makeCert.conf” file for configuration.
Examples:
Client in this scenario refers to Landslide. Server refers to Customer’s SUT.
(1) Start from Scratch
This scenario assumes we have fresh systems:
1. Create CA Private Key (cakey.pem).
2. Self-Sign CA Certificate (cacert.pem) using cakey.pem.
3. Create Client Private Key (client-private-key.pem)
4. Create Client CSR (client-request.csr) using client-private-key.pem.
5. Signed client-request.csr using cakey.pem and cacert.pem, this will genetate client-x509-cert.pem
6. Create Server Private Key (server-private-key.pem)
7. Create Server CSR (server-request.csr) using sever-private-key.pem.
8. Signed server-request.csr using cakey.pem and cacert.pem, this will genetate server-x509-cert.pem
Copy “cacert.pem”, “client-private-key.pem”, and “client-x509-cert.pem” to Client System.
Copy “cacert.pem”, “server-private-key.pem”, and “server-x509-cert.pem” to Server System.
(2) Client as Requestor
This scenario assumes Server has its own Certificate Authority (CA), which has both “cakey.pem” and “cacert.pem” and can sign Client’s CSR:
1. Create Client Private Key (client-private-key.pem)
2. Create Client CSR (client-request.csr) using client-private-key.pem.
Send “client-request.csr” to Server and have it sign/generate a certificate (Ex. client-x509-cert.pem) on behalf of Client (similar to Step 5 Scenario (1)).
Server need to send back “client-x509-cert.pem” and “cacert.pem” to Client.
Copy “cacert.pem”, “client-private-key.pem”, and “client-x509-cert.pem” to Client System.
(3) Server as Requestor
This scenario assumes Client has its own Certificate Authority (CA), which has both “cakey.pem” and “cacert.pem” and can sign Server’s CSR.
If “cakey.pem” and “cacert.pem” exist, skip to step 3.
1. Create CA Private Key (cakey.pem).
2. Self-Sign CA Certificate (cacert.pem) using cakey.pem.
3. Signed server-request.csr using cakey.pem and cacert.pem, this will generate server-x509-cert.pem
Send “cakey.pem” and “server-x509-cert.pem” to Server.
