Server Profile


In VoLTE testing, the Phonebook tab defines attributes of SIP Subscribers, SIP Endpoints, and Server Profile depending on what the Test Case configured.

The Server Profile tab includes a list of SIP Subscriber's attributes for registration, authentication and Rx interface purposes.

The Server Profile tab is not available when you select IMS Node as Remote on the VoLTE tab.

NOTES:
  • Number of Phone Book entries = Number of SIP Subscribers = Number of UEs * Number of SIP Subscribers per UE
  • Phone Book is applied to UEs that are simulated by Nodal Test Case (MME Nodal, SGW Nodal) and IMS Node that emulates SIP Subscribers
  • E911 Phonebook is available on the MME Nodal test case when Emergency PDNs ,  2-Way Live Audio Bridging and Enable Separate Phonebook are enabled. Phonebook 2 is available on the MME Nodal test case when Emergency PDNs is not enabled but 2-Way Live Audio Bridging and Enable Separate Phonebook are enabled.
  • Any parameter that uses auto-increment syntax should not be empty. GUI validation will prevent capture and report an error.

SIP Server Profile


SIP Server Profile


Server Profile
Public User Name

As of version 16.4, added support for Multiple Public IDs and Implicit Registration. Public User name is now a table containing up to five Public identifiers:  

  • Allows each subscriber to have more than one public identifiers.
  • Added optional configuration for indicating which configured public identifiers are implicitly registered; and, if configured, communicate those identifiers to registered subscribers during a registration stage.
  • Support different dialing styles (i.e. local versus global; with versus without international prefix, etc.)

Public User Name Table - This table should have a minimum of one and max of 5 rows. Each row contains the following columns:

  • URI Scheme – for indicating a SIP URI scheme of a public user name.  default is set SIP-URI.  Possible selection are SIP-URI(0), TEL-URI(1). 

  • Public User Name – this column contains one public name of a subscriber. Default: user#(N0)   - Click ++ to use the Auto-Increment Format Wizard.  

  • Registered – this column is used for indicating whether a configured public user name on this row is registered or not. The default value is checked. It must be checked in the first row and can’t be changed. If a row is checked, the public user name will be included in the list of P-Associated-URI of 200 ok message for the registration and the aor (message body) in the SIP NOTIFY message.

IMS-Node constructs a list of P-Associated-URI headers based on the order of names and the value of the third column in this table (from top to bottom).  The order of P-Associated-URI can cause received subscriber giving different treatments/priorities/preference to received names. For instance, landslide subscribers always pick a first name in this list for making calls.


NOTES: Backward Compatibility

  • The first set of Tcl Variables will be used.
  • When loading old saved tests (which has a single public name) to new GUI which has supports for multiple public user names, GUI will do the following:
    • The public user name in the edit box is transferred to the second column of public user name table in the first row and the scheme in the first row should be set to SIP URI.

    • GUI will add another row with TEL URI scheme if all values in the public user name are digital or if they start with + and other values are digital, and if any of conditions below are met:
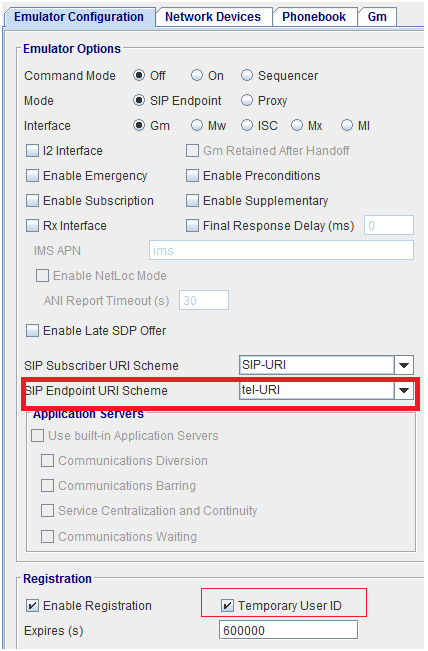
      • Temporary User Id is Checked
      • SIP Endpoint URI scheme is set to tel-URI


Tcl Parameter: ImsSrvProfilePUNameUriScheme  

Tcl Parameter: ImsSrvProfilePublicUserName   

Tcl Parameter: ImsSrvProfilePUNameRegisteredEn 

Tcl Parameter: ImsSrvProfilePUNameUriScheme_1  

Tcl Parameter: ImsSrvProfilePublicUserName_1   

Tcl Parameter: ImsSrvProfilePUNameRegisteredEn_1 

Tcl Parameter: ImsSrvProfilePUNameUriScheme_2  

Tcl Parameter: ImsSrvProfilePublicUserName_2   

Tcl Parameter: ImsSrvProfilePUNameRegisteredEn_2 

Tcl Parameter: ImsSrvProfilePUNameUriScheme_3  

Tcl Parameter: ImsSrvProfilePublicUserName_3   

Tcl Parameter: ImsSrvProfilePUNameRegisteredEn_3 

Tcl Parameter: ImsSrvProfilePUNameUriScheme_4  

Tcl Parameter: ImsSrvProfilePublicUserName_4   

Tcl Parameter: ImsSrvProfilePUNameRegisteredEn_4 

Tcl Parameter: ImsSrvProfilePUNameUriScheme_5  

Tcl Parameter: ImsSrvProfilePublicUserName_5   

Tcl Parameter: ImsSrvProfilePUNameRegisteredEn_5 

Private User Name

Private User Identity is a unique global user identity. Private User Identity does not identify the User, but identifies User’s subscription. Private User Identity is used for authentication purpose. It is not used for routing.

  • Each UE has one Private User Identity.
  • Private User Identity takes the form of NAI: [email protected].

Default: user#(N0) 

Tcl Parameter: ImsSrvProfilePrivateUserName


Secret Key

The key associated with the subscriber's private identity. this private key is required during the registration process.

Encrypt - Click on Encrypt to encrypt the Secret Key. Any user type can enter the value in plain text, and then click an “Encrypt” button which will encrypt the value and switch the TC-GUI to use parameter variable name with _Enc Suffix. (encrypted-mode). The fields in the GUI will become like passwords with just "****************" in them and they will be not be edit able. When the Secret Key is encrypted , the TDF-CSV editor will automatically encrypt the value when it is saved in the cell "Secret Key Encrypted". Additonal details in Apply Test Data File to NAS Protocol.

Decrypt - Click on Decrypt to decrypt the Secret Key.

Range: Up to 32 hexadecimal digits, prefixed by "0x," or 34 string characters

  • Each UE has one Private User Identity.
  • Private User Identity takes the form of NAI: [email protected].

Default: password#(N0)

Tcl Parameter: ImsSrvProfileSecretKey   

Tcl Parameter: ImsSrvProfileSecretKey_Enc 


IMSI

IMSI.

Default: 5050241#(N0121507:7)

Tcl Parameter: ImsSrvProfileImsi  

Secured Client Port

Secured Server Port

Indicates the secured Client and Server Ports for secure IPSec SIP communication.

NOTES:

  • Exclude Port numbers that are used by Signaling Port. Zero (0) is always excluded and 5060/5061 are the default Signaling port numbers and if used, they will be excluded.
  • When  Auto-Increment Format Wizard is used , zero and the Signaling Port Values are always skipped in the calculation of the next value.  
  • Random incrementor option (R) is not supported for Secured Server Port.


  • Default: Secured Client Port: #(N32001 0/2)

Tcl Parameter: ImsSrvProfileSecClientPort  


  • Default: Secured Server Port: #(N32000 0/2)

Tcl Parameter: ImsSrvProfileSecServerPort  

Client SPI

Server SPI

Indicates the security parameter index of the IPSec packet. The Security Parameter Index identifies a security context between two peers.

TIP: By default, a 64-bit SPI is transmitted. If your SUT requires a fixed length other than 64 bits, use a hexadecimal format.

Default: Client SPI: #(N257 0/2)

Tcl Parameter: ImsSrvProfileClientSpi  

Default: Server SPI: #(N256 0/2)

Tcl Parameter: ImsSrvProfileServerSpi 

Click ++ to use the Auto-Increment Format Wizard.

Preview Auto-Incremented Values
  • Click Preview Auto-Incremented Values to view the values generated by the wizard.
  • Click Generate Empty TDF, enter the desired value and save the values to a .CSV file for reuse.
Apply Test Data File

You can provision unique, non-sequential values for some parameters by using Test Data Files from your Test Library.

See Applying Parameter ValuesApplying Parameter Values.

See Test Data Files for further explanation and sample files. If a sample is not found for the specific TDF, you can obtain a sample file from your Technical Support representative. You may also use the following options to select an existing TDF or create/edit TDF-CSV files (TDF-CSV Editor). 

For most TDF Parameters used for Applying Parameters, each row in the file is the overridden value for a different “Session”, aka a different UE. But some TDFs are done in other dimensions, like Bearers, eNodeBs, Subscribers (2 per UE sometimes) or even Hosts, etc. Tooltips on the TDF Parameter: 

Note that the “ID” is a unique ID. Please Provide the ID when reporting issues with a TDF. For TDFs that do not apply / override Parameters, but instead are just their own configuration or data or media files you won’t see TDF ID row details.

TIP: When including large files, please be aware of memory limitations, since the TDF Editor shares memory with the Client.

NOTE: The available TDF options vary. on the L3-7 | IPSec tab > IKE with RSA Settings you may only select the Certificate TDF from TAS (these are non-CSV TDFs).

In addition, where applicable, any rules for defining TDFs are included in specific Test Cases. (For example, In MME Node test case, see MME Node - Provisioning TDF.)

From the DMF Window, press Shift+Alt+A to display the  Save DMF as Tcl window. Click the Save to File button to save as Tcl file. See additional details on Using the Tcl API.


Select/Create a new TDF-CSV

Allows you to create a new TDF by entering a file name that doesn’t already exist or select an existing file by entering a file name that already exists.

Click to open the Select Existing or Create window.

  • Navigate to the relevant library/folder,

  • Enter the name of the file:

  • If the file name already exists, the file is selected and applied in the test case.

  • If the file name does not exist, a message displays that says you are creating a new TDF and the embedded TDF-CSV will be launched.

    • Click Yes to launch the TDF-CSV Editor and create/save the new TDF-CSV.

    • Click No to select a different file

NOTE: If you do not have permission to save in the selected library, an error displays when you try to create a new file.
TIP: You may also navigate to the relevant library/folder and select file, and click OK.


Upload a New TDF to TAS

Click to import a new TDF file from your local folder and select in the test Case (instead of having to go to TDF Admin).

  • Navigate to the file on your local folder and select.
  • Then navigate to the location (library) where you want to save it on the TAS. You may rename the file, if required.  

View Edit Selected TDF in TDF-CSV Editor

Available only when you have selected a TDF on TAS. Click to open the selected file in TDF-CSV Editor (in place, that is, within the Test Case).

Edit the file and save. You may also click Save As to save the edited TDF-CSV to a different library and also rename the file, if required.

NOTE: You may also select a TDF from a library to which you do not have write permissions, edit the file as required, and save (Save As) only to a different library with the same file name or a different name.

The only options available are Save As and Cancel.

Open Selected TDF in Standalone TDF-CSV Editor

Available only when you have selected a TDF on TAS. Select to retrieve the CSV file and open it in the stand alone TDF-CSV Editor.

Generate Stub TDF-CSV

TIP: Available only when a CSV specification has been defined for in the Test Case for the TDF widget ( View TDF Actions/Options Menu)


Opens an example context specific test data parametersexample context specific test data parameters, which you may save as a .CSV file or open in the TDF-CSV Editor.


Launch Standalone TDF-CSV Editor

Click to open a blank TDF-CSV Editor.

The Launch Standalone TDF-CSV editor options handles very large TDFs that may use too much Client memory if opened within the Test Case/in the embedded editor.  You may set the standalone TDF-CSV Editor memory high to edit large TDFs.


^ Back to Top