SIP Editor
In VoLTE/IMS Node testing, the SIP tab on the Gm > Control tab allows you to define the transport used to establish, modify, and terminate SIP (Session Initiation Protocol) control protocol and modify content of the outgoing SIP messages. You may define a SIP message content using default templates or configure a custom SIP message format and/or a custom SDP message format.
The edit options available depends on whether you select Enable Supplementary on the VoLTE tab.
In AMF Nodal test case, a Gm2 tab is used for the Emergency Profile when Enable E911 Call is enabled.
| SIP SCRIPT Mode: If you select Enable Supplementary on the VoLTE tab or IMS Node Emulator Configuration or Command Mode/Sequencer - About VoLTE ODC Sequencer and VoLTE OnDemand Commands. | You may edit the SIP flow to define customized SIP flows, actions, and messages or use the default/Built-in flows. |
| SIP Flow Mode: If you do not select Enable Supplementary on the VoLTE tab or IMS Node Emulator Configuration. | You cannot modify a flow as SIP is defined by a combination of the following enablers/controls on VoLTE tab: |
|
SIP Flow: (Enable Supplementary not selected on VoLTE tab or IMS Node, and NOT Command Mode/Sequencer)
|
SIP SCRIPT: (Enable Supplementary selected on VoLTE tab or IMS Node, or Command Mode/Sequencer) SIP Supplementary Script - Create SIP tests using Scripts and Actions SIP Message Editor (Right pane)
Command Mode/Sequencer - About VoLTE ODC Sequencer and VoLTE OnDemand Commands.
|
|
Select the type transport protocol used to establish, modify, and terminate SIP IMS sessions. Options : UDP, TCP and UDP/TCP When UDP/TCP is selected, UDP transport is used for the initial registration and all other messages via TCP transport.
Tcl Parameter: SipTransport Tcl Parameter: Gm2SipTransport
|
||
|
Select to Enable TLS - Only supported when transport type is TCP. A new Tab TLS will be enabled where Cipher Suites, Private Key, and certificate can be used during TLS handshake. Available on MME Nodal, SGW Nodal, IMS Node and IP application test cases.
|
||
|
Select to increase the message buffer size to avoid double fragmentation. Available for all interfaces except Nc. Range: 1024 to 10240 Default: 4096 Tcl Parameter: SipMaxMsgBufferSize Tcl Parameter: Gm2SipMaxMsgBufferSize |
SIP Messages
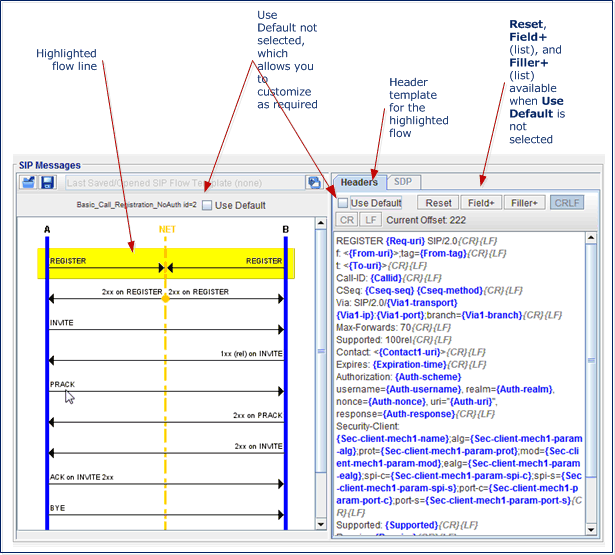
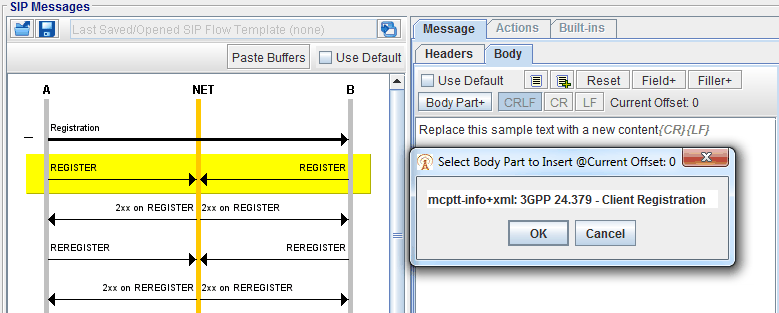
The SIP tab | SIP MessagesSIP Messages pane displays two columns/panes. The left pane displays SIP message flows line diagram and the right column/pane displays the relevant message header and message body content. When you click on a message (of a flow) in the left pane, the message is highlighted and on the right column/pane, displays the SIP message headers and SDP (SIP message body, where applicable) for the highlighted message.
|
NOTE:
|
A default configuration is displayed as a template and allows you to modify SIP headers and body (SDP), where applicable. (A template is displayed for every SIP message available to be modified). The combination of the configurable SIP message format and the configurable SDP message format allows you to customize SIP messages to your SIP implementation (e.g., interoperability testing).
|
NOTES:
|
|
Open a SIP Flow Template |
Click
|
|
|
Save as Data Profile Template |
Click to
|
|
|
dock/undock Pop-up SIP Flow |
Click the dock / undock button, to |
|
|
SIP Flow Line Diagram |
Click on any SIP Flow MessageSIP Flow Message (left column) to enable SIP Message editor (right column)
|
SIP Call Flow (Left Pane)
The SIP Call Flow (Left Pane) shows a flow of messages expected for a current test configuration. When you select a message in the flow control area, default SIP templates are shown in the editing windows (Right Pane).
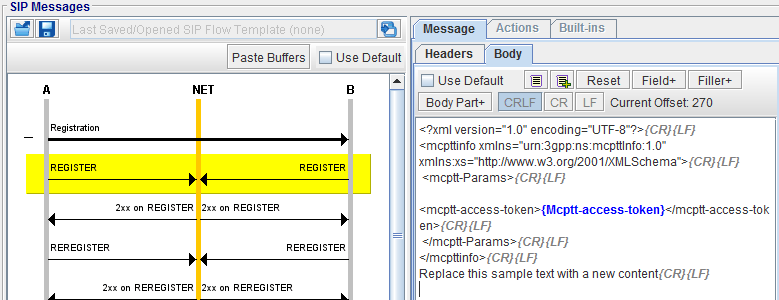
The line diagram illustrates standard representation of the selected message. Each message (represented by a horizontal line) includes a text string (Field) or a combination of a text string and predefined parameter type (Filler; shown in blue on the right pane).
SIP Messages Editor (Right Pane)
|
Use Default |
When selected, for all messages in the test case, Use Default is disabled for individual message (on the Right Pane). |
|||||||||||||
|
When not selected, individual message editor will be enabled for configuration. |
||||||||||||||
|
Reset, Field+ (list), and Filler+ (list) |
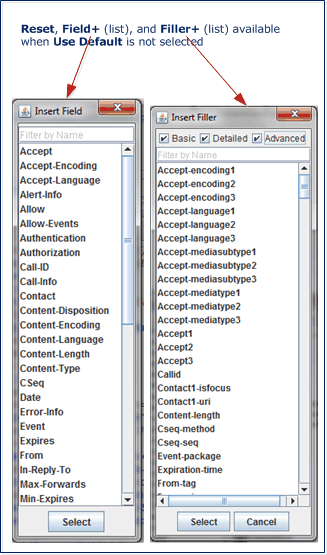
Available when Use Default is not selected. The Reset, Field+ , and Filler+Reset, Field+ , and Filler+ buttons help you with the editing process. You may replace the original Fields and Fillers in the message Header/Body (SDP) by any text.
|
|||||||||||||
|
||||||||||||||
|
Conditional Parameters (used when parameters used in your template do not exist in the original message) |
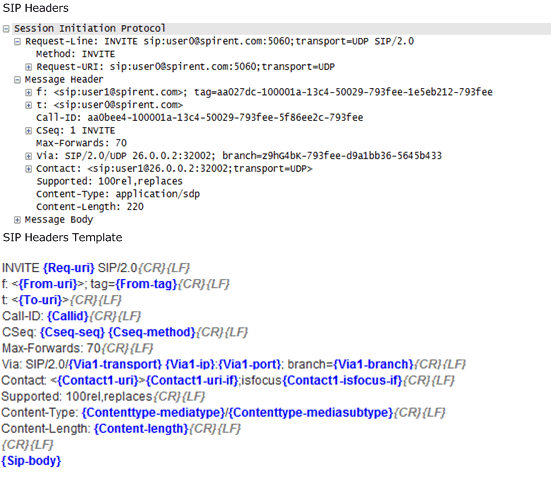
Since a configurable SIP message is generated from an existing message, some parameters used in your template may not exist in the original message. You may use “…-if” parameter to take care of such cases.
|
|||||||||||||
|
Example SIP Header and Template |
|
|||||||||||||
|
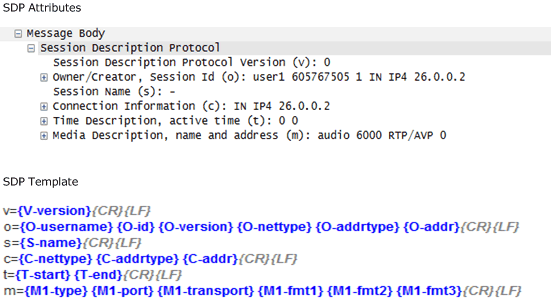
Example SDP |
|
SIP Supplementary Script
The SIP Supplementary option, when enabled (Enable Supplementary) , provides users with a way for creating SIP tests using scripts and actions.
The main advantage of using scripts and actions; is to allow users creating different SIP message flows tailored to their particular test environments.
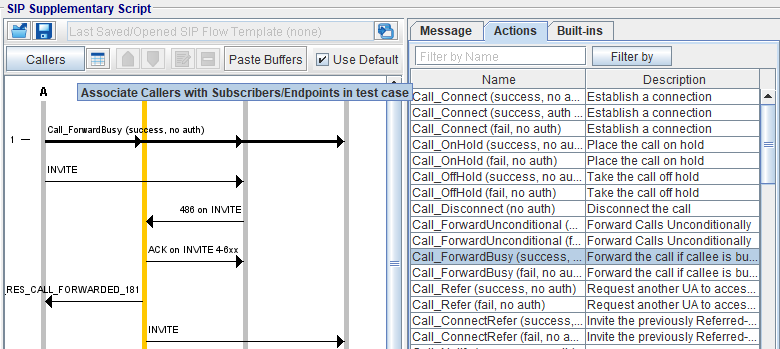
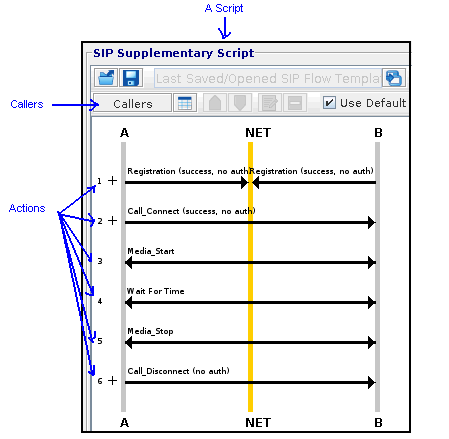
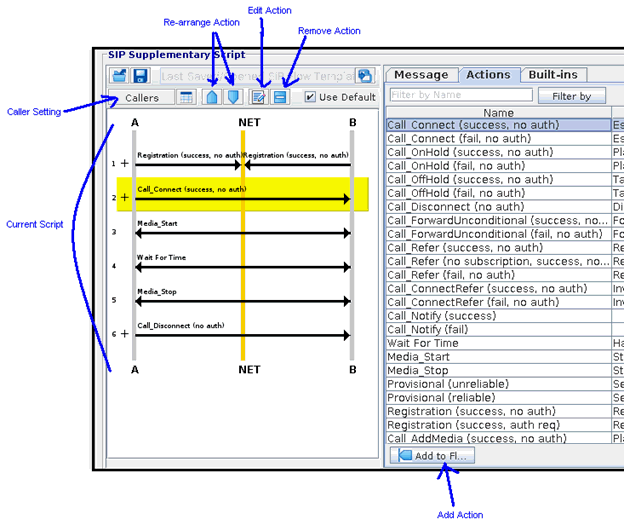
A script (a sample is shown below) consists of one of more actions and a set of callers who will be responsible for performing actions of a script. Users have full controls of which actions or callers will be included in their scripts.
An action performs a particular small common task in SIP tests such as waiting for time, starting or stopping media, connecting or disconnecting users, etc. Some actions have predefined sequence of messages and to or from whom messages are supposed to be sent or received. Actions are fixed and predefined by Landslide software; they cannot be created by users.
Callers of a script refer to local subscribers and/or external subscribers will perform the script. For instance, a local subscriber #1 will play as Caller-A of a script and a local subscriber #2 will play as Caller-B of the same script. A common caller setting is that all odd subscribers (1, 3, 5, and so on) of a test will play a Caller-A of a script and all even subscribers (2, 4, 6, and so on) will play a Caller-B of the same script; however, any local or external subscribers can be chosen for callers of a script using the Landslide common auto-increment patterns (see Auto-Increment Help for detail).
See SIP Call Group Pre viewer for additional information.
|
Message |
|
|
|
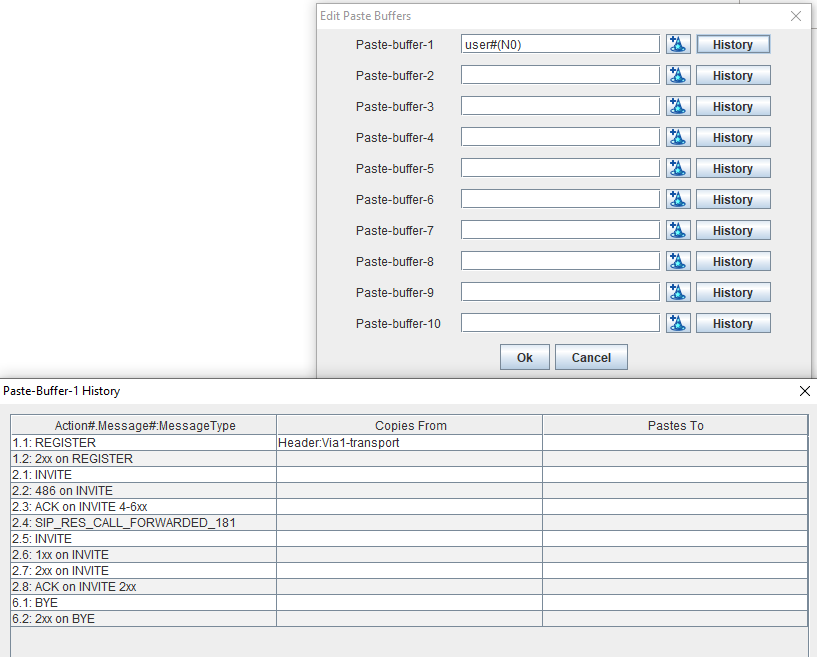
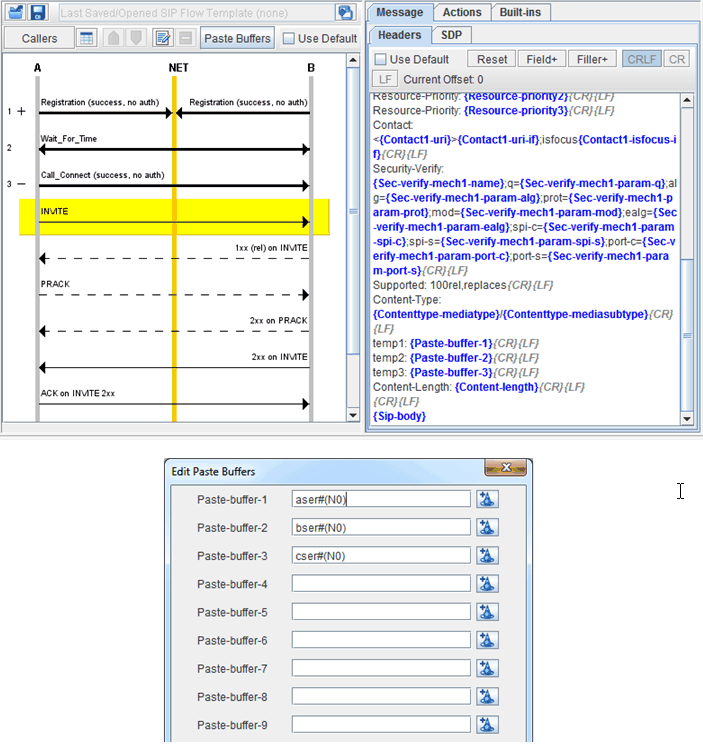
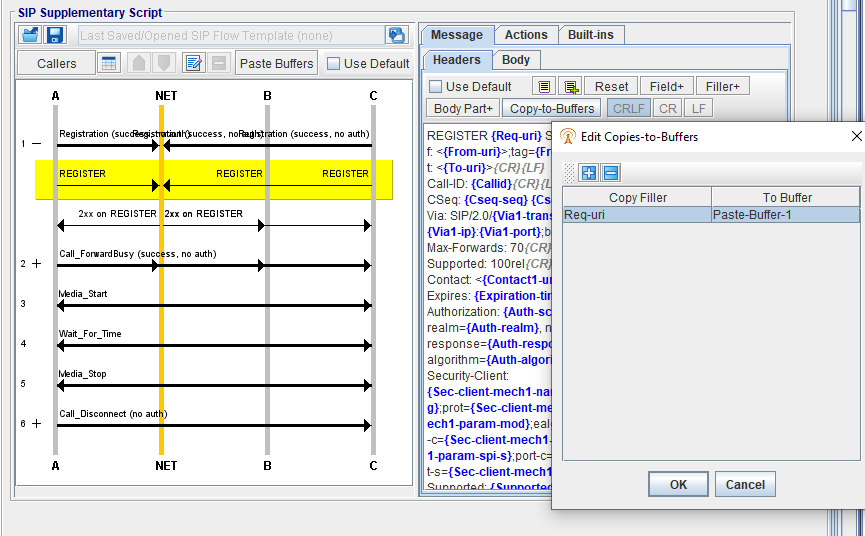
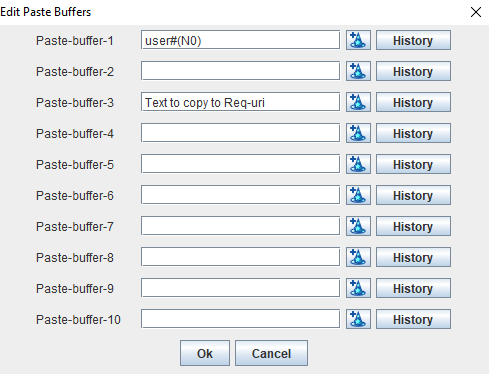
Use Paste Buffers to Edit SIP script buffers used in SIP Action message headers and SDP Body. Up to 10 paste-buffers. In the example listed below:
A new History dialog has been added to the Paste Buffer:
|
||
|
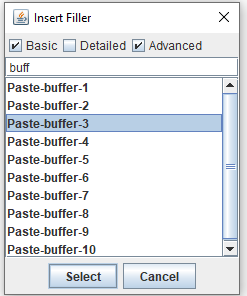
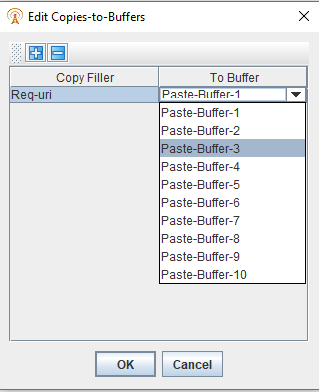
This feature applies to Gm Supplementary Scripts. You can copy Fillers to the Paste Buffers, similar functionality to DMF copy/paste buffers. The Copy-to-Buffers becomes available if your message is edit-able. Select any Filler to be copied to any buffer. That same filler must be defined/present in the message.
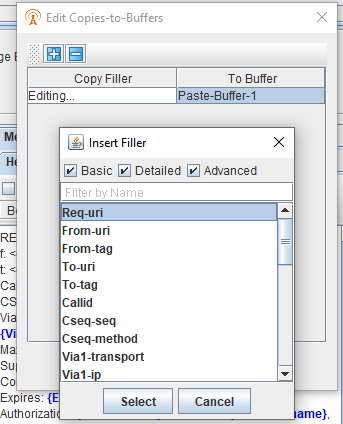
Double click on Copy Filler for Insert Filler pop-up:
Add text to Paste Buffers:
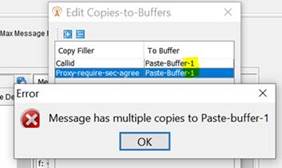
Validation rules for:
When you OK the Edit Copies-to-Buffers dialog only Rule #1 will be checked. When you OK the test case, all rules will be checked. Some examples of errors that fail the rules:
Note the difference in the labeling, if you don’t get the “Action”/”Message” detail in the error message, it is referring to the currently selected Message. A History Dialog has been added to the Paste Buffer:
|
||
| Use Default |
Selected by default. When selected, default content of SIP headers and SIP body are used in the test case. When not selected, the template will be used to replace the default message content. |
|
| User Fields |
Available if Use Default is not enabled. Selecting User Fields provides you with the ability to insert a user defined custom headers, without any filler, for SIP / SDP Messages. In the Tcl API, this attribute is UserFieldsEnabled. ##Get the default flow |
|
|
Actions |
See Complete list of Actions - Sip Actions |
|
|
Built-ins |
See Complete list of Built-in Scripts - Sip Built-in Scripts |
|
| Send Delay (ms) |
Select to support a delay at the message level for Supplementary Scripts. The SIP signaling messages will have an option to specify a send delay. Range : 0 to 65535 milliseconds Default : 0 which means no send delay The Send Delay option will be driven by the "delay" attribute in the SIP.xml files: <Message from="A" to="B" msg-type="SIP_RES_INVITE_1xx" msg-prototype-id="1" default-id="10" time-offset="0" delay="0" /> If the delay attribute is missing, or if the value is -1, the Message will NOT support Send Delay. Example: <Action prototype-id="1" class-id="1" odc-only="true"> Limitations:
|
SIP Call Group Pre viewer
A Call Group is defined as a group of subscribers and/or endpoints that take part in a SIP Script instance or call together.
When you configure SIP Scripts you assign Subscribers and Endpoints to Callers in your Script. When the test runs, the associated Subscribers and Endpoints take part in an execution of the instance of the SIP Script.
In this example, A and B are callers. When an instance of this script runs two specific Subscribers are taking part in a call, one as A and one as B:
The # of Subscribers in a test case = # of UEs * # of Subscribers Per UE. And the # of Endpoints == # of Subscribers if Endpoint is enabled (IMS Node).
The redesigned Configure Callers dialog provides for an easier test setup, UE-Subscriber assignment understanding, and added a new field “# of B Subs” for the B-Caller in the Caller Configuration:
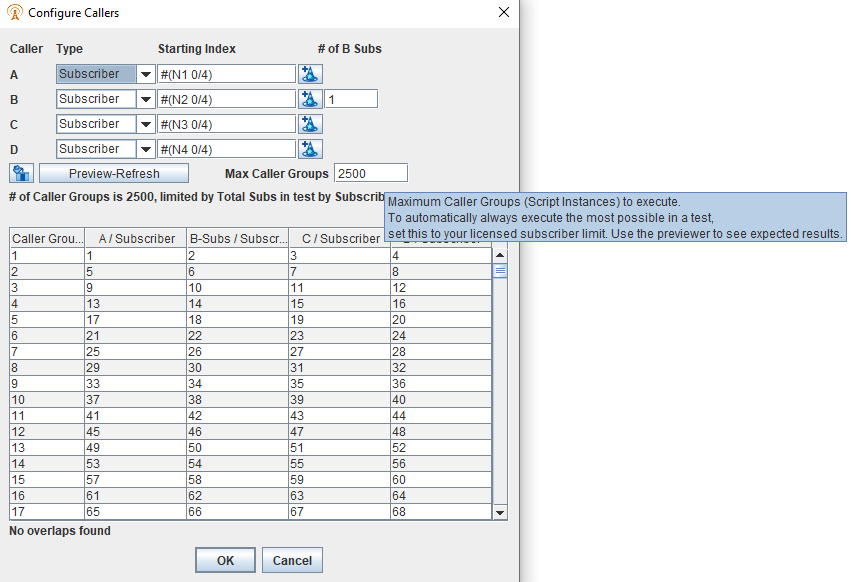
The separate indicators for “# of Callers” has been removed, as this really represents how many instances of your Script or Call (we call these Caller Groups) will be executed. This is a single value and determined by the limiting factor in your caller configuration. If you have 4 Callers in your script, A,B,C,D, and you have 100 Subscribers in your test, at best you can run 25 Caller Groups, 4 Subscribes in each Script. Within a test case, you can have some callers as Endpoints and some as Subscribers, so these are separate sets. If the previous example was 3 Subscriber Callers and 1 Endpoint Caller, at best there can be 33 Caller Groups, but you will only use 33 Endpoints out of a possible 100, because the 3 Callers must be shared across 100 Subs.
Open Conference Group : As of Release 19.0, we added the ability to add up to 100 users in a conference call (Number of Callers in SIP Supplementary Service Tests ).
Open Conference Group. : Open Group is based on SIP REFER message (A.2.1 @ 3GPP TS 24.605).
Open Group Scenarios rely on A/B/C/D/E Callers as UEs and Caller F as CONF. It has been changed in the following way:
- Caller A – UE
- Caller B – UE or a group of UEs: B1-BN (1 ≤ N ≤ 100)
- Caller C – CONF (if Conference Server is a part of test scenario)
If, in fact, N = 8 then it will be a Caller Group of 10: 9 UEs and 1 CONF (if needed).
It does not mean that existing CALLERs D/E/F cannot be used. But it seems a group of A/B/C is powerful enough to provide any script scenarios. From the other end, a script can be limited B-Caller group only: i.e. instead of having A, B, C, D, E, F in group we can use B1, B2, …, Bn.
Two actions, bellow, illustrate how it can be used:
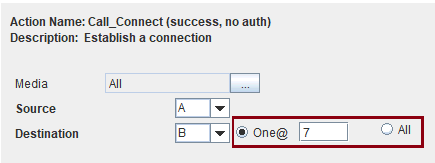 Action Call Connect: A calls B7
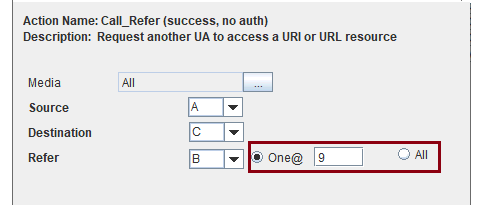 Action Call Refer: A refers B9 to C (CONF)
B-Callers as a group of up to 100 Subscriber or Endpoints. This concept is applied to ALL actions: Call Connect, Call Disconnect, Call Refer, Media Start, Media Stop, and so on…
 Configure Callers: B-Caller as a group of 9
and allow to specify a Sub Caller in B-Caller in any action: 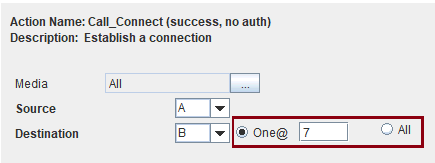
“Configuring Callers” specifies a list of X-Callers participating in a Supplementary Service script. B-Caller can be either a single Subscriber or Endpoint or a group of Subscribers or Endpoints, Sub-Callers. Number of Sub-Callers is a number within the range of 1-100.
An example of B-Caller-as-Group is shown here:
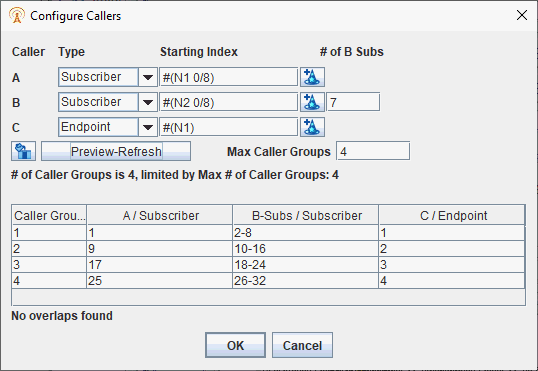
In addition in Release 18.8 with a special license, we added the ability to have the B-Caller be a list of UE-Subscribers or Endpoints, so that within a Call (Caller Group), you can have Caller B represent up to 100 Subscribers/Endpoints. This feature would only apply to certain special Actions, so while you might set the value to 100 in the Caller Configuration, most Actions would still have to pick just one Subscriber out of the list.
An Auto Fill Wizard  is available to help setup your scripts to use Subscribers in Round-robin or Sequential order. With a special license where B-Caller be a list of UE-Subscribers or Endpoints, so that within a Call (Caller Group), you can have Caller B represent up to 100 Subscribers/Endpoints. To be used with Special Actions/Scripts : SIP Built-in Scripts (MSRP Close Group Chat), SIP Built-in Actions (Group_CallConnect, Group_DataPathSetupMsrp, Group_DataPathTerminateMsrp, Group_CallDisconnect, Group_MediaStart, Group_MediaStop),
See example below: # of B Subs = 100
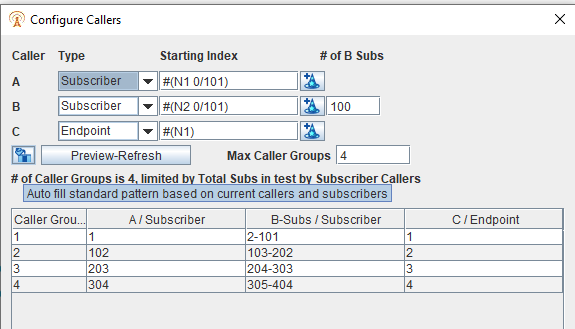

The Auto-filler will automatically find the maximum number of Caller Groups based on the number of Subscribers available in the test case.
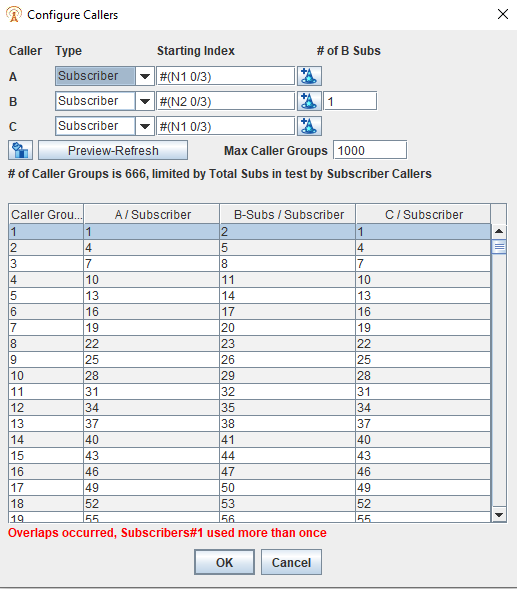
If you use the wrong auto-incremented configuration, you can end up with overlaps of a single Subscriber or Endpoint being used in the same instance or even other instances.
You will get an indication of what is the limiting factor for any configuration.
The Callers Previewer has been combined with the Callers Configuration to enable you to configure your SIP Script Call Groups and to see possible duplication:
You do however, need to click the "Preview-Refresh" button to refresh the preview after you change your configuration.
Figure Below shows Overlap Error:
Correct Overlap error by Using Auto-filler  option : ABCABCABC
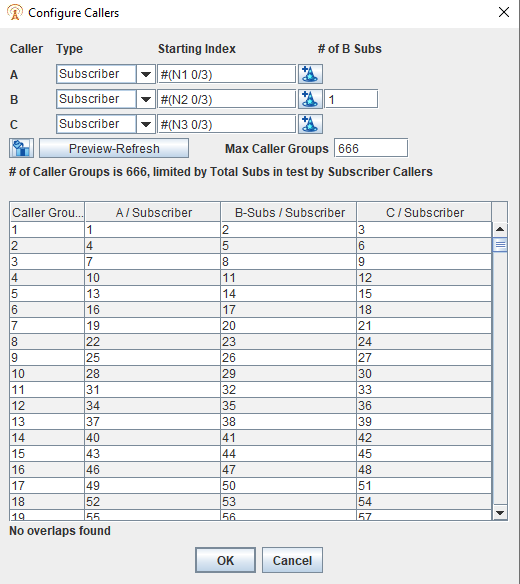
Or Correct Overlap error by Using Auto-filler  option : AAAABBBBBBCCCCC :
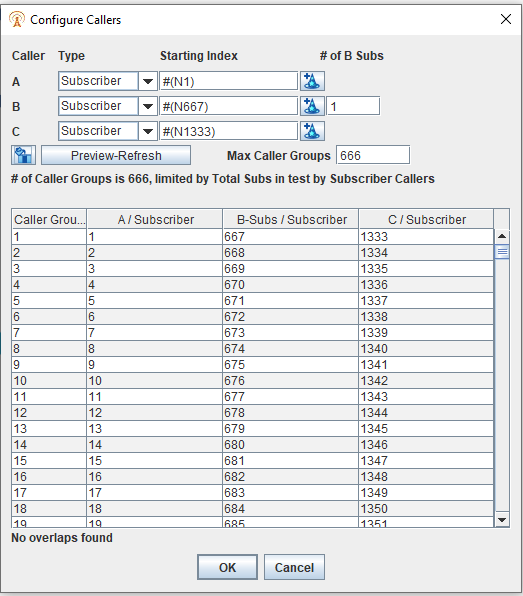
Switch C from Subscriber to Endpoint and use the Auto-Fill  Wizard to configure callers:
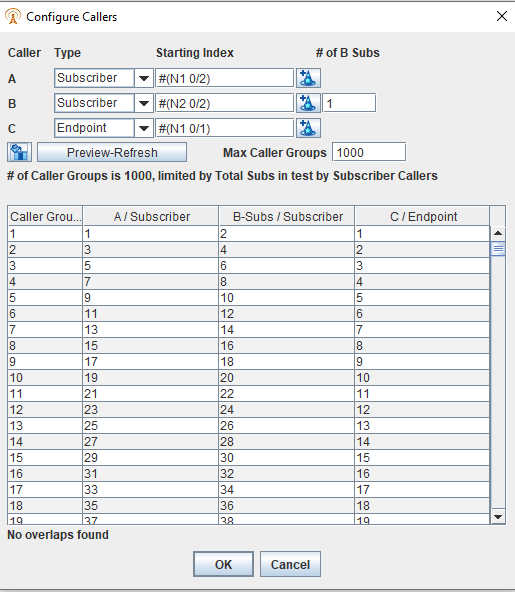
The # of Call Groups will be determined as follows:
NumCallGroups = Number of Subscribers;
For each Caller
If # of Callers < NumCallGroups
NumCallGroups = # of Callers
int callers = 0
for each Caller Index in auto-incremented Caller value
callers++
if Caller index > number of Subscribers
NumCallGroups = callers
break;
Examples:
1. # of Subscribers in test = 1000
-
Caller A #(N1) 500 Subscribers
-
Caller B #(N501) 500 Subscribers
-
Number of Call Groups = 500 Limited by # of Callers = 500 for Caller A/B
2. # of Subscribers in test = 1000
-
Caller A #(N1) 500 Subscribers
-
Caller B #(N501) 400 Subscribers
-
Number of Call Groups = 500 Limited by # of Callers = 400 for Caller B
3. # of Subscribers in test = 1000
-
Caller A #(N1) 500 Subscribers
-
Caller B #(N801) 500 Subscribers
-
Number of Call Groups = 200 Limited by Caller Index > 1000 in Caller B (801-1000)
4. # of Subscribers in test = 100
-
Caller A #(N1) 500 Subscribers
-
Caller B #(N801) 500 Subscribers
-
Number of Call Groups = 0 Limited by Caller Index > 100 in Caller B (801-1000, can’t be done)
5. # of Subscribers in test = 100
-
Caller A #(N1 0/2) 500 Subscribers
-
Caller B #(N2 0/2) 500 Subscribers
-
Number of Call Groups = 100 Limited by Number of Subs in test > 100
 Copy Text From Paste Buffer: