Configuring the Interface Ports and NTP
Use the Main tab... in the Test Server Configuration window to define the configuration of the test server's interfaces, and to monitor the test server's synchronization with its NTP server. See the field descriptions for guidelines and rules for the field values.
|
NOTE:
|
NTP Configuration
The synchronization status with the NTP server is displayed with color-coded text in the NTP Sync Status pane, and the results of the last ReSync command are displayed to the right of the status. You can click ReSync to attempt to synchronize the test server with its current NTP server. The following status indicators are used:
NTP Sync Status
| Status | Color | Description |
|---|---|---|
| N/A | White | If there is no trace reported |
| Not-In-Sync | Red | If first row of trace contains stratum15 or stratum16 or stratum 16 |
| In-Sync | White | If there are more than 2 rows |
| In-Sync (See trace) | Green | If there are 2 or fewer rows |
To change the NTP server:
-
Display a saved configuration... or modify the current configuration.
-
Select NTP or PTP option. PTP is available on Test Servers with Ubuntu > = 20.04. If a test server supports PTP, "timeSyncProtocol" will appear in the .tsConfig file with a value of "ntp" or "ptp".
-
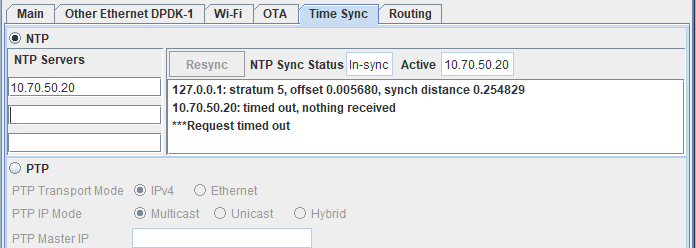
If NTP is selected, Enter the NTP address in NTP Servers. - Enter up to 3 IP address for NTP servers in the GUI boxes. Active displays the IP address of the active NTP server. In this example, 10.70.50.20 is the active NTP server.
The source of the trace is provided by the OS ntptrace command:
root@tas40:/home/cfguser# ntptrace
localhost: stratum 5, offset 0.005680, synch distance 0.254829
10.70.50.20: timed out, nothing received
***Request timed out
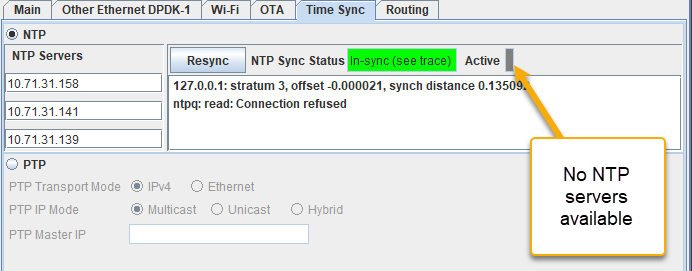
root@tas40:/home/cfguser# Please note that the request timed out message is coming from the NTP no query command added for security and is not an error indicator. Note : The active box shrunk when no active NTP servers are available:
-
If PTP (Precision Time Protocol - IEEE-1588 - it can achieve clock accuracy to the sub-microsecond range) is selected then select the following:
-
Select PTP Transport Mode - "Ipv4" or Ethernet. If Ipv4 is selected then configure PTP IP Mode. Configure PTP IP Mode - Select Multicast or Unicast or Hybrid. Configure PTP Master IP - available if Unicast is selected. Enter Valid IPv4 address with no mask.
-
When the test server status has cycled back to Ready, login to the Configuration window again and click ReSync to synchronize the test server with the new NTP server.
|
NOTES:
|
Interface Configuration
You can modify most of the IP addresses, masks, and address pools associated with the Ethernet and local interfaces.
To configure the Ethernet ports:
-
Display a saved configuration... or modify the current configuration.
-
Management Port — You can modify the IPv6 Gateway addresses, number of addresses, the address pool, and the speed and duplex settings.
-
Local Interface — You can modify the IPv4 and IPv6 address pools associated with the local interface.
-
Other Interfaces — You can modify the IP address, the Mask, the starting Pool IP address, the number of IP addresses in the address pool (# of IPs), whether the physical interface is Enabled on Boot, and the speed and duplex settings for all of the physical interfaces.
|
NOTES:
|
-
Apply your configuration changes...
CAUTION: The test system does not perform any validation of the IP addresses or masks assigned to the physical interfaces or address pools. Ensure that the addresses you assign do not intersect those used by other ports in your test system or by other devices in your network, and that the mask can accommodate an address pool if one is defined.