IPSec Tab


IPSec can be used to encrypt control plane traffic, Data Traffic, or both in a variety of test cases. With the IPSec settings, you can define the Internet Key Exchange (IKE) authentication mode and version used, and the encryption and identification information required to enable the negotiation of the IKE and IPSec Security Agreements (SA) required for IPSec tunnels. In some cases, multiple SAs per MN are supported and you can select the type of traffic that will be associated with each tunnel.

This topic describes the settings that control overall IPSec test support and behavior. The topics listed under Related Parameters describe the settings used during IKE v1 and v2, and the settings that determine how traffic is routed when multiple tunnels are used.

IKE Settings Pre-shared Keys

IKE With RSA Signature

Pre-provisioned Settings

(Security GW Node TC)


Related Measurements

IPSec measurements are reported on the IPSec report tab.


IKE Type

Use the drop-down list to select the IKE mode for the test. Parameters that are valid for the mode you select are enabled; parameters that are not applicable are disabled.

Options:

  • IKE With Pre-Shared Keys — Authentication using a static pre-shared key and either the MN's home address or an FQDN. The algorithms used in IKE Phase I and Phase II are configurable (see IKE Phase I Settings and IPSec Tunnel Definition), as are the SA lifetimes.

  • IKE with RSA Signature — Authentication using a digital certificate, verified by an RSA signature, and either the MN's home address, an FQDN, or the domain name from the certificate. The algorithms used in IKE Phase I and Phase II are configurable (see IKE Phase I Settings and IPSec Tunnel Definition), as are the SA lifetimes.

  • Pre-Provisioned — Simulates MNs that were configured with SAs when they were configured for their home link. In this case, IKE Phase I and IKE Phase II are not performed and the keying material normally exchanged during SA negotiation is known to both sides (see IPSec Algorithms and Keys and IPSec Tunnel Definition).

NOTE: The Pre-Provisioned option is not available on the MIP IPSec tab during CDMA Wifi Convergence testing.

This is because a Rekey is required for FA mode to learn the IP Addresses and rekeying is not available/valid in the pre-provisioned mode.

The Pre-Provisioned option is also not available on the IPSec tab in the following test cases: AAA Node/Nodal, DCCA Node/Nodal, OCS Node, OFCS Node.

Default: IKE With Pre-Shared Keys

Tcl Parameter: DataIkeType

IMPORTANT:

  • When MNs use IPSec in any mode except Pre-Provisioned, the maximum Activation Rate and Deactivation Rate are limited to 200 sessions/second or the licensed maximum, whichever is lower.

  • Before executing a test in IKE with RSA Signature mode, the test server must be provisioned with private key and X.509 certificate files generated by a Certificate Authority.

  • Learn more about using digital certificates

Update CDMA Wifi test cases (both nodal and node) to only allow IKEv2 for the .

Also changed the Combo Box enabling logic globally to prevent the case where the combo box text looks disabled but you can still change the choice.    Didn't seem to break anything, but we'll have to see how regression goes across the other test cases.

Fragment before ESP Header

Enable to fragment packets before adding the ESP Header.

Tcl Parameter: DataFragBeforeEspHeaderEn

Enable IKE SA Init Cookie Mechanism

Enable to support Anti CPU attack Cookie Mechanism per RFC 4306. For PSK and RSK, the checkbox is only enabled when IKE Version is V2. For Pre-provisioned, it is always enabled.

Only available in "Node type" Test Cases.

Tcl Parameter: DiaIkeCookieRequestEn

IKE Version

Use the drop-down list to select the IKE version used. When you select V2, you can include EAP Authorization and provision the initiator and responder information for each tunnel with the Advanced settings.

NOTES:

  • IKEv2 is not a valid selection for MIPv6 IPSec.

  • IKEv2 must always be selected in a PDG Micro-Mobility test since MOBIKE support is mandatory.

  • IKEv2 is the only option available during CDMA Wifi Convergence testing (Nodal and Node TCs) on the MN-FA IPSec tab (to support the mandatory MOBIKE).

Options: V1 or V2

Default: V1

Tcl Parameter: DataIkeVer

Number of Cryptographic Suites  

For the IPSec IKEv2 you may configure a maximum of 5 cryptographic suites, where each suite contains the Authentication type, Encryption Key Type, Use AEAD Type, Oakley Group type, and Hash type.

NOTE: The multiple cryptographic suite configuration is not applicable for IKE Pre-Provisioned or IKE Version 1.

Tcl Parameter: DataNumCryptoSuites

Options: 1 - 5

Default: 1

See for IPSec Algorithm and Keys topic for a description of these parameters:

Include Peer ID

Select the Include Peer ID checkbox to specify the contents of the ID-r payload that can be sent in the IKE_AUTH exchange for IKE version 2.

Use the Type drop-down list to select the ID type.

Option : Fully Qualified Domain Names is the only option available on most IPSec Tabs. Define the elements that form the FQDN in the following fields.

Option : KEY_ID  (ID Type as Key_ID(11) as per RFC 2407 Sec 4.6.2.12) is available on these IPSec tabs: 

AMF Nodal: NWu, SWu
      NWu - Inter-tech Wifi + N3IWF
      SWu - Inter-tech Wifi

MME Nodal: SWu
      SWu - Inter-tech Wifi

Wifi Nodal: Data-IPSec

When "Peer ID Type" is KEY_ID, "Peer Host Name" and "Peer Domain Name" are greyed out.

Tcl Parameter: DataIncludePeerIdPayload

Tcl Parameter: DataPeerIdPayloadType

Peer Host Name

Enter the Perr Host Name. 

When "Peer ID Type" is KEY_ID, "Peer Host Name" and "Peer Domain Name" are greyed out.

Range: N/A

Default: PeerAgent

Tcl Parameter: DataPeerHostName

Peer Domain Name

Enter the Perr Host Name. 

When "Peer ID Type" is KEY_ID, "Peer Host Name" and "Peer Domain Name" are greyed out.

Range: N/A

NOTE: Blank value for Peer Domain Name is allowed. To do that, you must add at least 1 blank space in the field.  


Default: spirent.net

Tcl Parameter: DataPeerDomainName

SA Response Timeout (s)


previously named 

Retry Interval

When IKE Phase I and II will be performed,  SA Response Timeout defines the maximum number of seconds the test will wait for a required response to an IKE message before re-transmitting the message. Enter 0 to disable retries.

NOTE:

  • This is not a fixed timer. For successive re transmissions of the same packet, transmission timer values is separated by increasingly longer time intervals (e.g., exponential backoff)
  • Interval = t x 2 ^(n-1) Where "t" is Value configured for "SA Response Timeout" and "n" is the number of times a retry has been made
  • Per RFC 2408, section 5.1

  • The reestablishment scenario requires the IPSec tunnel to reestablish after 1 sec. We use the reestablishment feature in case the responder sends a failure because of authentication data mismatch etc.

    SA Response Timeout (s) (previously named Retry interval) timer is needed in case of packet loss or delay in receiving response messages.


Range: 0— 65535

Default: 30

Tcl Parameter: DataRetryInterval

Related Measurements

SA Request Max Retries


previously named 

Max Retry Attempts

SA Request Max Retries (previously named Max Retry Attempts)

defines the maximum number of times the test attempts to send the IKE message to peer to determine if peer connection is not available. Once SA Request Max Retries is exhausted, the test will start a new Phase 1 negotiation.

The parameter is available for IKE V1 and V2 with IKE With Pre-Shared Keys and RSA Signature.

When there are high number of tunnels to be setup, the DUTs do not respond to IKE requests immediately. Repeated attempts allows all tunnels to be setup.

NOTE: The first attempt at establishing a tunnel is counted as 1. Hence, if SA Request Max Retries is set to 2, after the first time out and re-transmission the attempts would be counted as 2 and there would not be a 3rd attempt.  (The setting is not the number of retries after the first time out).


Range: 0 - 1000000

Default: 2

Tcl Parameter: MaxAttempts

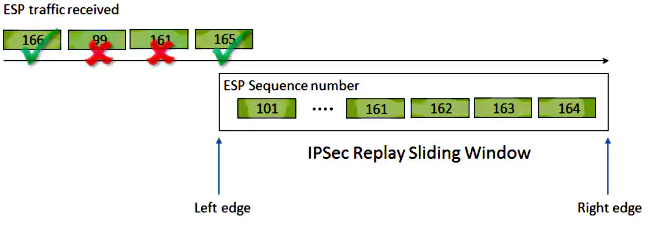
Anti-Replay Protection

Available on AMF Nodal, UPF Nodal, and Network Host, for IKE = IKE With Pre-Shared Keys or IKE With RSA Signature. 

Select to emulate IPSec Replay Attack. 

An Overview of Replay Attacks

A replay attack is a form of network attack in which valid data transmission is maliciously or fraudulently recorded and later repeated. It is an attempt to subvert security by someone who records legitimate communications and repeats them in order to impersonate a valid user and disrupt or cause a negative impact on legitimate connections.

IPsec Replay Check Protection

A sequence number that monotonically increases is assigned to each encrypted packet by IPsec to provide anti-replay protection against an attacker. The receiving IPsec endpoint keeps track of which packets it has already processed when it uses these numbers and a sliding window of acceptable sequence numbers.


When an IPsec tunnel endpoint has anti-replay protection enabled, the incoming IPsec traffic is processed as follows:

  • If the sequence number falls within the window and has not previously been received, the packet has its integrity checked. If the packet passes the integrity verification check, it is accepted and the router marks that this sequence number has been received. For example, a packet with Encapsulating Security Payload (ESP) sequence number 162.
  • If the sequence number falls within the window but has been previously received, the packet is dropped. This duplicated packet is discarded and the drop is recorded in the replay counter.
  • If the sequence number is greater than the highest sequence number in the window, the packet has its integrity checked. If the packet passes the integrity verification check, the sliding window is then moved to the right. For example, if a valid packet with a sequence number of 189 is received, then the new right edge of the window is set to 189, and the left edge is 125 (189 - 64 [window size]).
  • If the sequence number is lower than the left edge, the packet is dropped and recorded within the replay counter. This is considered an out-of-order packet.


Tcl Parameter: DataAntiReplayProtectionEn

IKEv2 Fragmentation

Select for support of IKEv2 message fragmentation. Per RFC 7383,

IKE fragmentation MUST NOT be used unless both peers have indicated their support for it.

Available on all IPSec tabs, in the "IKE Settings - Pre-Shared Key" and "IKE Settings - RSA Signature" panels when IKE Version = V2.

Tcl Parameter: DataIkeV2FragmentEn

Resource Congestion

N3GPP Backoff Timer (s)

Resource Congestion is used to indicate that the requested service was rejected because of congestion in the network. N3IWF will send this Notify Payload – CONGESTION(15500) via IKE_AUTH Response message. 

Resource Congestion is available at the bottom of the NWu IPSec tab for test cases AMF Nodal and Non 3GPP Access Node. 

Additionally, Non-3GPP Access GW Node's NWu IPSec tab includes a numerical input box labeled "N3GPP Backoff Timer (s)" which gets enabled when "Resource Congestion" is checked. This field indicates the value of the backoff timer. N3IWF will send this value in N3GPP_BACKOFF_TIMER(55507) Notify Payload in IKE_AUTH Response message. UE will try connection establishment after expiry of this timer. 

Enabling Resource Congestion requires NWu|TCP Version (24.502) >= 16.4.0.

Range : 0 - 65535

Tcl Parameter : NWuResourceCongestionEn

Tcl Parameter : NWuN3gppBackoffTimer

NAT Traversal

If one of the IPSec peers is an MN, you can use the checkbox to enable IPSec NAT Traversal, which allows an MN with a private address to exchange IPSec packets with a peer while traversing a NAT gateway. When NAT Traversal is used, IPSec packets are encapsulated with UDP and a keep-alive packet is sent every 4 minutes to refresh the NAT gateway's UDP bindings.

When you enable NAT Traversal, you can configure the number of seconds for the NAT Keep-alive Interval timer.

Tcl Parameter:

DataNatTraversalEn DataNattKeepaliveInterval DataNattSrcPort DataNattDestPort

Range: 065535

Default: 240

You can also define the NAT Source Port and NAT Destination Port.

Range: 065535

Default: 4500

NOTE: If the NAT gateway supports IPSec, the gateway will assume that it is the IPSec peer if port 500 is used.

Originating Source Port

Tcl Parameter: DataOriginatingSourcePort

Range: 0 — 65535

Default: 500

NOTE: The Originating Source Port may initiate SAs via  UDP port 4500 for IKE Phase I and then use UDP port 500 for subsequent SAs.

NAT Emulation

Available when NAT Traversal is enabled and (when AP Tunnel Type = None on the Wifi Offload Gateway Nodal Test Case or when N3IWF is enabled on the AMF Nodal Test Case or on the SWu IPSec tab when NAT Traversal is enabled for Inter Tech WiFi for AMF Nodal and MME Nodal).

Select NAT Emulation for NAT-T scenario for outer IPs.

Tcl Parameter:

DataNatNodeEn DataNatNodeIpAddr DataNatNodeStartingPort


Enter NAT Address and

NAT Starting Port

Range: 102565535

Default: 1025

Redirect (IKEv2)

The Redirect option is available in IP Application Node, Site to Site Nodal, MME Nodal and Node test cases when IKE Version is V2 for IKE With Pre-Shared Keys and IKE with RSA Signature.

NOTE: In MME Nodal and Node test cases, Redirect is available on S1-MME IPSec, Target S1-MME IPSec, S1-U IPSec, and Target S1-U IPSec. In addition, MME Nodal L3-7 | Data IPSec also supports Redirect.

Select Redirect to indicate the use of the redirect mechanism during the IKE_SA_INIT exchange. (RFC 5685 section 3).

Redirect is also available for selection in Security GW Node test case when IKE Version is V2 for IKE With Pre-Shared Keys and IKE with RSA Signature. The redirect mechanism in Security GE Node test case indicates redirecting the client to another VPN Gateway during an active session and also processing Redirects during Rekeys and Rekeys during Redirects (RFC 5685 section 5).

Selecting Redirect allows you to indicate whether Information Messages are redirected, enter the Redirect Security Gateway Address, the Tunnel ID used for start redirect messages and the time to hold before starting the redirect mechanism.

Information Messages

Select to indicate that the Security Gateway sends an Informational message with the REDIRECT Notify payload.  The REDIRECT payload carries information about the new Security Gateway.  

Tcl Parameter: DataIkeRiderectMsgType

Redirect Sec GW Address

Indicates the new Security Gateway Address included in the information message.

Tcl Parameter: DataIkeRiderectGwAddr

Starting Tunnel

Indicates the tunnel from which a redirect starts.

Option: 1 - Licensed Capacity

Default: 1 (Start first tunnel)

Tcl Parameter: DataIkeRiderectStartingTunnel

Hold Time (s)

Indicates the time to wait before the redirect mechanism starts.

Default: 0 indicates to redirect immediately.

Option: 0 - 2880 (> 0 indicates, to wait for X amount of seconds).

Tcl Parameter: DataIkeRiderectHoldTime

Private Vendor ID

The Private Vendor ID checkbox is available only with IKEv1 (for XAuth with PSK). Select the Private Vendor ID checkbox and click the Vendor IDs button to open the Private Vendor IDs dialog box.  

Select the number of IDs from the Number of IDs dropdown list, and the corresponding Vendor IDs become available.

Range: 2 - 128 characters (minimum of two in addition to 0x)

Default: 0x

Tcl Parameter: DataPrivateVendorIdEn

Private Attribute Configuration

The Private Attribute Configuration checkbox is only enabled only for IKEv2 and is currently only visible in the Network Host test case.

Select the Private Attribute Configuration checkbox to enable the private attribute feature, which allows you to add a maximum of ten IPv4 IPSec private attributes to the configuration payload in the IKE-AUTH message for up to 30 Mobile nodes.

This feature is used in conjunction with the following:

  • IPSec Private IP address:  Select the Identification Type as Private IP address, without which, this the Private Attribute features will not work correctly.

  • Test Data File: Include a Test Data File on the Data traffic pane of the Network Host test case (as it is an IP instance csv file). See See Apply TDFSee Apply TDF for details and sample private attribute file.

    See Test Data Files for further explanation and sample files. If a sample is not found for the specific TDF, you can obtain a sample file from your Technical Support representative. You may also use the following options to select an existing TDF or create/edit TDF-CSV files (TDF-CSV Editor). 

    For most TDF Parameters used for Applying Parameters, each row in the file is the overridden value for a different “Session”, aka a different UE. But some TDFs are done in other dimensions, like Bearers, eNodeBs, Subscribers (2 per UE sometimes) or even Hosts, etc. Tooltips on the TDF Parameter: 

    Note that the “ID” is a unique ID. Please Provide the ID when reporting issues with a TDF. For TDFs that do not apply / override Parameters, but instead are just their own configuration or data or media files you won’t see TDF ID row details.

    TIP: When including large files, please be aware of memory limitations, since the TDF Editor shares memory with the Client.

    NOTE: The available TDF options vary. on the L3-7 | IPSec tab > IKE with RSA Settings you may only select the Certificate TDF from TAS (these are non-CSV TDFs).

    In addition, where applicable, any rules for defining TDFs are included in specific Test Cases. (For example, In MME Node test case, see MME Node - Provisioning TDF.)

    From the DMF Window, press Shift+Alt+A to display the  Save DMF as Tcl window. Click the Save to File button to save as Tcl file. See additional details on Using the Tcl API.


    Select/Create a new TDF-CSV

    Allows you to create a new TDF by entering a file name that doesn’t already exist or select an existing file by entering a file name that already exists.

    Click to open the Select Existing or Create window.

    • Navigate to the relevant library/folder,

    • Enter the name of the file:

    • If the file name already exists, the file is selected and applied in the test case.

    • If the file name does not exist, a message displays that says you are creating a new TDF and the embedded TDF-CSV will be launched.

      • Click Yes to launch the TDF-CSV Editor and create/save the new TDF-CSV.

      • Click No to select a different file

    NOTE: If you do not have permission to save in the selected library, an error displays when you try to create a new file.
    TIP: You may also navigate to the relevant library/folder and select file, and click OK.


    Upload a New TDF to TAS

    Click to import a new TDF file from your local folder and select in the test Case (instead of having to go to TDF Admin).

    • Navigate to the file on your local folder and select.
    • Then navigate to the location (library) where you want to save it on the TAS. You may rename the file, if required.  

    View Edit Selected TDF in TDF-CSV Editor

    Available only when you have selected a TDF on TAS. Click to open the selected file in TDF-CSV Editor (in place, that is, within the Test Case).

    Edit the file and save. You may also click Save As to save the edited TDF-CSV to a different library and also rename the file, if required.

    NOTE: You may also select a TDF from a library to which you do not have write permissions, edit the file as required, and save (Save As) only to a different library with the same file name or a different name.

    The only options available are Save As and Cancel.

    Open Selected TDF in Standalone TDF-CSV Editor

    Available only when you have selected a TDF on TAS. Select to retrieve the CSV file and open it in the stand alone TDF-CSV Editor.

    Generate Stub TDF-CSV

    TIP: Available only when a CSV specification has been defined for in the Test Case for the TDF widget ( View TDF Actions/Options Menu)


    Opens an example context specific test data parametersexample context specific test data parameters, which you may save as a .CSV file or open in the TDF-CSV Editor.


    Launch Standalone TDF-CSV Editor

    Click to open a blank TDF-CSV Editor.

    The Launch Standalone TDF-CSV editor options handles very large TDFs that may use too much Client memory if opened within the Test Case/in the embedded editor.  You may set the standalone TDF-CSV Editor memory high to edit large TDFs.


  • The example csv file includes the maximum allowed ten IPv4 IPSec private attributes to the configuration payload in the IKE-AUTH message.

    • See Apply TDFSee Apply TDF topic

      See Test Data Files for further explanation and sample files. If a sample is not found for the specific TDF, you can obtain a sample file from your Technical Support representative. You may also use the following options to select an existing TDF or create/edit TDF-CSV files (TDF-CSV Editor). 

      For most TDF Parameters used for Applying Parameters, each row in the file is the overridden value for a different “Session”, aka a different UE. But some TDFs are done in other dimensions, like Bearers, eNodeBs, Subscribers (2 per UE sometimes) or even Hosts, etc. Tooltips on the TDF Parameter: 

      Note that the “ID” is a unique ID. Please Provide the ID when reporting issues with a TDF. For TDFs that do not apply / override Parameters, but instead are just their own configuration or data or media files you won’t see TDF ID row details.

      TIP: When including large files, please be aware of memory limitations, since the TDF Editor shares memory with the Client.

      NOTE: The available TDF options vary. on the L3-7 | IPSec tab > IKE with RSA Settings you may only select the Certificate TDF from TAS (these are non-CSV TDFs).

      In addition, where applicable, any rules for defining TDFs are included in specific Test Cases. (For example, In MME Node test case, see MME Node - Provisioning TDF.)

      From the DMF Window, press Shift+Alt+A to display the  Save DMF as Tcl window. Click the Save to File button to save as Tcl file. See additional details on Using the Tcl API.


      Select/Create a new TDF-CSV

      Allows you to create a new TDF by entering a file name that doesn’t already exist or select an existing file by entering a file name that already exists.

      Click to open the Select Existing or Create window.

      • Navigate to the relevant library/folder,

      • Enter the name of the file:

      • If the file name already exists, the file is selected and applied in the test case.

      • If the file name does not exist, a message displays that says you are creating a new TDF and the embedded TDF-CSV will be launched.

        • Click Yes to launch the TDF-CSV Editor and create/save the new TDF-CSV.

        • Click No to select a different file

      NOTE: If you do not have permission to save in the selected library, an error displays when you try to create a new file.
      TIP: You may also navigate to the relevant library/folder and select file, and click OK.


      Upload a New TDF to TAS

      Click to import a new TDF file from your local folder and select in the test Case (instead of having to go to TDF Admin).

      • Navigate to the file on your local folder and select.
      • Then navigate to the location (library) where you want to save it on the TAS. You may rename the file, if required.  

      View Edit Selected TDF in TDF-CSV Editor

      Available only when you have selected a TDF on TAS. Click to open the selected file in TDF-CSV Editor (in place, that is, within the Test Case).

      Edit the file and save. You may also click Save As to save the edited TDF-CSV to a different library and also rename the file, if required.

      NOTE: You may also select a TDF from a library to which you do not have write permissions, edit the file as required, and save (Save As) only to a different library with the same file name or a different name.

      The only options available are Save As and Cancel.

      Open Selected TDF in Standalone TDF-CSV Editor

      Available only when you have selected a TDF on TAS. Select to retrieve the CSV file and open it in the stand alone TDF-CSV Editor.

      Generate Stub TDF-CSV

      TIP: Available only when a CSV specification has been defined for in the Test Case for the TDF widget ( View TDF Actions/Options Menu)


      Opens an example context specific test data parametersexample context specific test data parameters, which you may save as a .CSV file or open in the TDF-CSV Editor.


      Launch Standalone TDF-CSV Editor

      Click to open a blank TDF-CSV Editor.

      The Launch Standalone TDF-CSV editor options handles very large TDFs that may use too much Client memory if opened within the Test Case/in the embedded editor.  You may set the standalone TDF-CSV Editor memory high to edit large TDFs.


    • Example: privateattribute.csv

NOTE: The test case does not limit the user to 30 Mobile nodes but 30 is all that is supported and configuring more may cause unpredictable behavior.

Multiple Authentication Settings

Multiple Authentication settings panel can only be used with IKEv2 for Data/Host IPsec, MnFa IPsec (PDIF applications), and in MME Nodal/Node test cases.

NOTE: In MME Nodal and Node test cases, Multiple Authentication Settings is available on S1-MME IPSec, Target S1-MME IPSec, S1-U IPSec, and Target S1-U IPSec. In addition, MME Nodal L3-7 | Data IPSec also supports Multiple Authentication Settings.

Multiple Authentication

Select the Multiple Authentication checkbox to enable the options in the Multiple Authentication Settings panel.

Tcl Parameter: DataMultAuthEn

Alternate ID Type

Select the check box to specify an Alternate ID Type as either an IP Address or an FQDN.

Use the drop-down list to select the type of peer credentials that are used for authentication.

Tcl Parameter: DataIpSecIdTypeM

Tcl Parameter: DataMultIdTypeEn

Distinguished Name: The DN is the name that uniquely identifies an entry in the directory. When you select the Distinguished Name option from the drop down list, a default Distinguished Name displays your default Host/User Name and Domain Name information.

Tcl Parameter: DataDistinguishedNameM

IP Address — The local peer's IP address is used for the peer credential.

Tcl Parameter: DataMultIdIpAddr

Fully Qualified Domain Names — Define the elements that form the FQDN in the fields provided. The default values produce unique names in the format MNn.HomeAgent.net, where n begins at 1 and increments for each peer.

TIP: The first character of Domain Name can be "@" — producing the user name format MNn@HomeAgent.net.


Host Name

Range: N/A

Default: MN#

Tcl Parameter: DataMobileNodeHostNameM

Domain Name

Range: N/A

Default: HomeAgent.net

Tcl Parameter: DataHaDomainNameM


Authentication Type

Select the Authentication Type options from the dropdown list: Pre-Shared Keys, EAP, and RSA Signature. Depending on the options you select, additional settings display.

If you select the Authentication Type as RSA (second authentication) and IKE type is also IKE with RSA Signature (first authentication), then the second authentication will use the same values for certificate settings provisioned for the first RSA authentication. That is, the values provisioned in Private key Filename, First Certificate Entry, File Format, X509 Certificate Filename for the first RSA authentication will be used for the second RSA authentication.

Tcl Parameter: DataAuthTypeM

Pre-Shared Key

The key, known to both peers, that is used during IKE Phase I authentication when IKE With Pre-Shared Keys is selected.

Range: N/A

Default: 0

Tcl Parameter: DataPreSharedKeyM

IKE with RSA Signature Options

Selecting RSA Signature displays a set of certificate setting options:

NOTES: The RSA Signature Options are not available when type is IKE with RSA Signature, IKE Version V2, and you select EAP Authorization.

  • When EAP is not selected, primary authentication certificate settings are used for Multiple Authentication.

  • when EAP is selected, in the Multiple Authentication pane, you select Authentication Type as RSA Signature, the Digital Certificate Files options are available for selection.
  • When EAP Authorization is selected, you can select EAP with RSA to re-enable the File Format, Private Key file and X509 Certificate File settings.


EAP with RSA

Enable the RSA Certificate file inputs when EAP Authorization is selected by enabling the EAP with RSA check-box. Used to re-enable the File format, Private key file and X509 Certificate file settings.

Tcl Parameter: WfoApEapWithRsaEn

EAP Only Authentication

Support for EAP Authentication to a AAA Server via IKEv2 per RFC 5998. Available when IKE Version = V2 and RSA or PSK.

Available for SWu IPSec in LTE to WiFi Inter Technology Scenarios on MME Nodal and Wifi Offload Gateway Nodal cases.

Tcl Parameter: DataEapOnlyAuthEn

EAP Authorization

When IKEv2 is used, the local peer can also support EAP authentication. Use the checkbox to enable EAP and click the EAP Settings.. button to open the settings window.

Tcl Parameter: DataEapEn


^ Back to Top