About Folders
You can add one-level of sub-library called Folder to the set of standard/custom libraries provided with the test system. You may define up to 100 Folders per user-account and organize test elements by test type, vendor, project, or any other grouping that suits your purpose, as in standard/custom libraries.
To open the Folder Administration window:
-
Select Admin > Folders from the Main menu. The administration window opens and displays the top-level libraries defined on your system.
Users with Test Administrator permissions or higher can add, modify, or delete folder to all users. The rest of the users can manage their own account folder. These folders will be displayed in the left (library) pane when opening, saving, importing, or exporting test elements. For example, in the Session Chooser window, the folder belonging to a user account displays as follows:
user
user/folder
If a user abc has 3 Folders, folder1, folder2 and folder3, the display is as follows.
abc
abc/folder1
abc/folder2
abc/folder3
Note : Nested folders (such as: abc/folder1/subfolder1 ) are not supported. If you want to make a hierarchy you can use a separator character in naming. For example :
myUsername/Folder1-SubFolder1
myUsername/Folder1-SubFolder2
myUsername/Folder1-SubFolder3
myUsername/Stateless
myUsername/Stateless-SocketBased
myUsername/Stateless-PacketBased
The Folder Administration Window
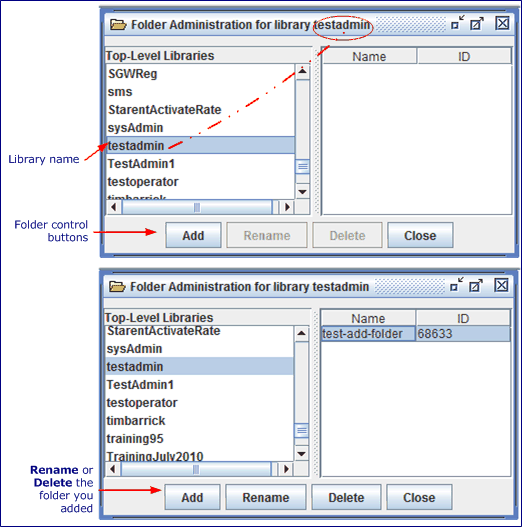
The Folder Administration window displays all the top level libraries that have been defined on the test system. You may add, rename, or delete folder within the custom library for which you have permission.
definitions, name and write permission, of the custom libraries that have been defined on the test system. A custom library can be added or modified by a user with Test Administrator permissions or higher, and a library can be written to by only those users or by all users.

-
Defined libraries are listed in the left-pane in alphabetical order by library name, Top-Level Libraries. The right-pane displays the Name and ID of the folders you added to a specific library.
-
Use the folder control buttons to Add, Rename, Delete, or Close.
| To open the Folder Administration window: |
|
|
| To Add a Folder: |
The folder inherits the properties of the parent library. i.e. the parent USER library or parent CUSTOM Library. |
|
| To Rename a Folder: |
|
|
| To Delete a Folder: |
|