Exporting Test Suites
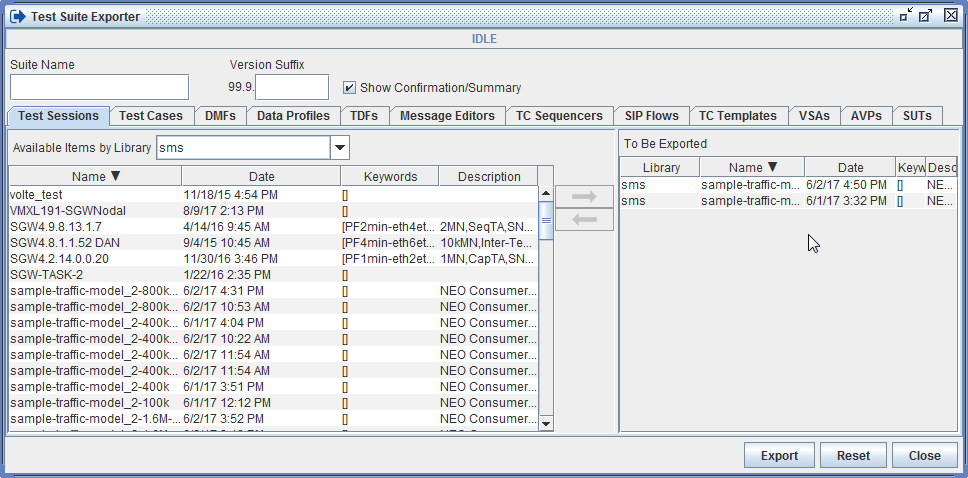
Administrators can use the Test Suite Exporter window to export elements from the test libraries into a compiled Test Suite that can then be imported on another test system. You can choose any combination of elements from any of the libraries on your test system except for the Basic and Extended sections, and the exporter compiles them all into one Test Suite file.
IMPORTANT: The definitions for system-related parameters — test servers and IP addresses — are cleared in all test cases contained in a Test Suite, and must be re-defined on the destination test system. |

To export a Test Suite:
Select Admin > Test Suite Exporter from the Main menu.
Enter the information used to form the final file name: the Suite Name and the Version Suffix. The Suite Name can be any name that represents the contents of the Test Suite. The Version Suffix should be the final two digits of your TAS software version to define the full version for compatibility purposes. Select Help > About from the Main menu to see the TAS version.
The system forms the file name and includes the major portion of the TAS version in this format: <Suite Name>.<TAS Version>.<Version Suffix>.ste.
Assuming that your TAS version is 1.3.0.7, that the Suite Name is "Mobility Rate with Capacity," and that "0.7" is the Version Suffix, the file name would be:
Mobility Rate with Capacity.1.3.0.7.ste
- Select the library elements to include in the Test
Suite.
NOTES:
Two elements with the same name cannot be included in the export even if they are from different library sections.
When the Test Suite is imported into the target system, the elements in the suite will overwrite elements with the same name in the target system if they are imported into the same library section.
As of Release 17.8, the TC-Template Type Column was added to the Exporter to make it easier to find / choose the template to export
Select a section tab and a library from the drop-down list, and the library elements are displayed. Only exportable library sections are available in the list.
Select an element and click the right arrow
 to add the
element to the export list. Associated elements (Test Cases, DMFs,
TDFs, AVPs, SUTs, etc) are automatically included in the export list
when a parent element is chosen, unless the associated element is
in the Basic section of a library. Elements from the Basic section
must already exist on the destination test system.
For example, export a Test Case, and any Test Data Files, customized DMFs, custom VSAs, custom AVPs, Data Profiles, TC Sequencers, SIP Flows, SUTs, TC Templates and Message Editors used by the Test Case are included in the suite. Export a customized DMF, and any embedded subflows or Test Data Files are included in the suite.TIPS:
Elements can be removed from the export list by selecting the element and then clicking the left arrow
 . If you
remove any subordinate element from the list, except for
a Test Data File, its parent element is also removed.
. If you
remove any subordinate element from the list, except for
a Test Data File, its parent element is also removed.If a Test Data File would overwrite a file on the target test system that you want to preserve, you can remove the file from your exported suite and manually import it to a different library section on the target system (see Managing Test Data Files). After the Test Suite has been imported, it will be linked to the data file that originally resided on the target system unless you edit the test cast and select the imported data file.
- When you are ready to export the suite, click Export and the Save Test Suite window opens. If a Test Session or Test Case contains elements that have since been deleted from the library, you will receive an error message that explains the problem.
- Browse to the location where you want to save the file and click Save. You will receive a confirmation message that the Test Suite has been exported.
Related Topics