Cross Reference
Use Cross-Reference to display/view Test Case Parameters shared by test cases in a test session. The XREF - Test Session window displays relevant test case tabs (e.g., interface tab, network devices tab, test activity tab, configuration tab, and so on) in a table format. You may select the following view options to display the information in the XREF - Test Session window and perform various actions using the right-click menu options.
Shift+F9 to Save Image / Screen to a file and F9 to Copy Image / Screen to the clipboard.
| NOTE: The Cross-Reference generically shows the Complex Class TC Parameters (TestNodes/AVPs/WLAN/OTA/UE), it will show ALL attributes and does not know the 'Context' in which they exist. Similar to API or TeX. |
|
|
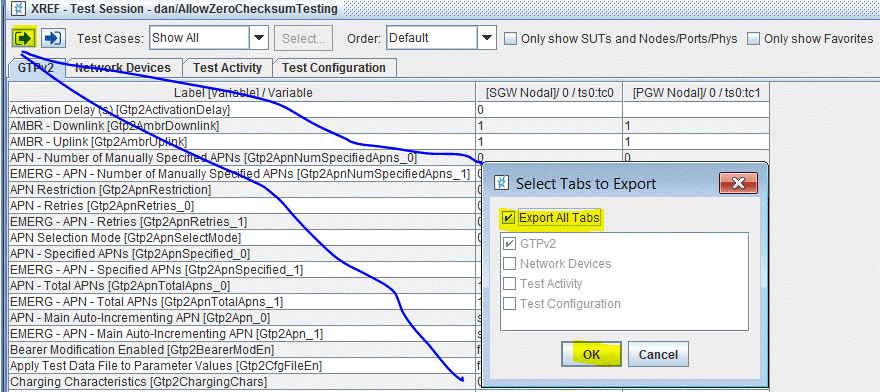
Use to export the currently displayed tab or selected tabs to a .csv or HTML format for your review. Click to display the Select Tabs to Export window and select the tabs you wish to export. |
|
|
|
Import XML - Caution- Only Import XML that was created by exporting tabs for current test session. Click to See example of export/import. |
|
|
|
Select to filter display to only show the Favorites. Click to display Select Favorites window and select the variables from various tabs to add to your favorite list. Your Favorites selections are stored in the test session, and if any Favorites are already defined, the default/initial XREF view will be filtered to display Only Favorites. |
|
|
Test Cases |
You select to view/display
|
|
|
Select... |
Not available when all Test Cases are displayed. The displays options depending on your selection on the Test Cases list:
|
|
|
Order |
Indicates the sort order of the parameters in the Test Case tabs.
|
|
|
Select to filter you view to display just the SUTs and Test Node IP Addresses or the variables from your Favorite tab.
|
You may also right-click on any single row/label variable or selected multiple rows to display options that allow you to perform tasks that applies across all test cases in the test session.
|
Duplicate tab based on Test Case 1 |
Select to display the Apply tab values across test cases window. Select test cases instances to which the tab is applied. |
||||
|
Apply selected values from Test Case |
Select to display the Apply tab values across test cases window. Select test cases instances to which the selected value is applied. |
||||
|
Apply a function to update parameters based on other parameters |
Select to display Apply Parameter Functions across test cases window. Select Function (1/X, X/Y. or the built-in Sessions/StartRate), Parameter X or, and Parameter Y as required. Parameter X is available when you select Function 1/X and both Parameter X and parameter Y are available when you select Function X/Y. With the 1/X and X/Y you can pick any numerical Source Parameter (see Apply Parameter Functions across test cases window).
Click
For example, if you want the session loading to be constant, you may execute a function that applies (Sessions/StartRate)/2 to the Pending Time and Hold Time. Apply Parameter Functions across test cases , the Function is Sessions/StartRate, 2 is constant, and has Pending and Hold Time as Target parameters. The exampleexample
|
||||
|
Adjust all selected numeric parameter value (s) at same rate |
Select to display Adjust values across test cases window. Select Fixed Amount or Percentage and enter the value for adjustment. Fixed: Enter a fixed value to adjust. (Example, 10 to increase or -10 to decrease). Percentage: Enter a % value to adjust. (Example, 100% = no adjustment; 50% = half of current value; 200% = double the current value; negative % not supported).
|
||||
|
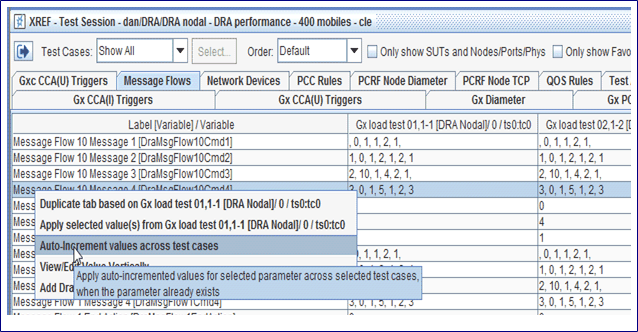
Auto-increment values across test cases |
Select to apply auto-increment values to the selected parameter across selected test cases (applies to existing parameters only).
|
||||
|
View/Edit Value Vertically |
Displays the selected row/parameter value across all test cases.
|
||||
|
Add parameter to Favorites |
Select to add the parameter to your Favorites list.
|
Auto-increment
| TIP: Displays the Parameter Auto-Increment Wizard (similar to TDF-CSV Column Filler Wizard) only within the context of Cross-Reference table. |
Select the Filler type used to assign a incrementing value. You may select many variations and options for the incrementing values:
|
Filler Type Options |
Description |
|
Constant Fill |
Enter a value to be applied for your selection (applicable only for Auto-increment only within the context of Cross-Reference table. ) |
|
Enter Min and Max values |
|
|
Enter Starting Value, # Of Repeats, Increment, Loop @ Value, Loop To Value |
|
|
Enter Starting Value, Subnet/CIDR, Loop At Subnet Boundary (Stay in Subnet), # of Repeats, Increment |
|
|
See section Multi-Filled String |
|
|
Add support for WPS PIN - In the Filler Options, may choose to Seed or not. Will generate 8 digit numerical pin(s). |
|
Sub Type |
Applicable only for Auto-increment only within the context of Cross-Reference table.
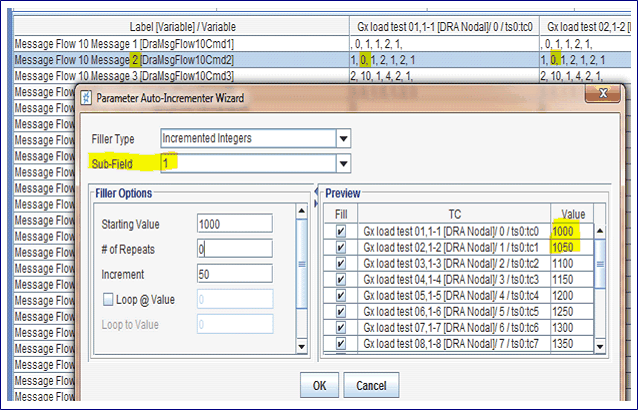
The values displayed, depends on the cross-reference tab | Label /parameter you selected to apply auto-increment value and indicates parameters you may edit. For example, on the test node, the Sub-type displays as illustrated in Cross Reference Table | Auto-Increment and the auto-increment for an array fields are as illustrated in the Example below. |
|
|
Preview |
Applicable only for Auto-increment only within the context of Cross-Reference table. Lists all the test cases in the Test Session | Cross Reference table. You may select the test cases to which the value you enter is applied. Enter the appropriate value and click the tab key to display in the Value Column of the Preview pane. |
Example
|
An Array Example (DRA Message Flow)
|
|
|
In this example, the Message Delay is set for the Second Message in each test case to an increasing value for each test case, first test case will be 1000ms, and each subsequent TC will be increased by 50ms. The delay is the second item in the array, that is, Sub-Field 1.
|
|
|
Click OK to apply and display new values as illustrated.
|
Export/Import Example
XML Import (to go with XML Export added in previous version)
Export all tabs of your test session to XML Format:
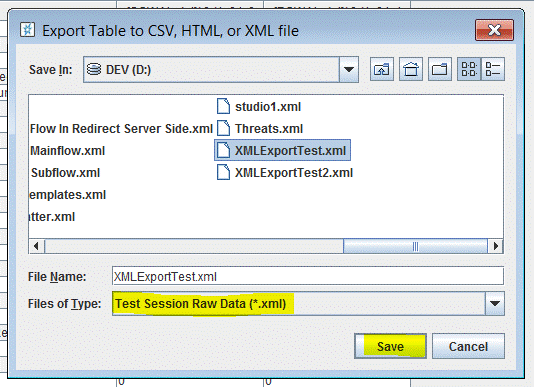
Then you can edit the XML directly to change values:
…
<tn n="EnbUserAddr" t="eth" a="eth7" r="1" l="1" i="10.207.6.1" h="" mac="" />
<nv n="EnbUserAddrErrInj" v="0" />
<nv n="Gtp2ActivationDelay" v="100" />
<nv n="Gtp2AmbrDownlink" v="1" />
<nv n="Gtp2AmbrUplink" v="1" />
<nv n="Gtp2ApnNumSpecifiedApns_0" v="0" />
<nv n="Gtp2ApnNumSpecifiedApns_1" v="0" />
<nv n="Gtp2ApnRestriction" v="0" />
<nv n="Gtp2ApnRetries_0" v="0" />
<nv n="Gtp2ApnRetries_1" v="0" />
<nv n="Gtp2ApnSelectMode" v="0" />
<arr n="Gtp2ApnSpecified_0" />
<arr n="Gtp2ApnSpecified_1" />
<nv n="Gtp2ApnTotalApns_0" v="1" />
<nv n="Gtp2ApnTotalApns_1" v="1" />
<nv n="Gtp2Apn_0" v="ssenoauth146" />
<nv n="Gtp2Apn_1" v="ssenoauth146" />
<nv n="Gtp2BearerModEn" v="false" />
<nv n="Gtp2CfgFileEn" v="false" />
<nv n="Gtp2ChargingChars" v="0x0" />
<nv n="Gtp2CustomMsgEn" v="false" />
<nv n="Gtp2DelayDlPacketNotifReq" v="1" />
<nv n="Gtp2Ecgi" v="0" />
<nv n="Gtp2EcgiSize" v="28" />
<nv n="Gtp2EchoTimeSec" v="55" />
<nv n="Gtp2ExtEn" v="false" />
<nv n="Gtp2FwdUplinkDataEcmIdle" v="false" />
<nv n="Gtp2GtpcTunnelEndptId" v="1000000" />
…
Then import the XML to update/replace your test session:
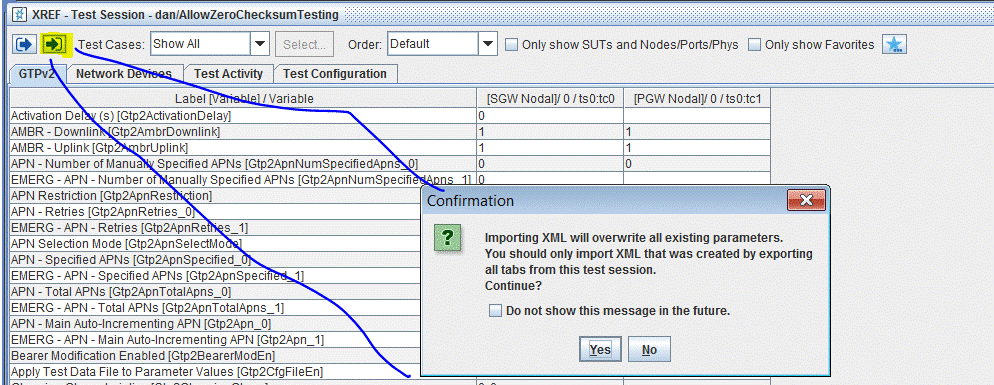
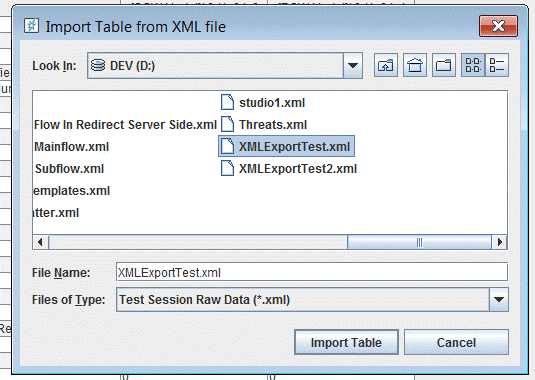
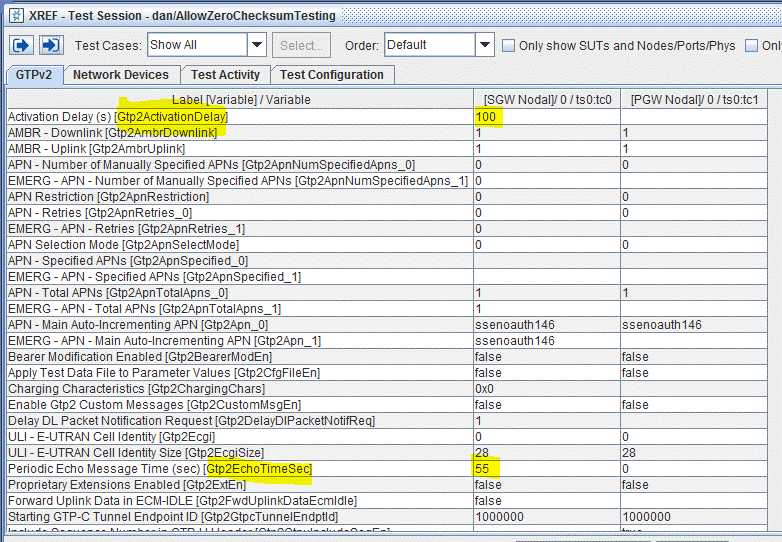
With the XML file you can edit every single parameter in the test. Each parameter is identifiable by its Tcl variable name. You can add new parameters and remove existing ones. But when you do an import the existing test session is cleared out and completely replaces with the content of the XML. Values are not fully accepted until you click the “Save and Validate” button, so if you mess up the import, just click Cancel on the XREF.
CommandSequence parameter is now using a multi-line editor.


The editor is word-wrapped, and any new line characters you accidentally add will be removed when you click OK, as the CommandSequence is a single line (I think all parameters values are single-line).
Word-wrapping:

As with everything else in XREF, your values are not validated until you close the XREF, this editor is free form text, for advanced users only.
Right-Click Apply value across test cases now has “If Exists” test case selector:


When you click “If Exists” only the test cases that have at least one of the selected parameters defined already will be selected for “Apply”.
If you wanted to apply the values to just some of the test cases that already have the parameters defined, you can click this button to quickly filter down to only the ones that matter. Ultimately this “Apply selected value(s)…” function will only apply the value if the parameter already exists.
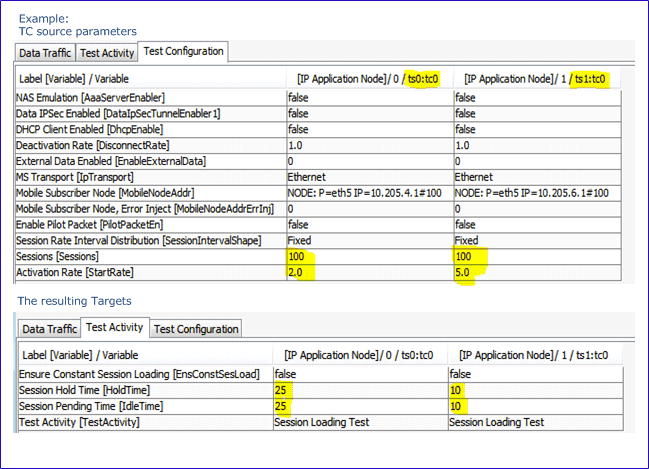 shows the test case source parameters and the resulting target parameters.