Managing Test Server UE
The UE Tab provides a mechanism to store TS specific Test Case configuration information for the UEs available on the UE Node Test Case. On the Test Server Administration window, select the UE Tab to define the UE information associated with the Test Server.
Select :
- Allow any User to access TeamViewer - You must be System Admin or above to see this option and TAS Setting "teamviewer_for_all"cannot be = ON. Use this checkbox to control permission for TeamViewer Access on a per Test Server (E10) basis. When checked, any user (any user level) will be given access to the TeamViewer button for that given Test Server. This feature requires a DB change to the TAS, so you must backup TAS before upgrading if you want to downgrade back to previous version.

- SCAN - Scan the UE Handset device and add it to the UE Table.
- Upgrade - Select for Remote Upgrade of the Landslide App.
- Setup - Select the Setup button to execute the handset_setup_py script for multiple UEs.
- TeamViewer - TeamViewer - Enable connectivity between a TeamViewer Client on the Android UE and a TAS which can be used to find the status of a UE.
If the UE Handset is not in the UE table: SCAN
Add it by:
- Plug in UE Handset on one of the 4 USB ports available on the E10 Edge box.
- Recycle Test Server.
- Select SCAN on UE Tab. The UE device should populate with an unauthorized status - See pic.

-
On UE Handset - Accept USB debugging by Selecting "Always allow from this computer":

- Select SCAN on UE Tab. UE Handset should go to Online State -
 UE Handset is now ready to be used in UE Node Test case.
 - If UE handset is Offline, plug in UE Handset on one of the 4 USB ports available on the E10 Edge box. Select SCAN to get UE reconnected and once Online then proceed to test via UE Node. -

| NOTE: Once the device has been Authorized, step number 4 will not be re-required. |
Remote Upgrade of the Landslide App:
Select Upgrade :

The following window becomes available for App version upgrade:

If Default is checked, then the default APK of the corresponding Test Server load is installed on the handset:

If Specific is checked, you have the ability to upload/upgrade using an Application APK jar/zip file. You can load the APK with an APK version different from the Test Server load.
You can upgrade to a later version and downgrade to old versions:

Select the list of UEs to include for the upgrade:

After the Upgrade is complete, this dialog is displayed:

If Auto-refresh button is clicked, then the Test Server will be polled every 5 seconds to get the APK version information:

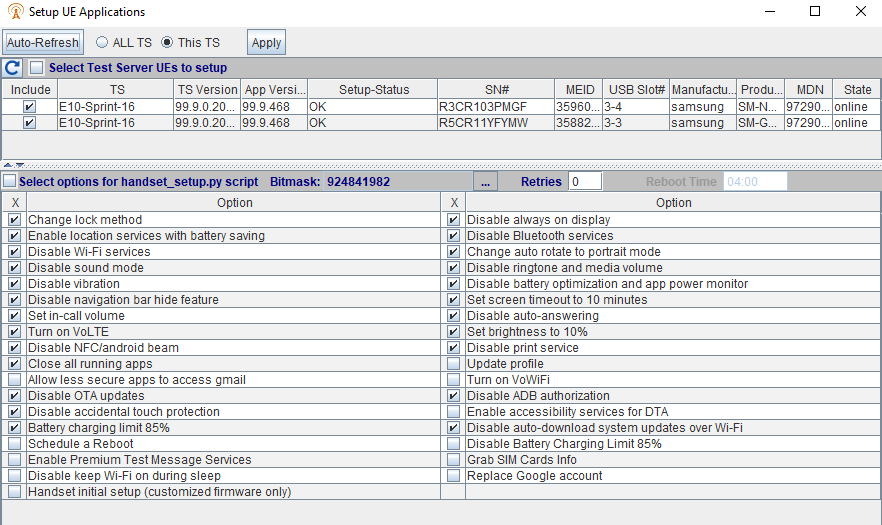
Setup
Select the Setup button to execute the handset_setup_py script for multiple UEs.
-
Select one or more UEs across "ALL TS" (All Test servers) or "This TS" (This Test Server).
-
Enter the number of Retries. Range : 0 to 5
-
Select steps to execute, and click Apply.
-
The TAS will send one command to each Test Server to initiate setup for all its selected UEs.
-
The Test Server will respond that it has initiated the setup, which can take several minutes.
-
If any Test Server returns an error you will get an error prompt:
 . View the details of UE Setup Status by editing the cell in the table. When you view the Setup Status, it shows the bits / messages by Level ( Click here for list of Errors and Informational messages) :
-
If it succeeds you will get the success prompt:

-
Or a "WARNING: NNNNN” where N is a bitmask value. If you edit the cell, you can get more details:

-
Once successful, you can choose to "Auto-Refresh", or refresh manually (after several minutes ) or just close he Setup Window.
-
While the UE is being setup, the TAS will report a Setup Status of "In-Progress".
TeamViewer
TeamViewer - Enable connectivity between a TeamViewer Client on the Android UE and a TAS which can be used to find the status of a UE.
|
NOTE: Prior to using TeamViewer on the UE tab :
|
-
Go to the Managing Test Server UE and click on the TeamViewer button :

-
Enter the TAS to Test Server SSH Port that will be used to run the activate-ue-teamviewer script that resides on the Test Server. It's available from CLI directly as cfguser for Automation purposes. The script will connect to the phone and launch TeamSupport app on the UE and print the TeamViewer ID for the TAS to read. You will be prompted to Select SSH Connection Options prior to logging in to the test server. In order to access Teamviewer, the Client should have network connectivity to the Test Server for accessing SSH services. Alternatively, the Client can SSH to the TAS first, then SSH to the Test Server. Select Direct to TS @ to select the option to directly access the TS from your client and pick the IP address that the client can reach the TS or Tunnel via TAS @ to select the option to tunnel through the TAS to reach the TS and then choose the IP address that you connected to the TAS with, and if needed any special TAS SSH Port. The standard way is directly to the TS at the Management Address and defined SSH port. However, if the TS has other IP Addresses known, such as VPN IP, or forced SSH Address, these will be choices in the first combo box. The other option is to tunnel through the TAS. The client will first SSH to the TAS, and then use the standard SSH configuration that the TAS uses, to SSH to the TS. The TAS may also have two IP Addresses. In some configurations there is a separate Public IP Address. A dialog will appear as the Client queries the TAS for the TeamViewer ID. The TAS will SSH to the TS and call the activate-ue-teamviewer script:
 The progress bar will provide some indication of what phase the script is in. i.e whether it is Connecting to Test Server, Test Server Login, getting the TeamViewer ID, or waiting for the TeamViewer Connection (as shown above). The script will run for an additional 60 seconds waiting for the Approval Prompt when TeamViewer Connects.
 -
UE launches the TeamSupport all (Executed by the script in step 2)
-
Test Server get UE's TeamViewer ID and returns it to the TAS (Executed by the script in step 2)
-
-
UE Sends TeamViewer ID to Test Server
-
Test Server Sends TeamViewer ID to the TAS
-
-
TAS gets TeamViewer ID and displays it in Dialog. If the TeamViewer Client is configured in the GUI already, the "Launch" button is enabled at the same time :

-
- If a TeamViewer ID is set , the TAS can allow this remote control feature.
- If the TeamViewer Client is not configured, the user can select it with the "..." configure button.
-
Click "Launch" button, the TAS calls the TeamViewer Client with the -ID <TEAMVIEWER_ID> command line arguments and start remote control.
-
As long as the TeamViewer Client was started within about 50s, the activate-ue-teamviewer script will still be running and automatically accept the connection on the UE. If there are issues, the user can click the refresh button on the TAS GUI TeamViewer ID and this will call the activate-ue-teamviewer script again.
- Allow Remote Control Panel, Control Remote Computer :
 Successful Connection :
- The TAS will indicate errors via a popup if there any issues with the activate-ue-teamviewer script: i.e. "Device does not exist" error :

On the UE tab you can define:
|
Serial Number (SN #) |
The Serial Number of the UE Handset. |
|
MEID # |
The Mobile Equipment Identifier (MEID) of the UE Handset. |
|
State |
The State of the UE Handset. Online - UE Handset is ready for use Offline - UE handset is in the UE table but not connected Scan - Perform Scan to view the state of the UE Handset Unauthorized - The UE Handset must be authorized for USB debugging (See step #4 above) |
|
USB Slot# |
The USB port the UE Handset is connected to 1 through 4. |
|
Manufacturer |
Manufacturer of UE Handset. |
|
Product Device |
The Product/Device information of the UE Handset. |
|
App Version |
The App Version displays which version of the MSA VisionWorks is currently loaded. See Upgrade procedure above to perform upgrade. |
| Setup |
View the details of UE Setup Status by editing the cell in the table. OK - When all selected steps executed correctly. While the UE is being setup, the TAS will report a Setup Status of "In-Progress". If any Test Server returns an error, you will get an error prompt: |
|
Test RID |
Test RUN ID. If it is being used by an active running test, it will be non-zero. The ID of the active test. |
|
WD Version |
Displays which version of the WatchDog App is currently loaded. The Watchdog app is an app that works with tDTA and can recover devices from unauthorized/offline states. The app is listening for:
|
|
MDN |
Mobile Directory Number (MDN) of the UE Handset. |
|
Battery |
Battery level in percentage (50%). |
|
Temperature (F) |
Handset battery temperature in Fahrenheit.
|
| SAM | System Available Memory in MB. |
| DF | Disk Free in GB. |
Use RESTful and TCL API to execute ts_status message which includes : appVersion, batteryLevel, device, diskFree, mdn, meid, state, systemAvailMemory, temperature, watchdogAppVersion, etc
- Supported by RESTFul API - Using the RESTFul API contains reference information about the Landslide RESTFul API system. Refer to Swagger UI on Landslide Home Page, it contains the latest most accurate information for anything it covers.
-
Tcl API - Landslide Tcl API Object and Perform Function Reference
Hand Script Errors and Warning messages:
| Number | Step | Enabled by default |
Report as Error, Warning, Information |
| 1 |
Change lock method |
yes | Error |
| 2 |
Disable always on display |
yes | Error |
| 3 |
Enable location services with battery saving |
yes | Warning |
| 4 |
Enable Bluetooth services |
yes | Warning |
| 5 |
Disable Wi-Fi services |
yes | Error |
| 6 |
Change auto rotate to portrait mode |
yes | Error |
| 7 |
Disable sound mode |
yes | Warning |
| 8 |
Disable ringtone and media volume |
yes | Warning |
| 9 |
Disable vibration |
yes | Warning |
| 10 |
Disable battery optimization and app power monitor |
yes | Error |
| 12 |
Disable navigation bar hide feature |
yes | Error |
| 13 |
Set screen timeout to 10 minutes |
yes | Error |
| 14 |
Set in-call volume |
yes | Warning |
| 15 |
Disable auto-answering |
yes | Error |
| 16 |
Turn on volte (android < 10 only) |
yes | Warning |
| 17 |
Set brightness to 10% |
yes | Warning |
| 18 |
Disable NFC/android beam |
yes | Warning |
| 19 |
Disable Print Service |
yes | Warning |
| 20 |
Close all running apps |
yes | N\A |
| 21 |
Update profile (Not done in whole step, select manual step 21) |
no | N\A |
| 22 |
Allow less secure apps to access gmail (Not done in whole step, select manual step 22) |
no | N\A |
| 23 |
Turn on VoWiFi (Not done in whole step, select manual step 23 |
no | N\A |
| 24 |
Disable OTA updates |
yes | Warning |
| 25 |
Disable ADB Authorization timeout |
yes | Warning |
| 26 |
Disable Accidental touch protection |
yes | Error |
| 27 |
Enable accessibility services for DTA |
no | N\A |
| 28 |
Battery charging limit 85% |
yes | Warning |
| 29 |
Disable auto-download system updates over Wi-Fi |
yes | Warning |
| 31 |
Schedule a reboot |
no | Warning |
| 32 |
Disable Battery Charging Limit 85% |
no | Warning |
| 33 |
Enable Premium Text Message Services |
no | Warning |
| 34 |
Grab SIM Cards Info |
no | Warning |
| 62 |
Disable Keep Wi-Fi on during sleep |
no | N\A |
| 63 |
Replace Google Account schedule |
no | N\A |
| 64 |
Handset Initial Setup (customized firmware only, not included in the whole step) |
no | N\A |
Related Topics: